This lesson covers RIP & EIGRP function and configuration. Routing Information Protocol (RIP) and Enhanced Interior Gateway Routing Protocol (EIGRP) are both distance vector interior gateway protocols. The previous lesson, Types of dynamic routing protocols, introduced dynamic routing protocols types, algorithms, and metrics. Dynamic routing involves configuring a dynamic routing protocol on a router, whereas static routing involves manually configuring each route for each destination on a router. Unlike in dynamic routing, static routes are not automatically updated and must be manually reconfigured any time the network topology changes.
This lesson covers RIP & EIGRP function and configuration and it is followed by three lessons on OSPF (Open Shortest Path First). OSPF is the only dynamic routing protocol explicitly named in the CCNA exam topics list, in subsection 3.4. This lesson gives an overview of both RIP and EIGRP. We explore some basic configurations for both, the minimum you need to get an understanding of how they work. A lot of the things we learn in this lesson can be applied to OSPF. This post constitutes Issue 20 of my CCNA 200-301 study notes.
- RIP introduction
- RIPv1 and RIPv2
- RIP configuration
- network command
- passive-interface command
- Advertise default route via RIP
- default-information originate command
- show ip protocols (RIP)
- EIGRP introduction
- EIGRP configuration
- Wildcard masks
- show ip protocols (EIGRP)
- EIGRP Router ID
- show ip route (EIGRP)
- Command review
- Key learnings
- Practice quiz questions
- Key references
You may also be interested in CCNA 200-301 study notes.
RIP introduction
*RIP (Routing Information Protocol) is an industry standard protocol, not Cisco proprietary.
*RIP is a distance vector IGP (interior gateway protocol), so it uses routing-by-rumour logic to learn and share routes.
*RIP uses hop count as its metric. Each router in the path to the destination counts as one hop, and the bandwidth is irrelevant. A 10 gigabit connection counts as one hop, and a 10 megabit connection also counts as one hop.
*The maximum hop count is 15. Anything more than that is considered unreachable, and RIP will not add the route to the routing table.
RIP’s scalability and time to converge are poor compared to EIGRP, OSPF, and IS-IS. RIP is almost never used in real networks. But RIP is easy to configure because it does not require any parameters, unlike other protocols. So RIP can possibly be used in small networks and in lab environments.
*RIP has three versions: RIPv1 and RIPv2, used for IPv4, and RIPng, RIP Next Generation, used for IPv6. This lesson will focus only on RIPv2.
*RIP uses two message types to learn and share routing information: 1) the request message, which asks RIP-enabled neighbor routers to send their routing table, and 2) the response message, which is used to send the local router’s routing table to neighboring routers.
*By default, RIP-enabled routers will share their routing table every 30 seconds. This can cause problems in networks with lots of routers, as the regular updates can clog up the network.
RIPv1 and RIPv2
*RIPv1 is a very old protocol. If you’re going to use RIP, don’t use version 1. Use RIPv2 or RIPng.
*RIPv1 does not support CIDR (Classless Inter-Domain Routing) and VLSM (variable-length subnet mask). RIPv1 only advertises classful addresses (Class A, Class B, and Class C). In modern networks the concept of classful addressing is no longer used.
*When RIPv1 advertises a network to a neighbor, it does not include the subnet mask information in the advertisements (response messages). If the advertised network is in the Class A range, it is assumed to be /8. If it is in the Class B range, it is assumed to be /16. If it is in the Class C range, it is assumed to be /24.
Here are some examples of subnets, and how RIPv1 would force them to become classful networks:
10.1.1.0/24 will become 10.0.0.0, a Class A network.
172.16.192.0/18 will become 172.16.0.0, a Class B network.
192.168.1.4/30 will become 192.168.1.0, a Class C network.
IPv4 address classes are no longer used in modern networks and have been replaced with CIDR and VLSM. We need the ability to use subnets, not just the classful networks.
*RIPv1 messages are broadcast to the IP address 255.255.255.255. So all routers on the local segment will receive the messages.
*RIPv2 improves upon RIPv1 in several ways.
*RIPv2 supports VLSM and CIDR. RIPv2 includes subnet mask information in its route advertisements. A /30 network will be advertised as /30, for example.
*RIPv2 messages are not broadcast, they are multicast to address 224.0.0.9. This address is in the Class D range, which is reserved for multicast addresses. Broadcast messages are delivered to all devices on the local network. Multicast messages are only received by devices that have joined a specific multicast group.
RIP configuration
Although RIP configuration is not on the CCNA, it is a simple configuration to learn. RIP configuration acts as a good introduction to dynamic routing configuration. Additionally, some of the mechanics of RIP configuration are similar to OSPF configuration, so learning RIP will make it easier to learn OSPF.
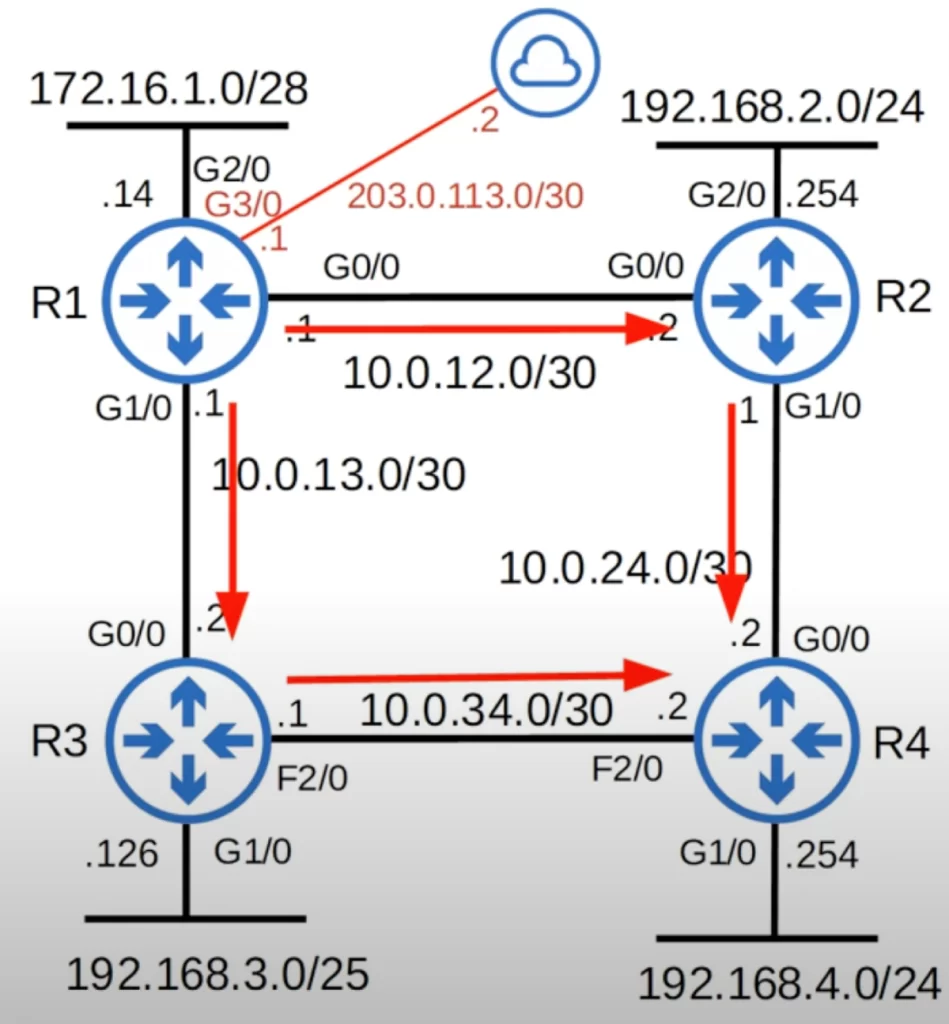
Let’s configure R1 in the following network topology.
From global configuration mode, enter RIP configuration mode with the command router rip. Next, configure the router to use RIP version 2 with the command version 2. Then, use the command no auto-summary. Auto-summary is on by default, and it automatically converts the networks the router advertises to classful networks. For example, using classful logic, the 172.16.1.0/28 network attached to R1 is a Class B network, so it would be converted to 172.16.0.0/16.

Next, use the NETWORK command. First we entered NETWORK 10.0.0.0, and then we entered NETWORK 172.16.0.0. Note that the NETWORK command is classful. You should use classful IP addresses in this command. If you don’t, the addresses will be automatically converted to classful anyway.
For example, if you enter the command NETWORK 10.0.12.0, it will be converted to 10.0.0.0. Because 10.0.12.0 falls in the Class A range, a /8 prefix length is assumed. So all bits after the first 8 bits will be converted to 0. Because of this behavior, there is no need to enter a network mask.
Let’s see how the NETWORK command works.
network command
*The NETWORK command tells the router to,
- look for interfaces on the router with an IP address that matches the prefix specified in the NETWORK command.
- activate RIP on the matching interfaces.
- form adjacencies with other RIP-enabled neighbors.
- advertise the network prefix of the RIP-activated interfaces to the adjacent routers (RIP neighbors).
Note, this is also how the EIGRP and OSPF NETWORK commands operate, although there are a few differences.
In our example, the network 10.0.0.0 command tells R1 to look for interfaces with IP addresses that match 10.0.0.0/8 and advertise the network prefix of the interfaces.
Let’s walk through the steps of applying the network command.
*We entered the network 10.0.0.0 command on R1.
R1(config-router)#network 10.0.0.0
Step 1: Because the network command is classful, 10.0.0.0 is assumed to be 10.0.0.0/8.
Step 2: R1 will look for any interfaces on it (R1) with an IP address that matches 10.0.0.0/8.
Step 3: R1 finds that 10.0.12.1 and 10.0.13.1 both match. So R1 activates RIP on G0/0 and G1/0.
Step 4: R1 advertises 10.0.12.0/30 and 10.0.13.0/30 to its RIP neighbors R2 and R3.
R1 forms adjacencies with its neighbors R2 and R3. So R1 will send and receive route information to and from R2 and R3.
R1 advertises 10.0.12.0/30 and 10.0.13.0/30, the network prefixes of its G0/0 and G1/0 interfaces, to its RIP neighbors R2 and R3. Even though we used the NETWORK 10.0.0.0 command, R1 does not advertise the 10.0.0.0/8 network.
The NETWORK command does not tell the router which networks to advertise. It tells the router which interfaces to activate RIP on, and then the router will advertise the network prefix of those interfaces.
*We also configured the network 172.16.0.0 command on R1.
R1(config-router)#network 172.16.0.0
Step 1: Because the network command is classful, 172.16.0.0 is assumed to be 172.16.0.0/16.
Step 2: R1 will look for any interfaces with an IP address that matches 17.16.0.0/16.
Step 3: R1 finds that 172.16.1.14 matches. So R1 activates RIP on G2/0.
There are no RIP neighbors connected to G2/0, so no new adjacencies are formed.
Step 4: R1 advertises 172.16.1.0/28 to its RIP neighbors R2 and R3.
Although there are no RIP neighbors connected to G2/0, R1 will continuously send RIP advertisements out of G2/0. This is unnecessary traffic, so G2/0 should be configured as a passive interface.
Let’s see how to do that.
passive-interface command
From RIP configuration mode, use the command PASSIVE-INTERFACE G2/0. This configures G2/0 as a passive interface.
R1(config-router)#passive-interface g2/0
Note that the command is done from RIP configuration mode, not directly on the interface itself. That’s why we need to specify the interface in the command.
The passive-interface command tells the router to stop sending advertisements out of the specified interface (g2/0). Use this command on interfaces that do not have any RIP neighbors. Note, EIGRP and OSPF both use the same command for the same purpose.
Advertise default route via RIP
An Internet connection to R1 via its G3/0 interface was added to demonstrate one more function of RIP, i.e., to advertise a default route to a router’s RIP neighbors.
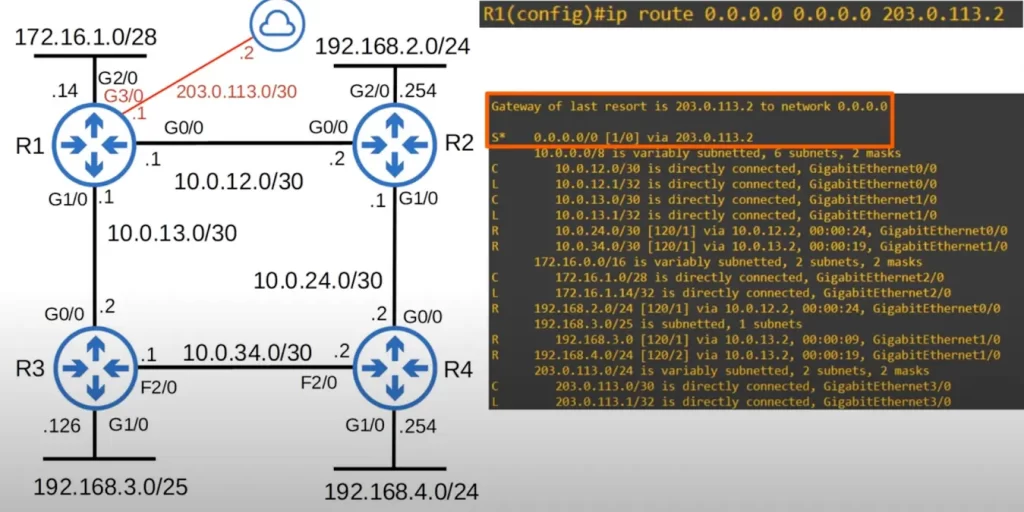
The ip route command was used to configure a static route on R1.
R1(config)#ip route 0.0.0.0 0.0.0.0 203.0.113.2
We configured a default route pointing to the Internet via the next hop 203.0.113.2. So any packets that do not match any of the other entries in R1’s routing table will be sent to the Internet. You can see the configuration in the routing table in the above diagram. Gateway of last resort is 203.0.113.2 to network 0.0.0.0.
default-information originate command
We want to use RIP to tell R2, R3, and R4 about the default route so that they can reach the Internet as well. The command to share this default route into RIP is DEFAULT-INFORMATION ORIGINATE, entered from RIP configuration mode.
R1(config-router)#default-information originate
After entering this command, R1 will advertise the default route to R2 and R3, and they will then advertise the route to R4.
Let’s check the routing table of R4.
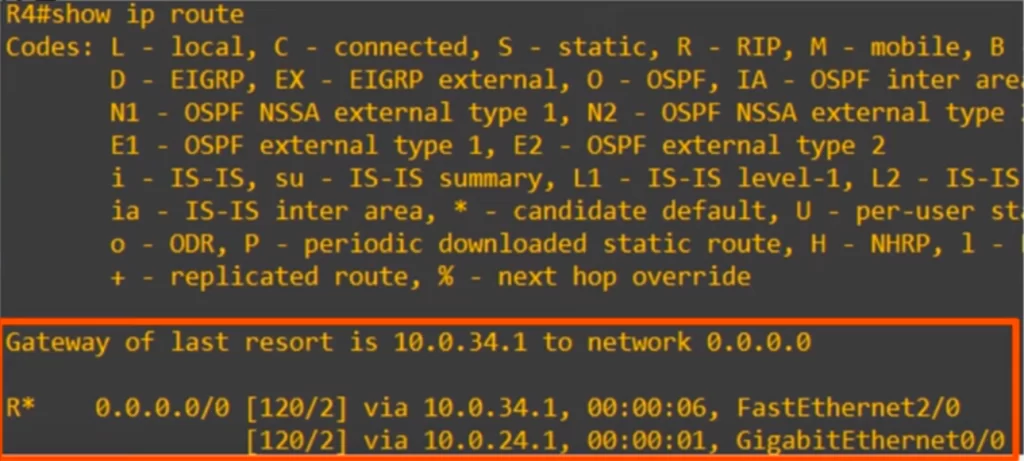
Note, Gateway of last resort is 10.0.34.1 to network 0.0.0.0. However below that you can see two routes, one via F2/0 to R3 and one via G0/0 to R2. Only one is stated up top as being the gateway of last resort, but because both of these routes have the same hop-count, R4 will load-balance traffic over the two routes.
RIP treats all connections equally, as one hop, so even though the connection via R3 is a slower FastEthernet connection, RIP considers it equal to the faster Gigabit Ethernet connection via R2.
Like RIP, OSPF also uses the DEFAULT-INFORMATION ORIGINATE command to share a default route with neighbors.
show ip protocols (RIP)
SHOW IP PROTOCOLS is a very useful command that can be used for RIP, EIGRP, and OSPF to check various stats.
Let’s run through a few key fields.
>”IP routing is NSF aware” indicates that the router is aware of and supports Nonstop Forwarding (NSF) functionality.
Here’s a breakdown:
- IP routing: This refers to the overall process of directing network traffic across interconnected devices based on their IP addresses.
- NSF aware: This means the router is equipped with NSF technology. NSF allows routers to maintain uninterrupted packet forwarding even during control plane failures or planned maintenance, minimizing network downtime and disruption.
So essentially, “IP routing is NSF aware” is stating that the router’s IP routing functionality is enhanced with NSF capabilities. It can still seamlessly forward packets even if it encounters issues with its routing protocols or internal systems.
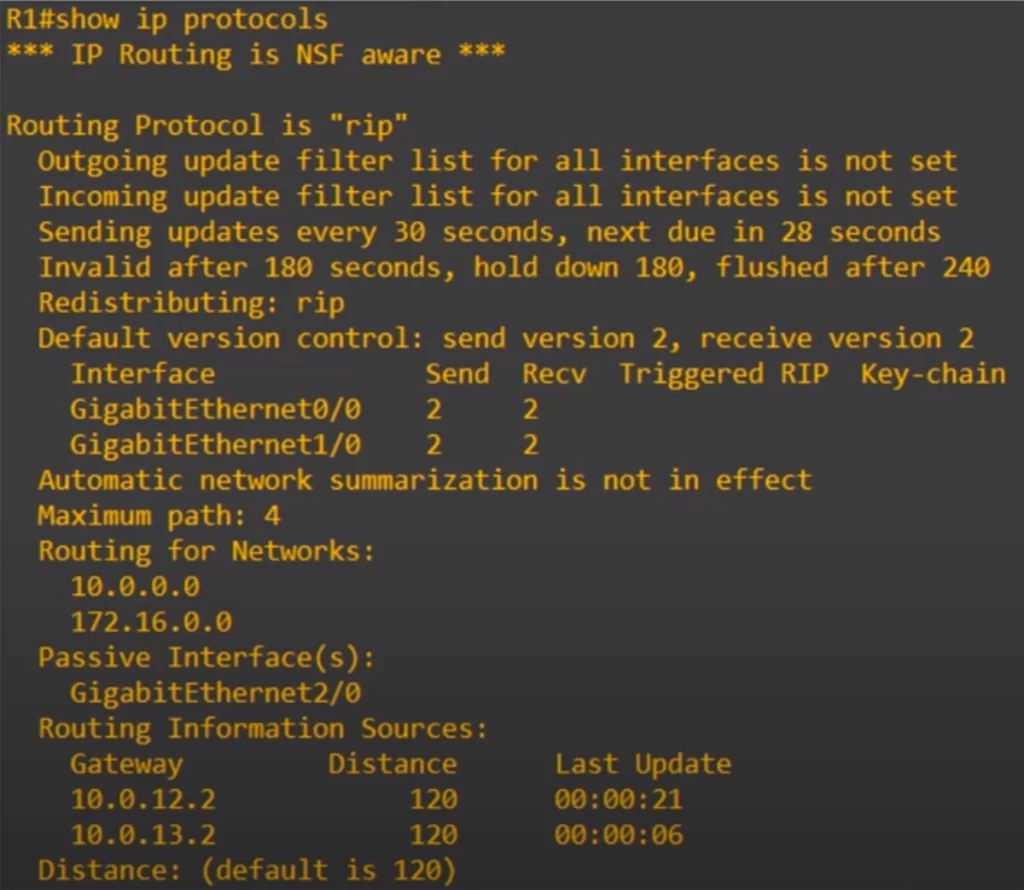
>Notice the Routing Protocol, “rip”.
>Next, notice the entry, “Sending updates every 30 seconds … flushed after 240”. These are some timers that RIP uses to operate.
>Notice “Default version control”, information about the RIP version being used, notice that it’s version 2 as we configured.
>Automatic network summarization is not in effect, this is because we used the NO AUTO-SUMMARY command earlier.
>Maximum paths is 4, this refers to ECMP (Equal-Cost Multi-Path) load-balancing, a routing strategy where packet forwarding to a single destination can occur over multiple “best paths” which tie for top place in routing metric calculations.
By default, RIP inserts up to 4 paths to the same destination into the routing table if they have the same metric. However, this setting can be changed.
From RIP configuration mode use the command MAXIMUM-PATHS, followed by a number from 1 to 32 (in the example below, 8 is specified).
R1(config-router)#maximum-paths ?
<1-32> Number of paths
R1(config-router)#maximum-paths 8
This command is the same for EIGRP and OSPF, by the way.
>Next up, the section “Routing for Networks” shows the networks we entered with the NETWORK command. Remember, these are not the actual networks RIP is advertising. RIP will advertise the network prefix of the interfaces which match the IP address used in the network command.
>Next the section “Passive Interface(s)” shows any passive interfaces listed, just G2/0 in this case.
>Under “Routing Information Sources” you can see R1’s RIP neighbors, 10.0.12.2 (R2) and 10.0.13.2 (R3).
>Finally, “Distance” – distance states the administrative distance of RIP, which is currently the default of 120. This can be changed with this command from RIP configuration mode, DISTANCE, followed by a number, 1 to 255.
R1(config-router)#distance ?
<1-255> Administrative distance
R1(config-router)#distance 85
For example, if you want to make RIP routes preferred over EIGRP routes for some reason, you could set it to 85, thus making RIP’s AD lower than EIGRP’s AD of 90.
The DISTANCE command is the same for EIGRP and OSPF.
EIGRP introduction
There are many similarities between EIGRP and RIP in configurations and how the protocols function.
*EIGRP (Enhanced Interior Gateway Routing Protocol) is an improved version of the older IGRP (Interior Gateway Routing Protocol).
*EIGRP is a Cisco proprietary protocol, developed by Cisco Systems in the early 1990s. However, Cisco has released some details of the EIGRP protocol in RFC 7868 to assist companies whose networks operate in a multi-vendor environment.
*EIGRP is considered an advanced or hybrid distance vector routing protocol. It improves on the very basic operations of RIP.
*EIGRP is much faster than RIP in reacting to changes in the network.
*EIGRP does not have the 15 hop-count limit of RIP, so it supports very large networks.
*RIPv1 broadcasts messages to the IP address 255.255.255.255. RIPv2 multicasts messages to 224.0.0.9. EIGRP multicasts messages to 224.0.0.10.
*EIGRP is the only IGP that can perform unequal-cost load-balancing. By default EIGRP performs ECMP load-balancing over 4 paths like RIP. But EIGRP can be configured to load-balance over multiple paths that do not have equal cost.
EIGRP can even load-balance multiple paths in proportion to their bandwidth. This way, more traffic would be sent over paths with a lower-metric, since they are faster paths, and less traffic would be sent over paths with a higher metric, since they are slower paths.
Because the use of EIGRP is mostly limited to Cisco devices, it’s not used nearly as much as OSPF.
EIGRP configuration
Although you can simultaneously run RIP and EIGRP, that would just be a waste of resources on the routers. Usually there is one IGP running on a router.
Here’s the same network as before. The RIP configurations have been removed.
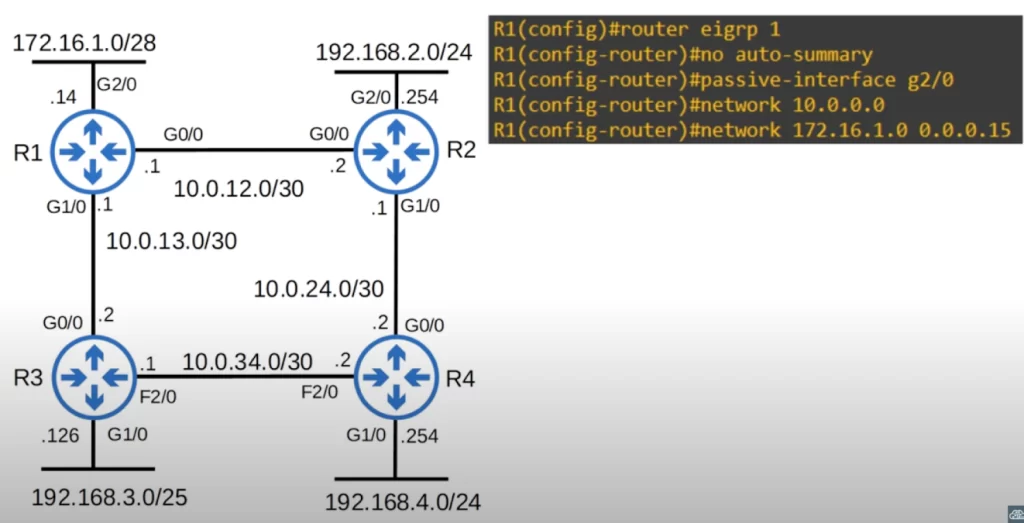
Enter EIGRP configuration mode with the command ROUTER EIGRP, followed by an AS (autonomous system) number. We’re using 1 for this demo. For routers to form adjacencies and share route information, their AS numbers must match. So for this configuration to work, the same AS number, 1, was configured on R2, R3, and R4.

>Next, we disabled auto-summary. This feature works the same way as in RIP.
>Next, we used the passive-interface command, as we did in the RIP configuration example.
>Next, we used the command NETWORK 10.0.0.0 to activate EIGRP on the G0/0 and G1/0 interfaces. You can use a mask with EIGRP’s NETWORK command. If you do not specify the mask, the network command will assume a classful address.
NETWORK 10.0.0.0 is assumed to be 10.0.0.0/8. This network command functions like RIP’s. You are not telling the router to advertise the 10.0.0.0/8 network. You are telling the router to activate EIGRP on interfaces with an IP address that falls in the 10.0.0.0/8 range, so any IP address that begins with 10. That includes G0/0 and G1/0, so EIGRP is activated on both interfaces.
>If you specify the mask, it looks as follows. The command NETWORK 172.16.1.0 0.0.0.15 activates EIGRP on the G2/0 interface.
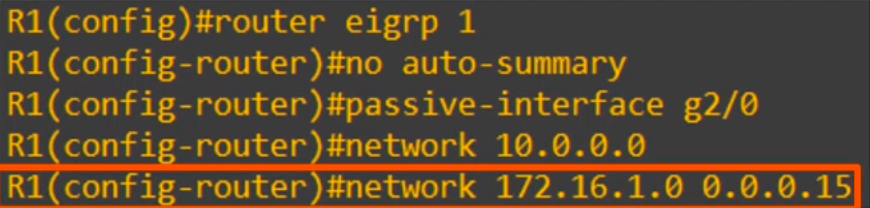
The subnet mask for a /28 prefix is 255.255.255.240. So what is 0.0.0.15?
0.0.0.15 is the wildcard mask equivalent of 255.255.255.240.
EIGRP uses a wildcard mask instead of a regular subnet mask.
Wildcard masks
*A wildcard mask is basically an inverted subnet mask. All 1s in the subnet mask are 0 in the equivalent wildcard mask, and all 0s in the subnet mask are 1 in the equivalent wildcard mask.
Let’s look at some examples.
>Here is a subnet mask in binary and dotted decimal. When we invert all the bits, the 1s to 0s and the 0s to 1s, we get 0.0.0.255 in dotted decimal.

0.0.0.255 is the wildcard mask equivalent of /24.
>Here’s another example.
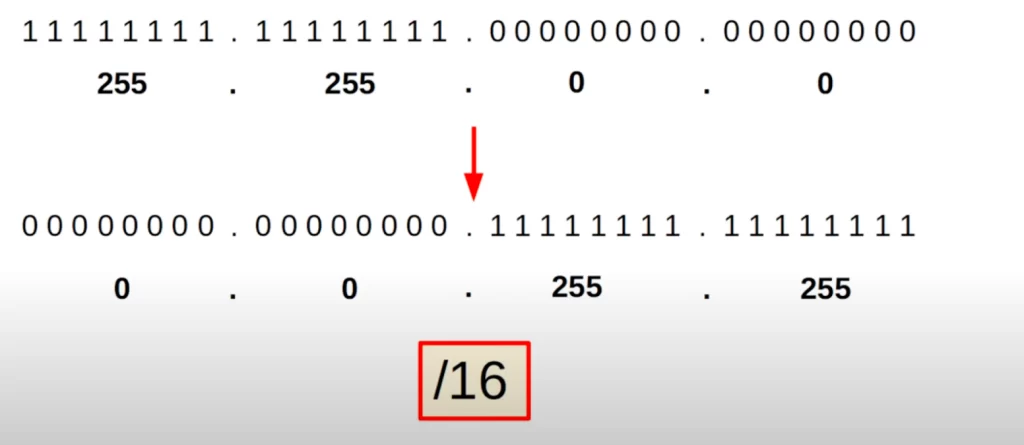
0.0.255.255 is the wildcard mask equivalent of /16.
>Here’s another example.
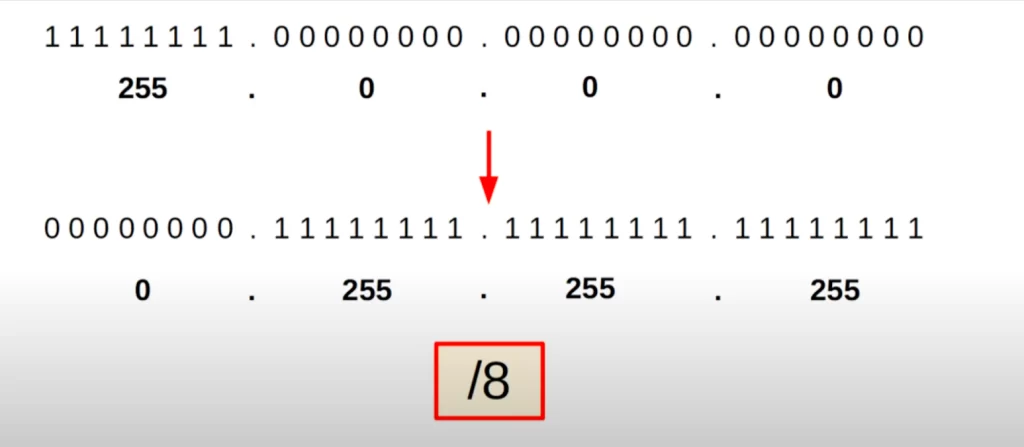
0.255.255.255 is the wildcard mask equivalent of /8.
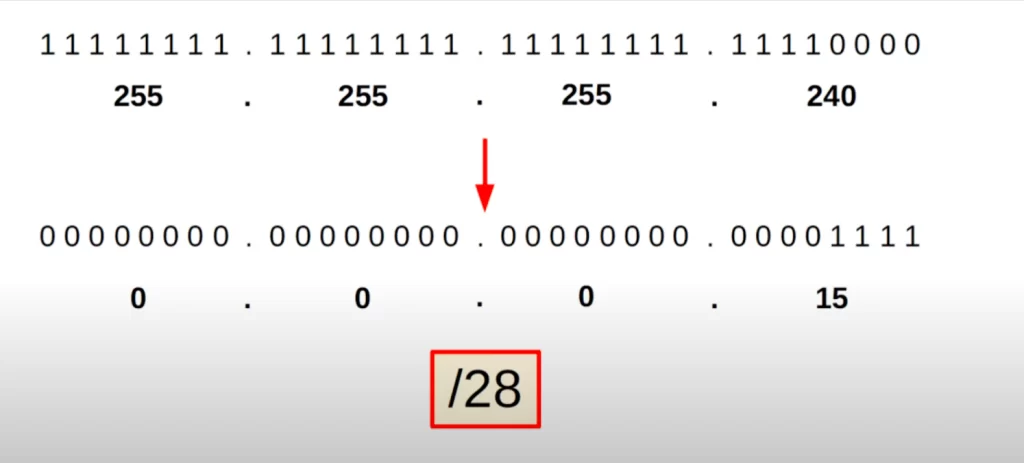
>In our network, R1’s G2/0 interface has a /28 prefix length, 255.255.255.240 written as a normal subnet mask in dotted decimal. If you invert the bits, you get 0.0.0.15 in dotted decimal. 0.0.0.15 is the wildcard mask equivalent of /28.
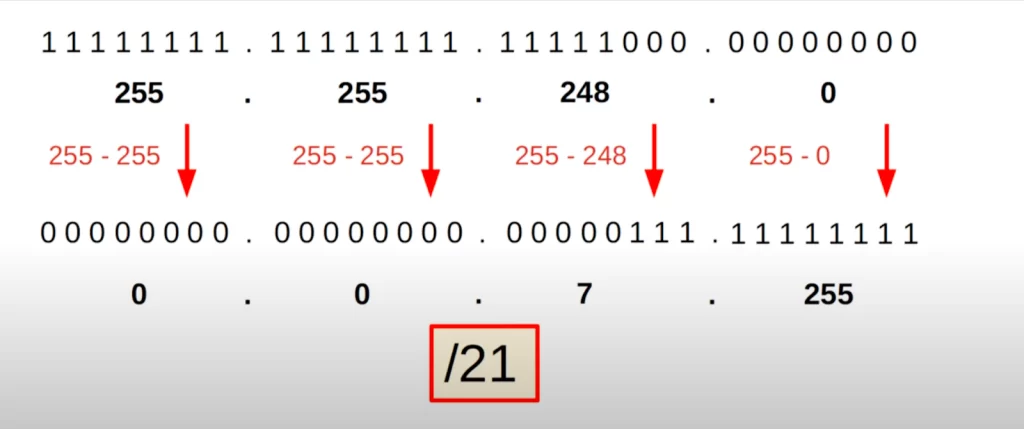
>A shortcut to calculate the wildcard mask is to subtract each octet of the subnet mask from 255. This /21 subnet mask becomes 0.0.7.255 when written using a wildcard mask.
How the wildcard is used in configurations.
*A “0” in the wildcard mask means the bits must match between the interface’s IP address and the EIGRP network command. A “1” in the wildcard mask means the bits do not have to match.
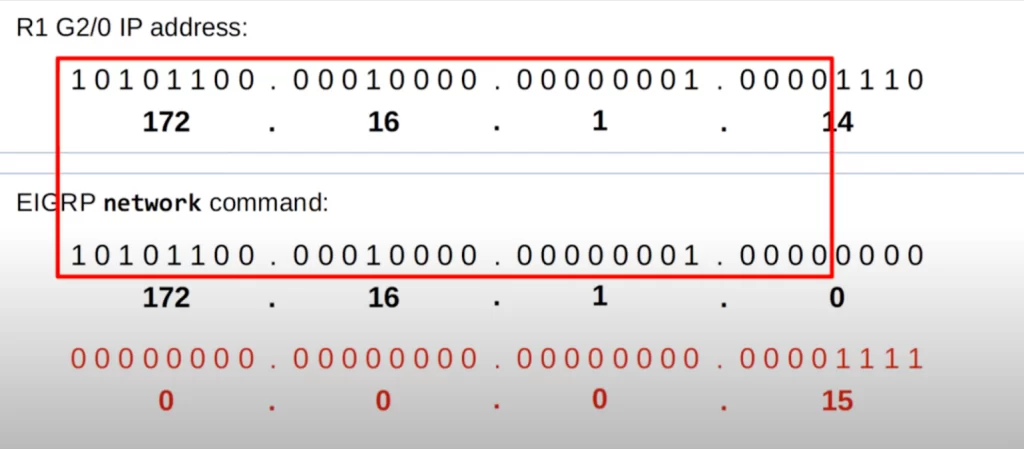
The IP address on R1’s G2/0 is 172.16.1.14.
We are using the EIGRP network command 172.16.1.0 with the wildcard mask 0.0.0.15. This means that the first 28 bits must match between the IP address of R1’s G2/0 interface and the EIGRP network command address so that EIGRP will be activated on the interface. And they do.
>Let’s try another configuration, to see if the IP address in the network command and the interface’s IP address will match, in which case EIGRP will be activated.
With the same interface IP address, let’s use the command network 172.16.1.0 with a wildcard mask of 0.0.0.7. This means the first 29 bits must match. They don’t.

The bit highlighted in yellow does not match between R1’s G2/0 interface and the NETWORK command. EIGRP will not be activated on the interface.
>Another example: the network command is NETWORK 168.0.0.0 7.255.255.255. Will EIGRP be activated on the interface? With this wildcard mask, only the first 5 bits need to match between the interface IP address and the EIGRP network command.

We have a match and EIGRP will be activated on the interface.
*EIGRP configuration (cont.)
Back to our EIGRP configuration.
We used a /28 wildcard mask, the prefix length of the network 172.16.1.0 which G2/0 is connected to. Using the same prefix length as the interface keeps things simple. We could have used other values of wildcard masks to activate EIGRP on the interface.
You could use a /32 wildcard mask and specify the exact IP address on the interface. You would write a /32 wildcard mask as 0.0.0.0 because a /32 subnet mask is 255.255.255.255.
Remember that this command only specifies which interface or interfaces to activate EIGRP on. R1 will then advertise the network prefix on that interface, 172.16.1.0/28 in this case.
show ip protocols (EIGRP)
Let’s look at the SHOW IP PROTOCOLS command when EIGRP is running.
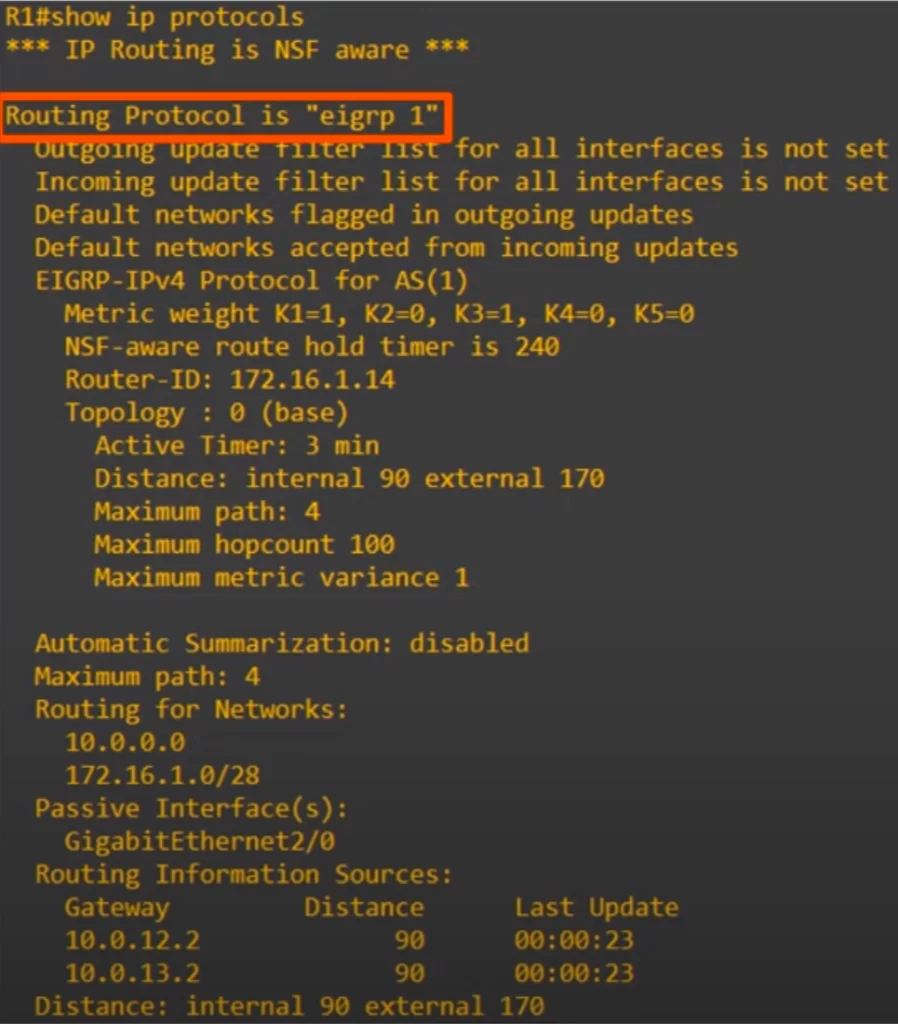
>“Routing protocol is EIGRP 1”. 1 is the AS number we configured.
>Recall that EIGRP’s metric uses interface bandwidth and delay by default. Those are the K1 and K3 values that are set to 1 in the “Metric weight” field.
The bandwidth of the slowest link in the path, plus the sum of the delay values of all the links in the path, are used to calculate the metric. The other k-values, K2, K4, and K5 are set to 0 by default and are not used to calculate metric, however that can be changed with configuration.
>Note the field “Router-ID: 172.16.1.14”.
EIGRP Router ID
In EIGRP and OSPF, the router has a unique router ID which identifies it within the AS.
The default Router ID on R1 is 172.16.1.14. Why is that?
*Router ID order of priority:
The router ID is determined like this:
1) If the router ID is manually configured, that will be the router ID.
2) If the router ID is not manually configured, the highest IP address on any of the router’s loopback interfaces will be the router ID. Loopback interfaces are virtual interfaces inside the router.
3) Finally, if there are no loopback interfaces configured, as is the case here, the highest IP address on any of the router’s physical interfaces will become the router ID.
So, G2/0’s 172.16.1.14 became the router ID.
Note that the router ID is not actually an IP address, it’s a 32-bit number formatted like a dotted-decimal IP address, and you can change it to any 32 bit number.
Here’s how to configure the EIGRP router ID. From EIGRP configuration mode, use the command EIGRP ROUTER-ID, followed by the router ID you want to configure, in this case we used 1.1.1.1. Now you can see using show ip protocols that the router ID changes to 1.1.1.1, since manual configuration takes highest priority.

*show ip protocols (EIGRP) – cont.
Let’s continue exploring the fields in the CLI output of the SHOW IP PROTOCOLS command. Here is the output again.
>”Automatic Summarization” is disabled, as it should be, and EIGRP performs ECMP load-balancing over a maximum of 4 paths by default, like RIP.
>”Routing for Networks” 10.0.0.0 and 172.16.1.0/28. These are the two NETWORK commands we entered earlier.
>”Passive Interface(s)”: G2/0 is configured as a passive interface.
>”Routing Information Sources”: there are two neighbors, R2 and R3.
>”Distance”: EIGRP has two separate AD values, 90 for internal routes and 170 for external. Internal routes are normal EIGRP routes. External routes are routes from outside EIGRP which are then inserted into EIGRP.
show ip route (EIGRP)
Finally let’s see how EIGRP looks in the routing table.
From privileged EXEC mode, use the show ip route command on a router to display the routing table, which is a list of all the networks that the router knows about and how to get to them.
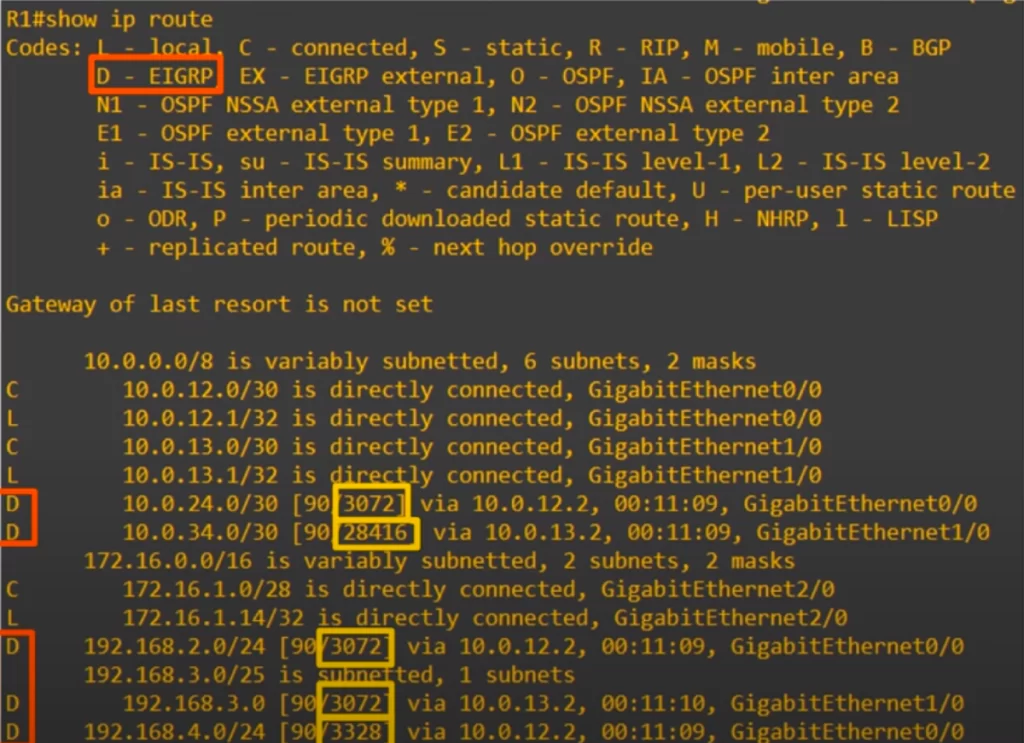
First, notice that EIGRP routes are indicated with the letter D.
Check out the metric costs: 3072, 3328, 28416. These costs are much higher than you see in OSPF and RIP, and this is a very small network. In large networks, these numbers can get much bigger. That’s perhaps a downside of EIGRP, the metrics are harder to understand.
Command review
1. RIP configuration:
R(config)#router rip
→to enter rip config mode
R(config-router)#version 2
→to configure the router to use RIP version 2 from RIP configuration mode
R(config-router)#no auto-summary
→to prevent the automatic conversion of the networks that the router advertises to classful networks
R(config-router)#network network-address
R(config-router)#passive-interface interface
→to configure an interface as a passive interface
R(config)#ip route 0.0.0.0 0.0.0.0 next-hop
→to configure a default static route on a Cisco router
R(config-router)#default-information originate
→to configure RIP on a router to tell neighboring routers about the default route
R#show ip protocols
R(config-router)#maximum-paths number-of-paths
→to set ECMP load balancing number of paths (default is 4)
R(config-router)#distance AD
→to set the AD of RIP (default is 120)
2. EIGRP configuration:
R(config)#router eigrp autonomous-system-number
→to enter eigrp config mode (AS number must match on adjacencies)
R(config-router)#no auto-summary
R(config-router)#passive-interface interface
R(config-router)#network network-address
→you can specify a wildcard mask. If you do not specify the mask, the network command will assume a classful address
Example, for the network 172.16.1.0/28:
R1(config-router)#network 172.16.1.0 0.0.0.15
→0.0.0.15 is the wildcard mask ~ /28 or 255.255.255.240
R(config-router)#eigrp router-id router-id
→to configure the EIGRP router ID from EIGRP configuration mode
Free CCNA | Configuring EIGRP | Day 25 Lab – Notes
Key learnings
*The basics of RIP and its configuration on Cisco routers.
*The basics of EIGRP and its configuration on Cisco routers.
Practice quiz questions
Quiz question 1
R1 and R2 both use RIP to share routes. R1 has a default route to the Internet that you want to advertise to R2. Which command should you use?
a) R1(config-router)#default-information originate
b) R1(config-router)#network 203.0.113.0
c) R2(config)#ip route 0.0.0.0 0.0.0.0 10.0.12.1
d) R2(config-router)#default-information originate
The answer is a), default-information originate. This command will advertise R1’s default route to R1’s RIP neighbors.
For two more practice quiz questions (plus a bonus one), visit Jeremy’s RIP & EIGRP video lesson, cited below.
Key references
Note: The resources cited below (in the “Key references” section of this document) are the main source of knowledge for these study notes/this lesson, unless stated otherwise.
Free CCNA | RIP & EIGRP | Day 25 | CCNA 200-301 Complete Course
Free CCNA | Configuring EIGRP | Day 25 Lab | CCNA 200-301 Complete Course
Related content
Compliance frameworks and industry standards
How data flow through the Internet
How to break into information security
IT career paths – everything you need to know
Job roles in IT and cybersecurity
Network security risk mitigation best practices
The GRC approach to managing cybersecurity
The penetration testing process
The Security Operations Center (SOC) career path
Back to DTI Courses


