We continue our studies of the topics in the Security Fundamentals section of the CCNA exam blueprint. This lesson covers DHCP snooping configuration and verification on Cisco devices. DHCP snooping is covered in exam topic 5.7, which says you must be able to “Configure Layer 2 security features (DHCP snooping, dynamic ARP inspection, and port security)”. We covered switch port security configuration and verification in the previous lesson. Dynamic ARP inspection (DAI) configuration and verification is covered in the next lesson. This lesson and the DAI lesson look at how attackers might use DHCP in a malicious way and how DHCP snooping and DAI can help defeat those attacks.
This lesson begins with a brief introduction to DHCP snooping purpose and how it is used. This serves as a prelude to discussing key DHCP snooping concepts and the need for DHCP snooping, including the types of attacks it can try to prevent. Then DHCP snooping logic and rules are discussed. Finally, DHCP snooping configuration and verification are explained for required and optional features. This post constitutes Issue 39 of my CCNA 200-301 study notes.
- Introduction to DHCP snooping
- Key DHCP snooping concepts
- A spurious DHCP server and a malicious MITM
- DHCP snooping logic
- DHCP snooping configuration
- Optional DHCP snooping features
- DHCP snooping configuration summary
- Command review
- Practice quiz questions
- Key references
You may also be interested in CCNA 200-301 study notes.

Introduction to DHCP snooping
DHCP snooping is a switch feature that helps prevent attacks that can result in an attacker obtaining copies of packets sent to/from a legitimate host.
In many ways, DHCP snooping on a switch acts like an access control list (ACL) or a firewall. Switches configured with DHCP snooping analyze incoming messages on the specified subset of ports in a VLAN.
DHCP snooping can filter DHCP messages, applying logic to make a choice— allow the incoming DHCP message or discard the message.
DHCP snooping notices DHCP messages that fall outside the normal use of DHCP and discards those messages, since those messages could be part of an attack. LAN switches are configured to watch the DHCP messages that flow through it and to build a table that lists the details of legitimate DHCP flows, so that other switch features can know what legitimate DHCP leases exist for devices connected to the switch.
DHCP servers play a vital role in networks. Almost every user endpoint uses DHCP to learn its IP address, mask, default gateway, and DNS server IP addresses. For the background for this lesson, feel free to consult the section “The DHCP protocol” in this lesson: Network protocols and their functions. The lesson Configuring and verifying DHCP client and relay shows how DHCP works under normal circumstances.
Key DHCP snooping concepts
While DHCP itself provides a Layer 3 service, DHCP Snooping operates on LAN switches and is commonly used on Layer 2 LAN switches and enabled on Layer 2 ports. The reason to put DHCP Snooping on the switch is that the function needs to be performed between a typical end-user device—the type of device that acts as a DHCP client—and DHCP servers or DHCP relay agents. (Odom, 2020, pp. 406-407)
DHCP snooping is a security feature that helps to prevent unauthorized DHCP servers from providing IP addresses to devices on a network. It does this by classifying ports on a switch as either trusted or untrusted.
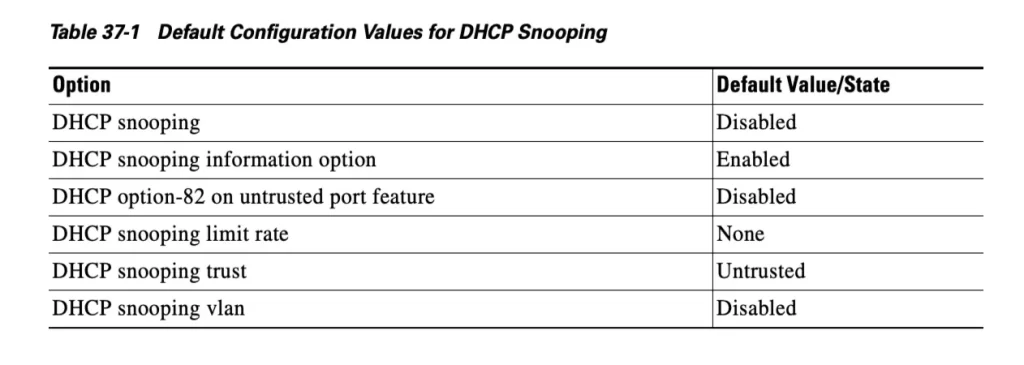
In a VLAN, all ports are either trusted or untrusted by DHCP snooping. The switch administrator must configure each port as trusted or untrusted. The default setting for ports is untrusted.
Trusted ports are ports that are connected to DHCP servers or to other trusted devices, such as routers. Trusted ports are allowed to forward all DHCP messages, including DHCP offers, DHCP acknowledgements, and DHCP releases.
Untrusted ports are ports that are connected to devices that are not trusted, such as end-user devices. Untrusted ports are only allowed to forward DHCP discover messages.
This means that a DHCP server can only send DHCP offers and acknowledgements to ports that are trusted. If a DHCP server tries to send a DHCP offer or acknowledgement to an untrusted port, the switch will drop the packet. This helps to prevent unauthorized DHCP servers from providing IP addresses to devices on the network.
Here are some of the benefits of using DHCP snooping:
- It can help to prevent unauthorized DHCP servers from providing IP addresses to devices on the network.
- It can help to prevent DHCP attacks, such as DHCP starvation attacks and DHCP spoofing attacks.
- It can help to improve the performance of the DHCP server by reducing the number of DHCP messages that need to be processed.
Here’s a summary of the general rules used by DHCP snooping. The rules differentiate between messages normally sent by servers (like DHCP OFFER and DHCP ACK) versus messages normally sent by DHCP clients:
- DHCP messages received on an untrusted port, for messages normally sent by a server, will always be discarded.
- DHCP messages received on an untrusted port, as normally sent by a DHCP client, may be filtered if they appear to be part of an attack.
- DHCP messages received on a trusted port will be forwarded; trusted ports do not filter (discard) any DHCP messages.
A spurious DHCP server and a malicious MITM
PC1 is attempting to lease an IP address while the attacker using a spurious DHCP server is making his attack: an attacker has connected his laptop to the LAN and started his DHCP attack by acting like a DHCP server.
1. PC1 sends a LAN broadcast with PC1’s first DHCP message (DHCP DISCOVER).
2. The attacker’s PC—acting as a spurious DHCP server—replies to the DHCP DISCOVER with a DHCP OFFER.
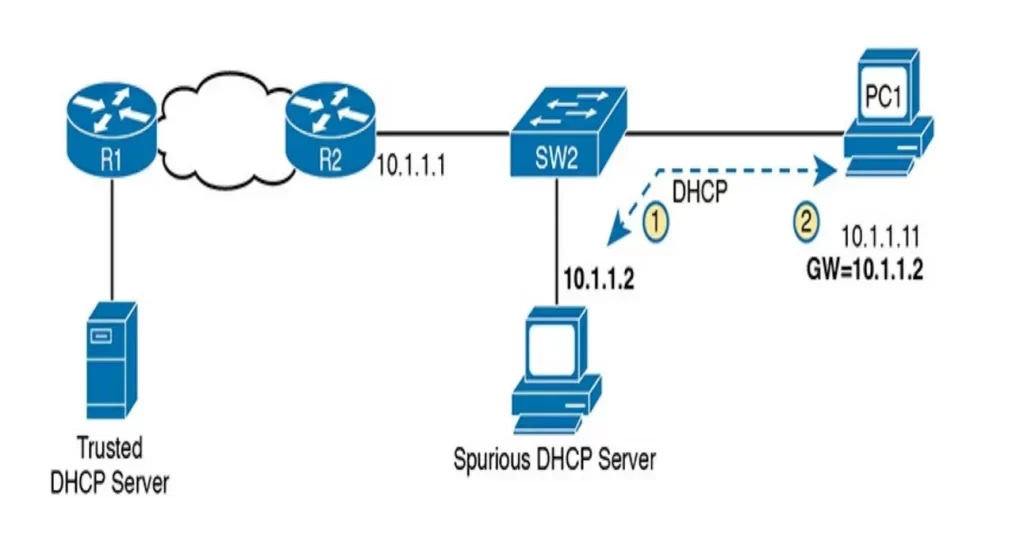
The spurious DHCP server leases a useful IP address to PC1, in the correct subnet, with the correct mask. But notice the default gateway assigned to PC1: 10.1.1.2, which is the attacker’s PC address, rather than 10.1.1.1, which is R2’s address.
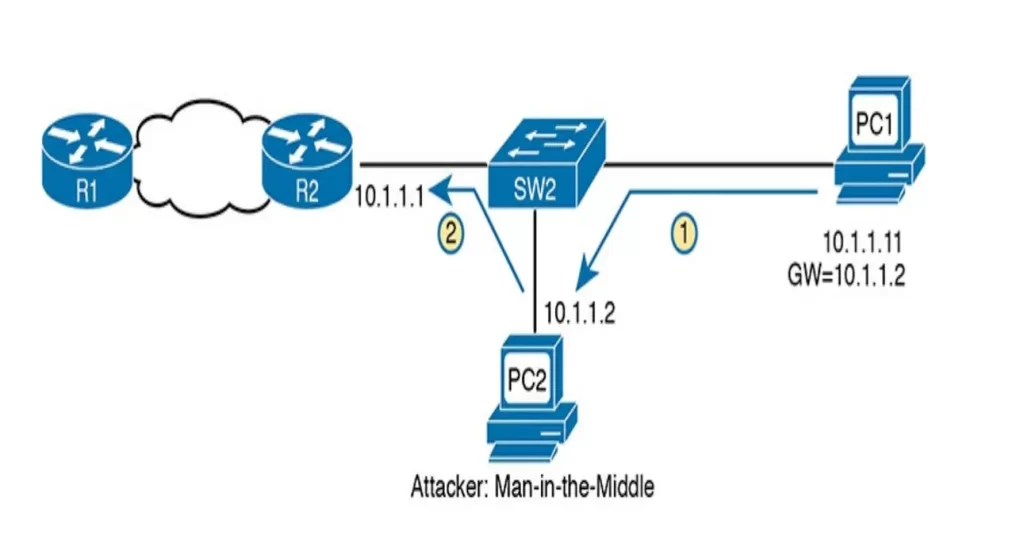
Now PC1 thinks it has all it needs to connect to the network, and when it does all the packets sent by PC1 flow first through the attacker’s PC, creating a man-in-the-middle attack, as shown in Figure 8-3.
The attacker likely sent his DHCP Offer before the legitimate DHCP server did, but since most hosts use the first received DHCP OFFER, the unsuspecting user of PC1 fell for the attack.
PC1 sends its packets to its default gateway, 10.1.1.2, that of the attacker, and the attacker forwards the packets to R1. In this way any traffic destined to leave the subnet will seem and act like normal but now the attacker can keep a copy of anything sent by PC1.
DHCP snooping logic
DHCP snooping defeats such attacks by making most ports untrusted, by filtering the DHCP server messages that arrive on the untrusted ports. In our previous example, making the port connected to the spurious DHCP server an untrusted port defeats the attack.
Recall Dora? The explorer? The normal DHCP message flow follows the sequence DISCOVER, OFFER, REQUEST, ACK. Clients send DISCOVER and REQUEST. Servers send OFFER and ACK.
DHCP clients also use the DHCP RELEASE and DHCP DECLINE messages. A client can send a DHCP DECLINE message to turn down the use of an IP address during the normal DORA flow on messages. And a client can send a DHCP RELEASE message when deciding to release an address it no longer wants to use back to the DHCP server.
Figure 8-4 summarizes the logic for DHCP snooping untrusted ports. On the left, the switch port connects to a legitimate DHCP server so it should be trusted (otherwise DHCP would not work because the switch would filter all DHCP messages sent by the DHCP server). On the right, PC1 connects to an untrusted port with a DHCP client.
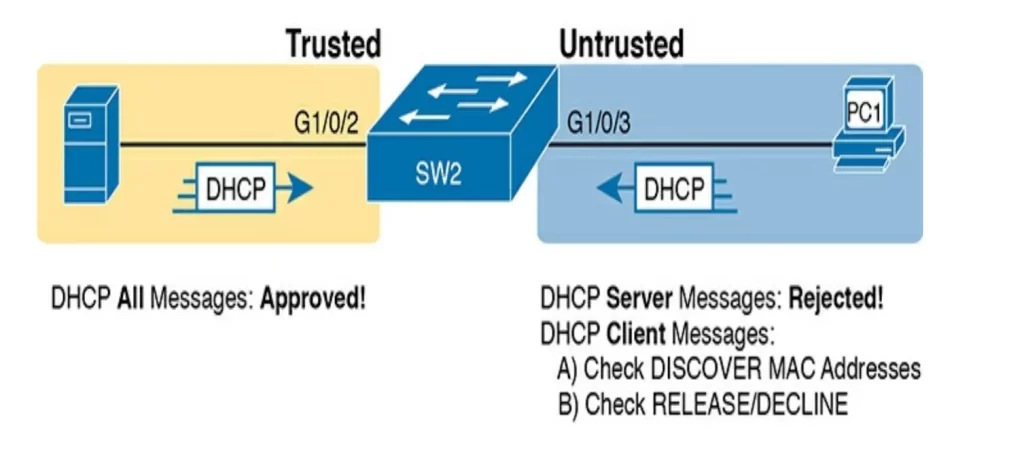
The following list (p. 412) summarizes the DHCP snooping rules:
1. Examine all incoming DHCP messages.
2. If normally sent by servers, discard the message.
3. If normally sent by clients, filter as follows:
3.1. For DISCOVER and REQUEST messages, check for MAC address consistency between the Ethernet frame and the DHCP message.
3.2. For RELEASE or DECLINE messages, check the incoming interface plus IP address versus the DHCP snooping binding table.
More on the DHCP snooping binding table in a minute.
4. For messages not filtered that result in a DHCP lease, build a new entry to the DHCP snooping binding table.
Filtering DISCOVER messages based on MAC address
DHCP snooping does one straightforward check for the most common client-sent messages: DISCOVER and REQUEST.
DHCP snooping does a simple check to make sure that two values match: the source MAC address in the Ethernet frame (encapsulating the DHCP message) and the MAC address used in the DHCP chaddr (client hardware address) field, which is in the DHCP header. DHCP messages define the chaddr field to identify the client.
Figure 8-5 shows how an attacker could attempt to overload the DHCP server and lease all the addresses in the subnet so that no other hosts could obtain a lease. The attacker’s PC uses pseudo source Ethernet MAC address A. However, each DHCP (Discover) message identifies a different MAC address in the chaddr value (shown as MAC1, MAC2, and MAC3 in the figure for brevity), so from a DHCP perspective, each message appears to be a different DHCP request.
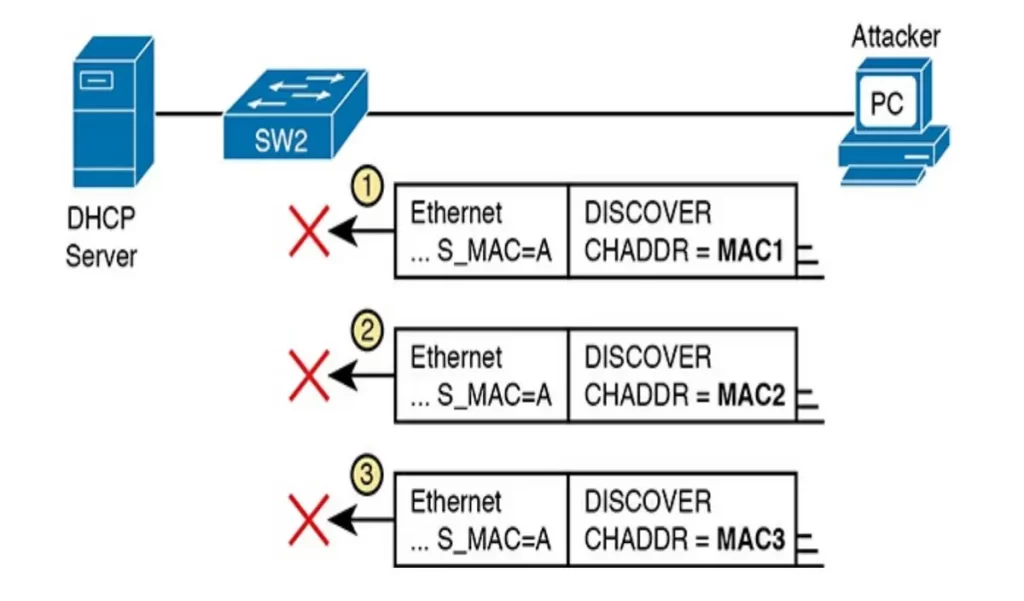
The core feature of DHCP Snooping defeats this type of attack on untrusted ports. It checks the Ethernet header source MAC address and compares that address to the MAC address in the DHCP header, and if the values do not match, DHCP Snooping discards the message. (p. 414)
Filtering messages that release IP addresses
DHCP snooping can apply additional filtering logic that uses the DHCP snooping binding table: it checks client-sent messages like RELEASE and DECLINE that would cause the DHCP server to be allowed to release an address.
DHCP snooping builds the DHCP snooping binding table containing a list of important facts for any working legitimate DHCP flow. DHCP snooping, and other features like dynamic ARP inspection, can use the table to make decisions.
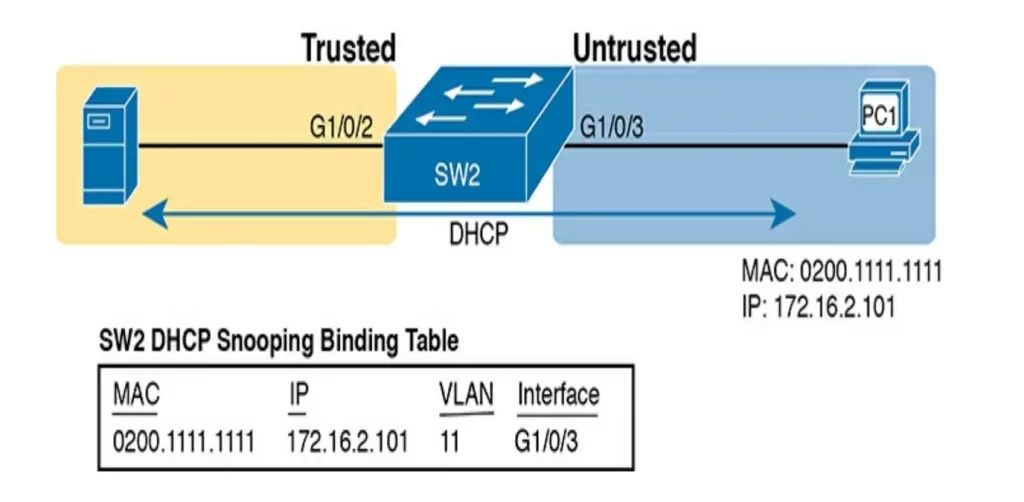
PC1, the DHCP client on the right, leases the IP address 172.16.2.101 from the DHCP server on the left. The switch’s DHCP snooping feature gathers information from the DHCP messages and combines it with information about the port (interface G1/0/3, assigned to VLAN 11 by the switch) and puts that in the DHCP snooping binding table.
DHCP snooping then checks client-sent messages like RELEASE and DECLINE that would cause the DHCP server to be allowed to release an address.
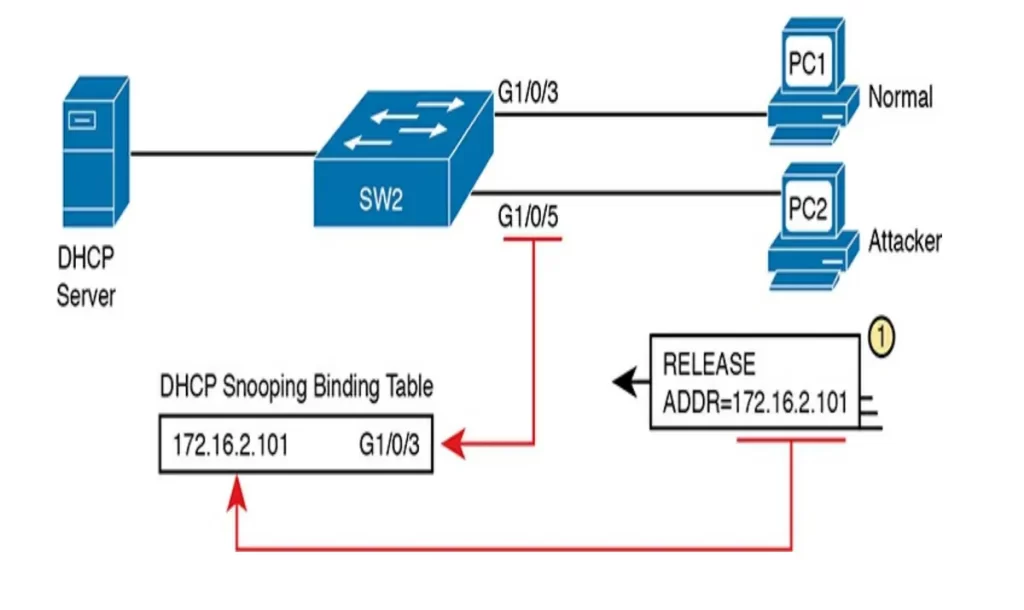
Say a legitimate user has leased the address 172.16.2.101. An attacker could send a DHCP RELEASE message to release that address back into the pool. The attacker could then try to lease that address immediately, hoping the DHCP server assigns the same address to the attacker.
Can the attacker defeat the DHCP snooping logic and fool the DHCP server?
PC1 (Figure 8-7) already has a DHCP address (172.16.2.101), with SW2 listing an entry in the DHCP snooping binding table. The attacker attempts to release PC1’s address via port G1/0/5. DHCP snooping compares the incoming message, incoming interface, and matching table entry:
1. The incoming message is a DHCP RELEASE message in port G1/0/5 listing address 172.16.2.101.
2. The DHCP Snooping binding table lists 172.16.2.101 as being originally leased via messages arriving on port G1/0/3.
3. DHCP Snooping discards the DHCP RELEASE message.
DHCP snooping configuration
Configuring DHCP snooping on a Layer 2 switch requires several steps to make it work.
- First, using two associated global commands: one to enable DHCP snooping and a second to list the VLANs on which to use DHCP snooping.
- Second, while not literally required, configuring a few ports as trusted ports. Most switches that use DHCP snooping for a VLAN have some trusted ports and some untrusted ports. The default state for ports is untrusted.
Let’s look at an example that shows how to configure a typical Layer 2 switch to use DHCP snooping, with required commands as just described and with other optional commands.
We will use the following topology for our discussion (Figure 8-8). We want to enable DHCP snooping on SW2. The DHCP server sits on the other side of the WAN, on the left of the figure. Hence, SW2’s port connected to R2 (a DHCP relay agent) needs to be trusted. The two PCs on the right can use the default untrusted setting.
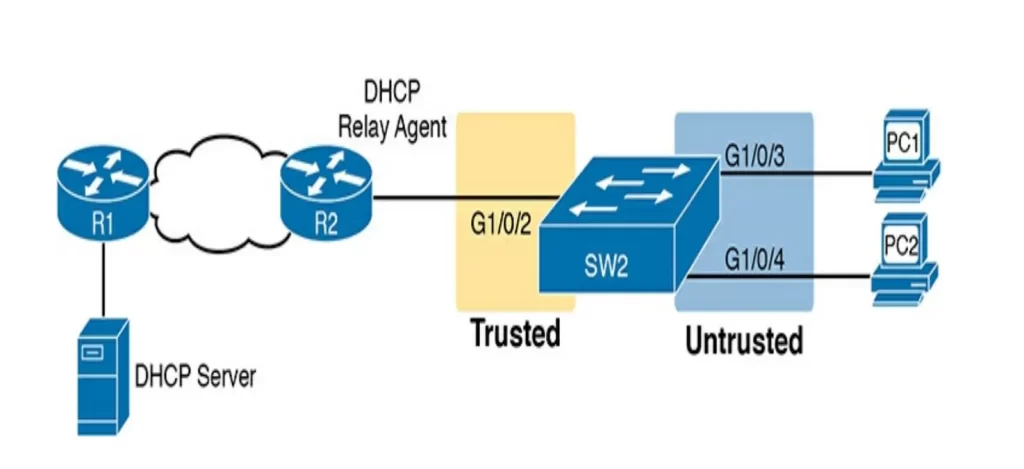
SW2 places all the ports in VLAN 11. To enable DHCP snooping in VLAN 11, SW2 requires two commands, as shown near the top of Example 8-1 below: ip dhcp snooping and ip dhcp snooping vlan 11.
Then, to change the logic on port G1/0/2 (connected to the router) to be trusted, the configuration includes the ip dhcp snooping trust interface subcommand. We will come back to the no ip dhcp snooping information option command.
Example 8-1 DHCP Snooping Configuration to Match Figure 8-8 (Odom, 2020)

Does this configuration really work the way we want it to?
Example 8-2 shows the output from the show ip dhcp snooping command on switch SW2. The highlighted lines point out a few of the key configuration settings.
Example 8-2 SW2 DHCP Snooping Status (Odom, 2020)
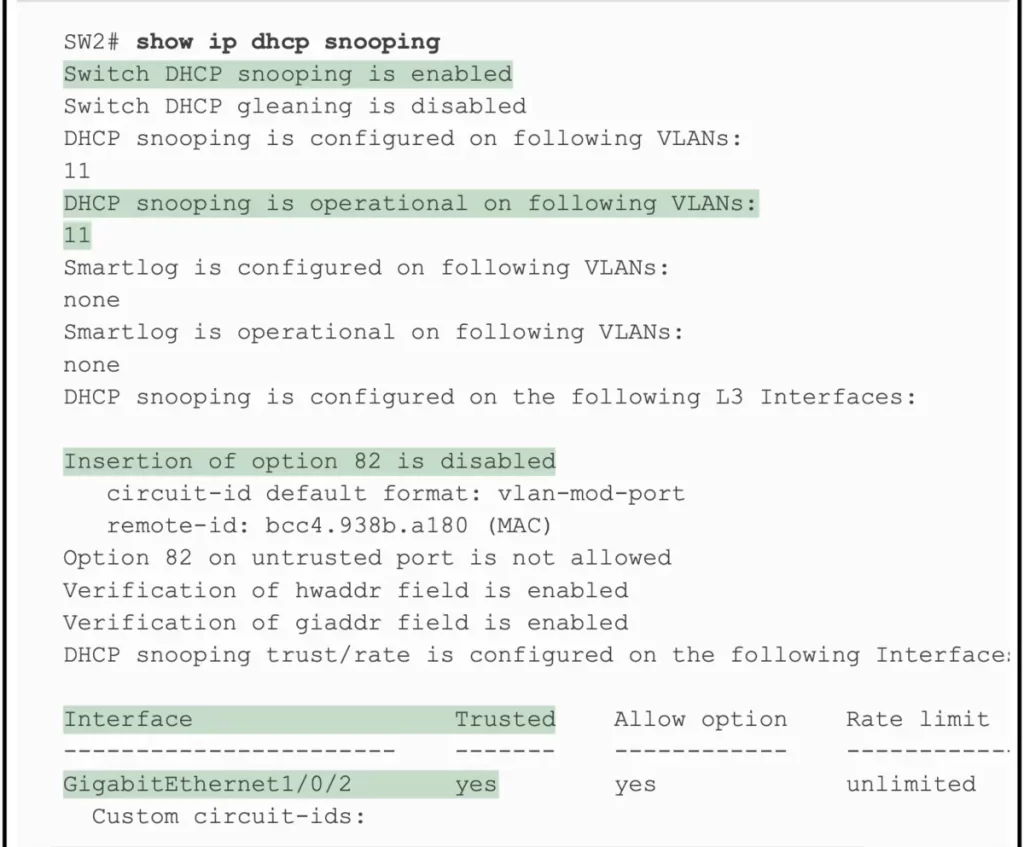
>The first two highlighted lines confirm the configuration of the ip dhcp snooping and ip dhcp snooping vlan 11 commands, respectively.
>The highlighted lines at the bottom of the output show a section that lists trusted ports – only port G1/0/2, in this case.
Recall in Example 8-1 we said we would come back to the no ip dhcp snooping information option command:
>The highlighted line in the middle of the CLI output states, “Insertion of option 82 is disabled”. This line confirms the addition of the no ip dhcp information option command to the configuration.
But why use this command? In short, to make DHCP snooping work on a switch that is not also a DHCP relay agent.
The no ip dhcp snooping information option command is used to disable the insertion of DHCP Option 82 information in DHCP packets. DHCP Option 82 is an optional DHCP message that can be used to provide additional information about the DHCP client to the DHCP server. This information can include the VLAN ID, the interface the client is connected to, and the MAC address of the DHCP server.
The switch defaults to use ip dhcp snooping information option. You would leave enabled the insertion of DHCP Option 82 information if you are using a DHCP relay agent to forward DHCP requests between networks. In this case the DHCP relay agent may need the VLAN ID and the interface information to forward the requests to the correct DHCP server.
If the switch is not acting as a DHCP relay agent, as in our example, the DHCP server does not need the VLAN ID or the interface information. Additionally, the DHCP server may not be able to handle the additional traffic generated by the DHCP Option 82 information.
Optional DHCP snooping features
Attackers can devise attacks to generate large volumes of DHCP messages in an attempt to overload the DHCP Snooping feature and the switch CPU itself. The goal can be as a simple denial-of-service attack or a combination of attacks that might cause DHCP Snooping to fail to examine every message, allowing other DHCP attacks to then work. (Odom, 2020, p. 421)
To help prevent this kind of attack, DHCP snooping includes an optional feature which can be enabled both on trusted and untrusted interfaces. This feature, DHCP snooping rate limits, tracks the number of incoming DHCP messages and if it exceeds that limit over a one-second period, DHCP snooping treats the event as an attack and moves the port to an err-disabled state.
Although rate limiting DHCP messages can help, placing the port in an err-disabled state might be too severe an action because in the err-disabled state the switch will not send or receive frames for the interface. Further, the default recovery action for an err-disabled state requires the configuration of a shutdown and then a no shutdown subcommand on the interface.
To help strike a better balance, you can enable DHCP snooping rate limiting and then also configure the switch to automatically recover from the port’s err-disabled state, without the need for a shutdown and then no shutdown command.
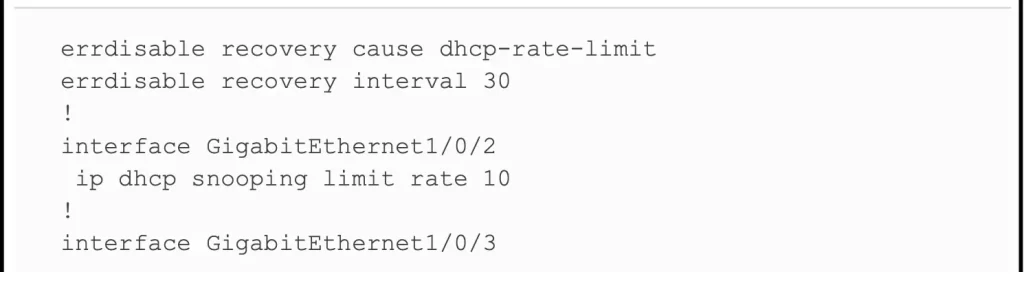
Example 8-3 shows how to enable DHCP snooping rate limits and err-disabled recovery. The configuration in this example relies on the core configuration for DHCP snooping as shown in Example 8-1.
>At the top of the configuration you can see the global settings telling IOS to recover from an err-disabled state if it is caused by DHCP snooping and to use a nondefault number of seconds to wait before recovering the interface.
>At the lower half of the configuration to the interfaces you can see the straightforward setting of the per-interface limits using the ip dhcp snooping limit rate number interface subcommands.
Example 8-3 Configuring DHCP Snooping Message Rate Limits (Odom, 2020)
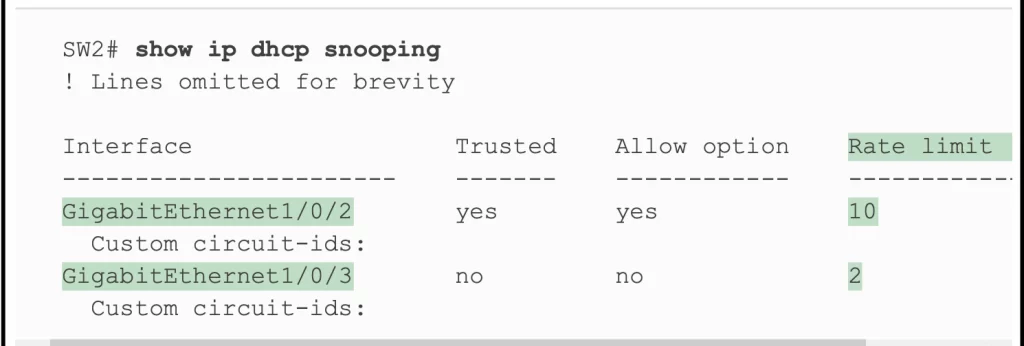
Using the show ip dhcp snooping command again shows the rate limits near the end of the output, as noted in Example 8-4.
Example 8-4 Confirming DHCP Snooping Rate Limits (Odom, 2020)
DHCP snooping configuration summary
Here’s a summary of the steps and commands for configuring DHCP snooping.
- Step 1. (Required): Use the ip dhcp snooping global command to enable DHCP snooping on the switch.
- Step 2. (Required): Use the ip dhcp snooping vlan vlan-list global command to identify the VLANs to use DHCP snooping on.
- Step 3. (Optional): Use the no ip dhcp snooping information option global command on L2 switches to disable Option 82 on switches that do not act as a DHCP relay agent.
- Step 4. (Optional): Configure the ip dhcp snooping trust interface subcommand to override the default setting of not trusted.
- Step 5. (Optional): Configure DHCP snooping rate limits and err-disabled recovery:
- Step 5.1. (Optional): ip dhcp snooping limit rate number interface subcommand to set a limit of DHCP messages per second.
- Step 5.2. (Optional): no ip dhcp snooping limit rate number interface subcommand to remove an existing limit and reset the interface to use the default of no rate limit.
- Step 5.3. (Optional): errdisable recovery cause dhcp-rate-limit global command to enable the feature of automatic recovery from err-disabled mode.
- Step 5.4. (Optional): errdisable recovery interval seconds global command to set the time to wait before recovering from an err-disabled state.
Command review
1. Configuration commands
>Required DHCP snooping features:
Configuring DHCP snooping on a Layer 2 switch requires several steps.
First, using two associated global commands: one to enable DHCP snooping and a second to list the VLANs on which to use DHCP snooping.
ip dhcp snooping
→global command to enable DHCP snooping if combined with enabling it on one or more VLANs
ip dhcp snooping vlan vlan-list
→global command to list VLANs on which to enable DHCP snooping, assuming the ip dhcp snooping command is also configured
Second, while not literally required, configuring a few ports as trusted ports. The default state for ports is untrusted.
[no] ip dhcp snooping trust
→interface subcommand that sets the DHCP snooping trust state for an interface
[no] ip dhcp snooping information option
→global command that enables (or disables with no option) the feature of inserting DHCP option 82 parameters by the switch when also using DHCP snooping
>Optional DHCP snooping features (rate limits and err-disabled recovery):
ip dhcp snooping limit rate number
→interface subcommand that sets a limit to the number of incoming DHCP messages processed on an interface, per second, before DHCP snooping discards all other incoming DHCP messages in that same second
Use no in front of the command to remove an existing limit and reset the interface to use the default of no rate limit.
err-disable recovery cause dhcp-rate-limit
→global command that enables the switch to automatically recover an err-disabled interface if set to that state because of exceeding a DHCP rate limit setting
err-disable recovery interval seconds
→global command that sets the number of seconds IOS waits before recovering any err-disabled interfaces which, per various configuration settings, should be recovered automatically
2. Verification commands
show ip dhcp snooping
→to list a large variety of DHCP snooping configuration settings
show ip dhcp snooping statistics
→to list counters regarding DHCP snooping behavior on the switch
show ip dhcp snooping binding
→to display the contents of the dynamically created DHCP snooping binding table
Free CCNA | DHCP Snooping | Day 50 Lab – Notes
Practice quiz questions
You can find four quiz questions and answers for this lesson in Odom, 2020, pp. 403-405.
Key references
Odom, W. (2020). Chapter 8. DHCP Snooping and ARP Inspection, CCNA 200-301 Official Cert Guide (pp. 401-449), Volume 2. Cisco Press.
Other references/resources
Related content
Compliance frameworks and industry standards
DAI configuration and verification
How data flow through the Internet
How to break into information security
IT career paths – everything you need to know
Job roles in IT and cybersecurity
Switch port security configuration and verification
The GRC approach to managing cybersecurity
The Security Operations Center (SOC) career path
Back to DTI Courses


