This is Part 3 of 3 of my study notes for IPv6 for the CCNA. In Part 1, Introduction to IPv6 for the CCNA, we learned how to do some basic IPv6 router configurations – how to enable IPv6 routing on routers, and how to configure an IPv6 address on the router interface. In Part 2, Configuring IPv6 addresses using EUI-64, we went deeper in IPv6 configuration and learned how to use EUI to configure an IPv6 address on a router interface.
This lesson (Part 3) focuses on CCNA exam topic 3.3 in Section 3.0 IP Connectivity. Topic 3.3 says you must be able to “Configure and verify IPv4 and IPv6 static routing”. First, we look at IPv6 address representation in RFC 5952. Then we briefly cover the IPv6 header. Next we cover neighbor discovery protocol, NDP, which replaced ARP in IPv6. Next we cover SLAAC, Stateless Address Auto-Configuration. Finally, we dive into the main topic of this lesson, IPv6 static routing, and learn IPv6 static route configuration by applying the static routing concepts we learned in IPv4 to IPv6. This post constitutes Issue 27 of my CCNA 200-301 study notes.
- IPv6 address representation in RFC 5952
- IPv6 header
- Solicited-node multicast addresses
- Neighbor discovery protocol (NDP)
- NDP – neighbor solicitation (NS)
- NDP – neighbor advertisement (NA)
- IPv6 neighbor table
- NDP – router solicitation/advertisement
- SLAAC – Stateless Address Auto-Configuration
- Duplicate Address Detection (DAD)
- IPv6 static route configuration
- Static routes types (names)
- Link-local next hops
- Command review
- Key learnings
- Practice quiz questions
- Key references
You may also be interested in CCNA 200-301 study notes.
IPv6 address representation in RFC 5952
In IPv6 Part 1, Introduction to IPv6 for the CCNA, and IPv6 Part 2, Configuring IPv6 addresses using EUI-64, we did not adhere to a specific industry standard regarding how we write IPv6 addresses. From now on, we will try to adhere to the RFC 5952 standard (“A Recommendation for IPv6 Address Text Representation”) when representing IPv6 addresses.
Here are the four key IPv6 address representation requirements according to RFC 5952.
1) Remove leading 0s from the quartets of the address.
2001:0db8:0000:0001:0f2a:4fff:fea3:00b1
→ 2001:db8:0:1:f2a:4fff:fea3:b1
2) Shorten the longest string of all-0 quartets using the double colon. If there is just a single all-0 quartet, do not use the double-colon.
2001:0000:0000:0000:0f2a:0000:0000:00b1
→ 2001::f2a:0:0:b1
3) If there are two equal-length choices for the double colon, use the double colon to shorten the one on the left.
2001:0db8:0000:0000:0f2a:0000:0000:00b1
→ 2001:db8::f2a:0:0:b1
4) Write hexadecimal characters using lower-case (a, b, c, d, e, and f), not upper-case (A,B,C,D,E, and F).
IPv6 header
Here is a brief explanation of the IPv6 header and its fields. It is doubtful you will get any direct questions about the IPv6 header on the CCNA exam. But this is good foundational knowledge for network engineers.
Let’s briefly compare the IPv4 header with the IPv6 header.
Here is the IPv4 header.

And here is the IPv6 header. Notice how the IPv6 header is less cluttered compared to the IPv4 header.
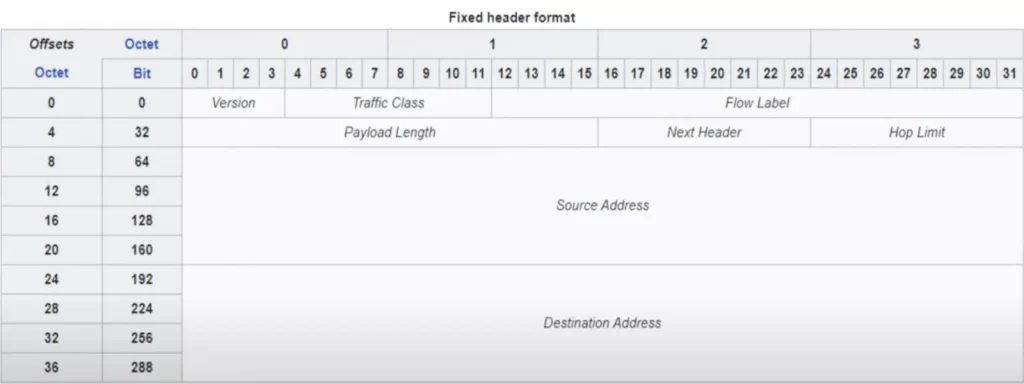
The IPv6 header looks simpler. One thing that makes it simpler is the fact that it has a fixed header format. The IPv4 header has a variable header length, from 20 to 60 bytes. The IPv6 header is always 40 bytes long, regardless of the size of the payload.
The processing of the IPv6 header is much easier for routers, so performance is generally improved.
*IPv6 header – version
The version field is 4 bits in length. It indicates the version of IP that is used. Because this is IPv6, this field will always be set to 6, or binary 0110, indicating IP version 6.
*IPv6 header – traffic class
The traffic class field is 8 bits in length. It’s used for QoS (quality of service) to indicate high-priority traffic. For example, IP phone traffic and live video calls will have a traffic class value which gives them priority over other traffic.
*IPv6 header – flow label
The flow label field is 20 bits in length. It’s used to identify specific traffic flows, which are communications between a specific source and destination, like the interaction between a server and a client downloading a file.
*IPv6 header – payload length
The payload length field is 16 bits in length. It indicates the length of the payload, the L4 segment that is encapsulated in the IPv6 header, in bytes. For example, a value of 1024 in this field would mean that the encapsulated segment is 1024 bytes in length.
*IPv6 header – next header
The next header field is 8 bits in length. It indicates the type of the header of the encapsulated segment, for example TCP or UDP. It has the same function as the protocol field of the IPv4 header.
*IPv6 header – hop limit
The hop limit field is 8 bits. The value in this field is decremented by one by each router that forwards it. If the value reaches 0, the packet is discarded. So, the function is the same as the IPv4 header’s TTL field.
*IPv6 header – source/destination
The last two fields are the source address and destination address fields. They are 128 bits in length each. These fields contain the IPv6 addresses of the packet’s source and the packet’s destination.
Solicited-node multicast addresses
Uses of the solicited-node multicast address include:
- Neighbor Discovery Protocol (NDP): The solicited-node multicast address is an important part of NDP, which replaces ARP in IPv6. Solicited-node multicast addresses are used by NDP to determine the link layer address (MAC address) associated with a given IPv6 address. A host trying to discover the link layer address associated with a given IPV6 address sends a Neighbor Solicitation message to the solicited-node multicast address associated with the target IPv6 address. The neighbor will respond with a Neighbor Advertisement message which includes its link layer address.
- Duplicate Address Detection (DAD): Solicited-node multicast addresses are used by DAD to check if an IPv6 address is already being used by another node on the local link. When a node assigns itself an IPv6 address, it sends a Neighbor Solicitation message to the solicited-node multicast address for that address. If no other node responds, then the node can be sure that the address is not in use.
- Link-local multicast routing: Solicited-node multicast addresses can be used for link-local multicast routing. This is a process by which nodes on the same link can exchange routing information with each other.
- Time synchronization: Solicited-node multicast addresses can be used to synchronize the clocks of nodes on the same link.
First let’s see how the solicited-node multicast address is formed. We will see how it is used when we talk about NDP.
An IPv6 solicited-node multicast address is generated or derived from a unicast address. An IPv6 solicited-node multicast address begins with a fixed prefix, ff02::1:ff, and then appended to this prefix are the last 6 hex digits of the unicast address which the solicited-node multicast address is being generated from.
In the following diagram,
>The first line is the structure of an IPv6 solicited-node multicast address.
>The second line is the unicast address which the solicited-node address is being generated from.
>The third line is the generated IPv6 solicited-node multicast address.
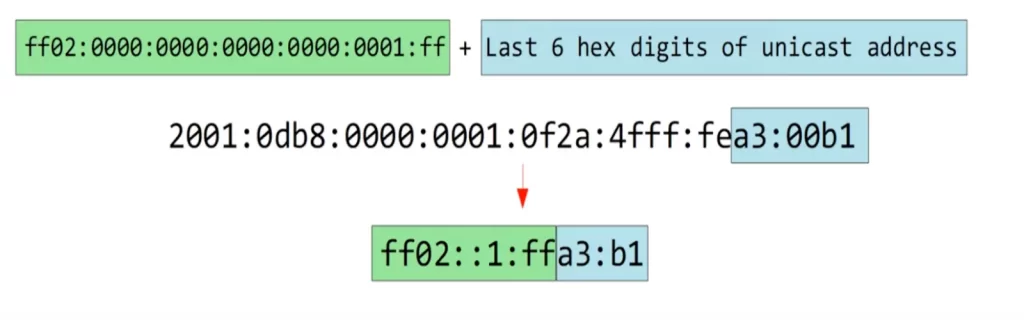
Here’s another example.

We saw the following output in IPv6 Part 2 when talking about IPv6 multicast addresses. We learned that routers join the FF02::1 and FF02::2 multicast groups by default.
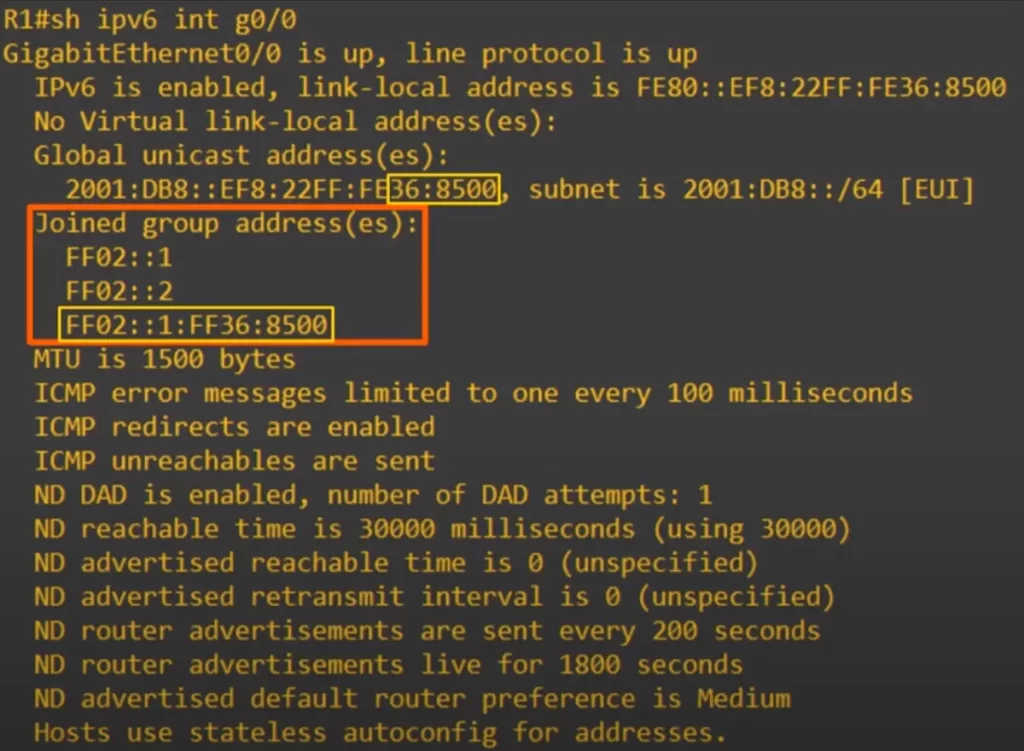
Notice this other multicast group that R1 joined: FF02::1:FF36:8500. That’s a solicited-node multicast address. FF02::1:FF, and then 6 more hex digits. The last six digits are the same as in the global unicast address on the router’s interface.
Neighbor discovery protocol (NDP)
NDP (Neighbor discovery protocol) functions include address resolution/neighbor discovery using NS (neighbor solicitation)/NA (neighbor advertisement) messages, router discovery using RS (router solicitation)/RA (router advertisement) messages, SLAAC (Stateless Address Auto-Configuration), and DAD (Duplicate Address Detection).
Let’s start with discussing address resolution/neighbor discovery using NS/NA messages.
NDP replaced ARP, which is no longer used in IPv6. NDP allows hosts to resolve IPv6 addresses to their corresponding link layer addresses (MAC addresses). This is similar to the function of the ARP in IPv4.
The basic concepts of address resolution in IPv6 are similar to those in IPv4 ARP. Resolution is still dynamic and based on using a cache table (ARP table) that maintains pairings of IPv6 addresses and MAC addresses.
The ARP-like function of NDP uses ICMPv6 and solicited-node multicast addresses to learn the MAC address of other hosts.
Recall, ARP in IPv4 uses broadcast messages for the ARP requests. Solicited-node multicast messages are much more efficient, being addressed to a specific host, unlike a broadcast which is for all hosts.
In the neighbor discovery process, two message types are used.
>The first message is the neighbor solicitation (NS) message, the NDP equivalent of an ARP request. The NDP neighbor solicitation message is ICMPv6 Type 135.
A NS message is sent by a host to determine a remote host’s link layer address. The destination IP address will be the solicited-node multicast address of the remote host.
>The second message is the neighbor advertisement (NA) message, the NDP equivalent of an ARP reply. The NDP neighbor advertisement message is ICMPv6 Type 136.
The neighbor responds to the NS message with a NA message which includes the neighbor’s link layer address.
The host now knows the link layer address of the neighbor, and can use it to send packets to the neighbor.
NDP – neighbor solicitation (NS)
Here’s the basic function of the neighbor solicitation message, the NDP equivalent of an ARP request.

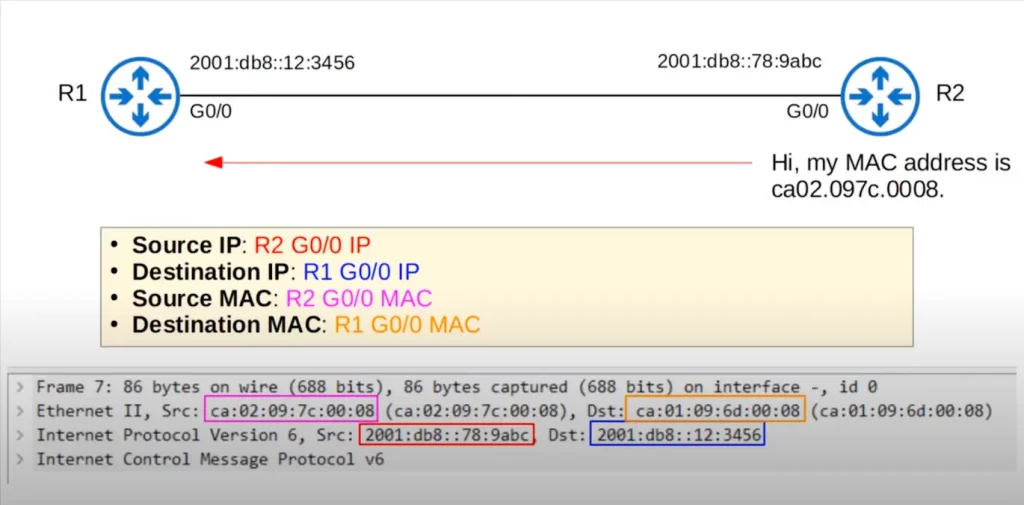
We typed PING 2001:db8::78:9abc on R1 to ping R2 thus generating an IPv6 packet. R1 needs to encapsulate that ping packet from R1 to R2 in an Ethernet frame, so R1 needs to know R2’s MAC address. To ask for R2’s MAC address, R1 will send a neighbor solicitation message (Hi, what’s your MAC address?).
To see how this is different from an ARP request message let’s look at the different addresses in the packet and frame involved in this ping in a Wireshark capture.
>The source IP is R1’s IP address. That’s the same as ARP.
>The destination IP address, however, is R2’s solicited-node multicast address. R1 was able to automatically calculate R2’s solicited-node multicast address from R2’s global unicast address.
>The source MAC is the MAC address of R1’s G0/0 interface. That’s the same as in ARP as well.
>The destination MAC address is a multicast MAC address based on R2’s solicited-node multicast address. In Wireshark this address is displayed as IPv6mcast_ff:78:9a:bc, but to the right you can see the real multicast MAC address in brackets.
You do not need to study multicast MAC addresses for the CCNA.
But remember that the ARP request is broadcast, and the neighbor solicitation is multicast, which is more efficient.
NDP – neighbor advertisement (NA)
Now let’s see the neighbor advertisement message, the NDP equivalent of an ARP reply.
R2 received a message from R1 (a neighbor solicitation message) asking for the MAC address of R2. Now R2 will reply.
Let’s see the different addresses in the message.
>R2 will send the neighbor advertisement message using its G0/0 IP address as the source.
>The destination IP will be R1’s G0/0 IP address. R2 knows R1’s IP address because it was the source address of the solicitation message.
>The source MAC will be R2’s G0/0 MAC address.
>The destination MAC will be R1’s MAC address. R2 knows R1’s MAC address because R1 used it as the source for the solicitation message.
IPv6 neighbor table
In IPv6 communications, routers maintain an IPv6 neighbor table rather than an ARP table. All devices running IPv6 will use NDP and keep a neighbor table.
Let’s look at R1’s IPv6 neighbor table with the command SHOW IPV6 NEIGHBOR.
>First, the IPv6 Address column. R1 has an entry for both, R2’s global unicast address (2001:DB8::78:9ABC) and its link-local address. R1 learned that link-local address automatically, we did not ping it.

>Next, the Age column indicates how long ago in minutes R1 received traffic from these addresses.
>The Link-layer address column shows R2’s MAC address. The Interface column shows the interface this entry was learned on. The State column indicates that the neighbor is reachable.
This is R2’s neighbor table.

NDP – router solicitation/advertisement
NDP allows hosts to automatically discover routers on the local network.
Two messages are used in the router discovery process.
>The first message, router solicitation (RS), is ICMPv6 Type 133. RS messages are sent to multicast address FF02::2, the all routers address. RS messages ask routers on the local link, the local network, to identify themselves. This message type is sent when an interface is enabled or when the host is connected to the network.
>The second kind of message is the router advertisement (RA), ICMPv6 Type 134. RA messages are sent to multicast address FF02::1, the all nodes address. So these messages are received by all hosts on the local link, not just routers. Using this message, the router announces its presence and provides some other information about the link, the local network, such as the prefix of the network, the flags that are associated with the prefix, and the reachable time.
Routers send RA messages in response to RS messages. But even if the router does not receive an RS, it will send RAs periodically.
Let’s say we enable R2’s G0/0 interface. R2 automatically sends an RS message asking if there are any routers on the link. R1 replies, identifying itself.

Hosts can automatically learn their default gateway from these RA messages.
Although only routers send router advertisements, all IPv6 hosts send router solicitations when they come online.
Let’s see another purpose for the RS and RA messages.
SLAAC – Stateless Address Auto-Configuration
NDP allows hosts to automatically configure their own IPv6 addresses without the need for a DHCP server.
SLAAC is another way to configure IPv6 addresses. SLAAC is a standard function of IPv6. It can be used on end hosts like PCs.
When using SLAAC, hosts use the RS and RA messages to learn the IPv6 prefix of the local link, e.g., 2001:db8::/64. The network prefix is a portion of the IPv6 address that is shared by all hosts on the network. A host then automatically generates its own IPv6 address by combining the network prefix with a unique identifier, such as its MAC address.
As we learned in IPv6 Part 2, when using the IPv6 address eui-64 command we have to manually enter the prefix:
Router(config-if)#ipv6 address network prefix/prefix-length eui-64
However, the command for SLAAC, IPV6 ADDRESS AUTOCONFIG, does not need the prefix. The devices use NDP to learn the prefix used on the local link, via the RS and RA messages.
The ipv6 address autoconfig command tells the device to use SLAAC to configure its IPv6 address. The device will use EUI-64 to generate the interface ID, or it can be randomly generated, depending on the device and maker.
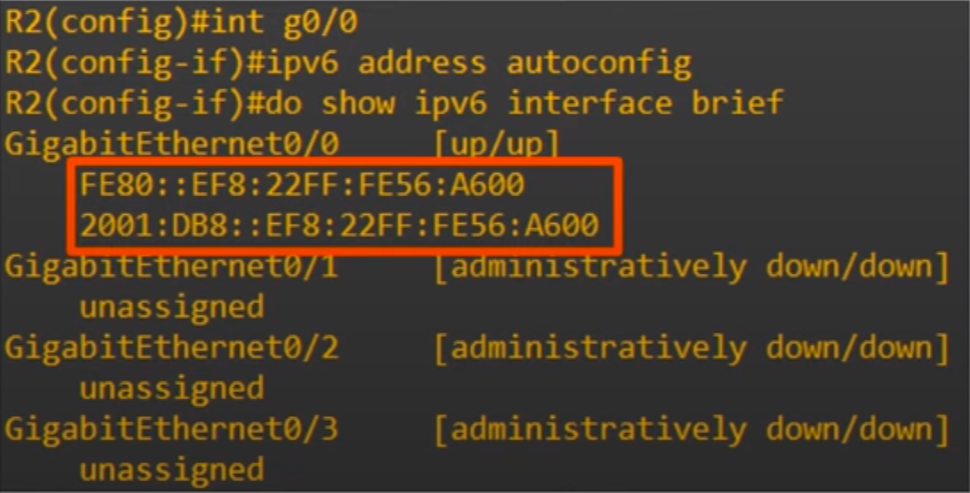
Let’s see that on a Cisco router.
R1 is connected to R2. R1 is configured with an IPv6 address, but R2 does not have an IP address yet. We use the command IPV6 ADDRESS AUTOCONFIG on R2’s G0/0 interface. As you can see, the global unicast address it generated, and the link-local address of course.
Duplicate Address Detection (DAD)
Duplicate Address Detection, DAD, is another function of NDP. DAD allows hosts to check if other devices on the local link are using the same IPv6 address.
DAD helps to prevent hosts from configuring duplicate IPv6 addresses on the same network. Any time an IPv6-enabled interface initializes, for example via the NO SHUTDOWN command, or an IPv6 address is configured on an interface, for example a manual IPv6 address, or a SLAAC address, the device performs DAD to check if another device is using that same IPv6 address.
For this function, DAD uses the two message types neighbor solicitation (NS) and neighbor advertisement (NA).
To perform DAD, the host will send an NS to its own IPv6 address, its own solicited-node multicast address. If it does not get a reply it knows the address is unique. If it does get a reply, a neighbor advertisement message, it means that another host on the network is already using the address.
On a Cisco router, you’ll get a message like this if a duplicate address is detected:

IPv6 static route configuration
This discussion focuses on IPv6 static routing but also discusses static routes in general.
The ensuing discussion focuses on three types of IPv6 static routes: directly attached, recursive, and fully specified. We look at how to configure IPv6 static routing: default, network, host, and floating static. All of those types of routes and configuration methods apply to both IPv4 and IPv6.
IPv6 routing works the same as IPv4 routing. When a packet arrives at a router’s interface, the router searches its routing table for the destination IP address. The router then forwards the packet according to the longest prefix match in the routing table.
Although IPv6 routing is similar to IPv4 routing, the two processes are handled separately on the router, and the two routing tables are also separate.
You can view a router’s IPv6 routing table with command SHOW IPV6 ROUTE.
On Cisco routers, IPv4 routing is enabled by default, while IPv6 routing is disabled by default and must be enabled with the IPV6 UNICAST-ROUTING command.
If IPv6 routing is disabled, the router will send and receive IPv6 traffic, but will not route IPv6 traffic, meaning it will not forward traffic between networks.
To demonstrate IPv6 routing, we’ll use this network.

But before we configure static routes on our example network, let’s check out R1’s IPv6 routing table as it is now. Here it is.
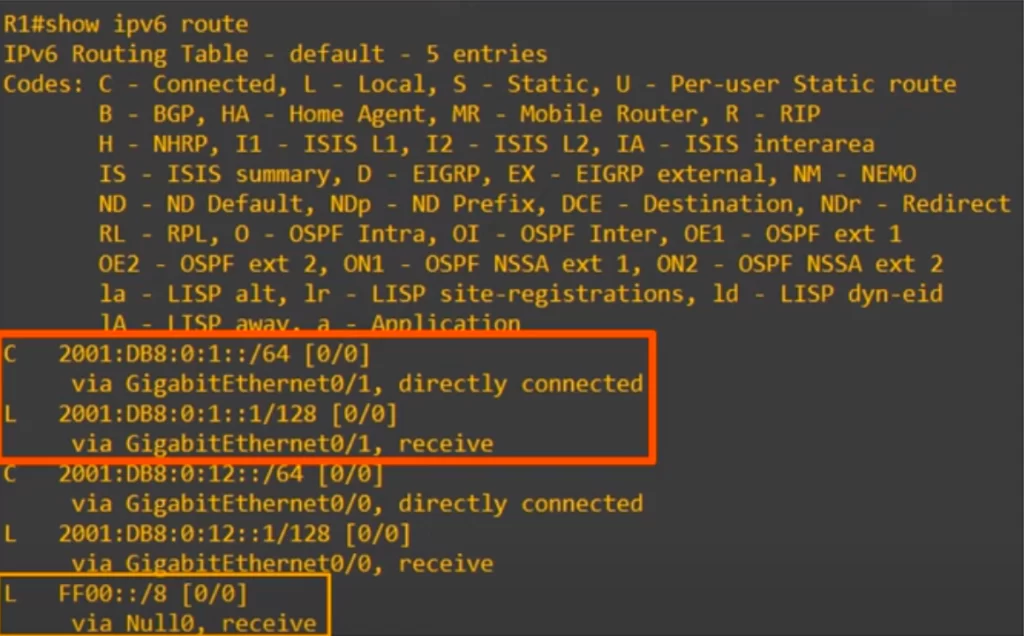
Just like in IPv4, a connected network route is automatically added for each connected network. A connected network route is a route that is automatically added to the routing table for each network that is directly connected to the router. This means that the router knows how to reach any device on the connected network without having to learn about it from a routing protocol.
The connected network route is added to the routing table when the router is configured with an IP address for an interface. The routing table entry for the connected network route will have a metric of 0, which means that it is the most preferred route to the connected network.
Also, a local host route is automatically added to the routing table for each address configured on the router interface. This is the same as in IPv4. A host route is a route to a single specific host, using a /32 prefix length in IPv4 or a /128 prefix length in IPv6.
In the red rectangle in the above diagram, you can see the connected and local routes that were automatically configured for R1’s G0/1 interface. A /64 connected network route, and a /128 local host route.
Notice the route to FF00::/8 in the yellow rectangle, that’s the IPv6 multicast range. It says via Null0, which is an interface that discards multicast traffic matching that route. This route was automatically configured, but it’s beyond the scope of the CCNA.
Routes for link-local addresses are not added to the routing table. R1’s G0/0 and G0/1 both have link local addresses on them, but those routes don’t appear in the routing table.
Now let’s look at how to configure IPv6 static routes on our example network.
Here is the IPv6 static route command, entered from global configuration mode.

If you have not seen a command written like this before it might be difficult to understand.
This first part of the command syntax enclosed in a red rectangle is easy enough to understand (see Command syntax conventions).

Now this next part in the curly brackets:

Curly brackets mean a required choice. So you have to enter either a next-hop address, or an exit-interface with an optional next hop. The square brackets mean the next-hop is optional if you enter an exit interface.
Finally, you can see AD (administrative distance) in square brackets, meaning this is optional too.
You need to enter the AD to configure a floating static route.
Each of these kinds of static routes have a name, depending on if you specify just the exit interface, just the next hop, or both. These names – these types of static routes – also apply to IPv4.
Static routes types (names)
Here is our sample network again.
You can have directly attached, recursive, and fully specified static routes.
>First, a directly attached static route is a route where only the exit interface is specified. The command is:

For example, on R1 you might use the following command to reach the network connected to R3.
R1(config)#ipv6 route 2001:db8:0:3::/64 g0/0
But in IPv6, you cannot use directly attached static routes if the interface is an Ethernet interface. G0/0 stands for GigabitEthernet0/0, so the command will not work.
The router will let you enter the command, you can “configure” the route on the router, but the route will not work. R1 will not send the packet. If it was a serial interface, the command would work.
Although directly attached static routes work on Ethernet interfaces when using IPv4, they do not work in IPv6.
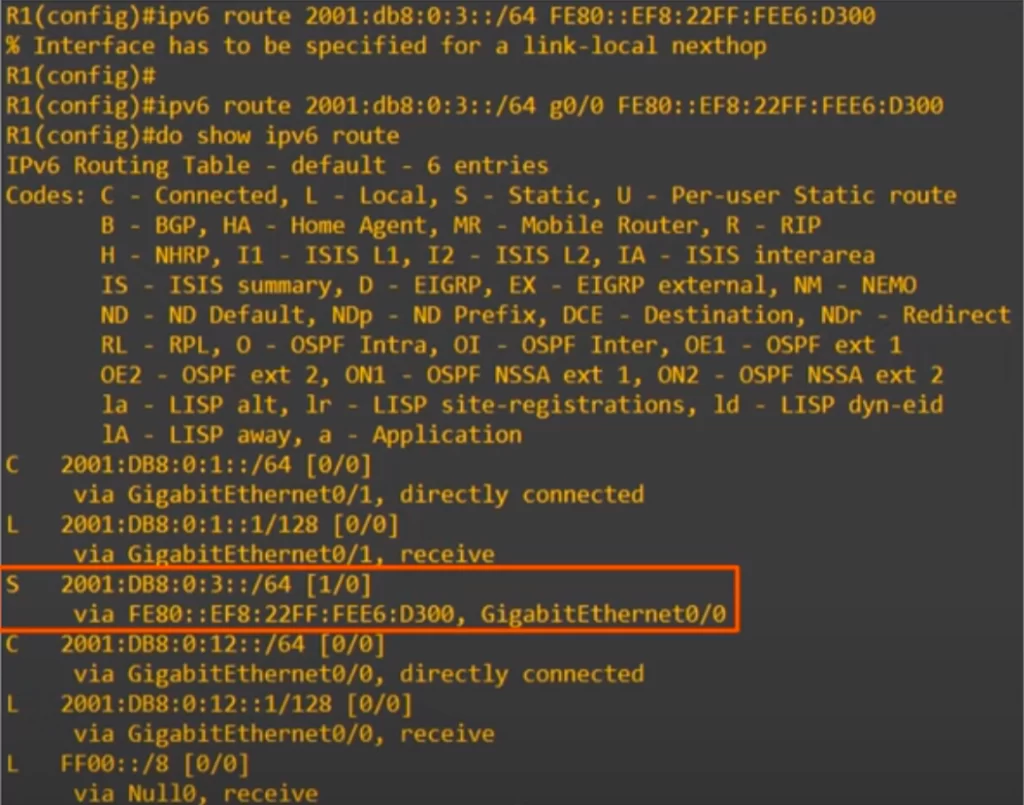
>Second, a recursive static route, which specifies only the next hop address. The command is:

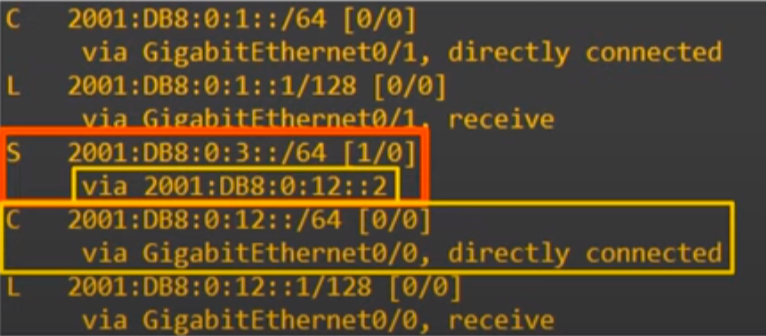
On R1, you might use the command IPV6 ROUTE 2001:db8:0:3::/64, using R3’s LAN as the destination. And then 2001:db8:0:12::2, telling R1 to send the packet to next-hop R2.
R1(config)#ipv6 route 2001:db8:0:3::/64 2001:db8:0:12::2
This type of static route is called recursive because the route requires a recursive lookup in the routing table: R1 has to check its routing table multiple times. First, it has to look up the destination. Then it has to look up the next hop to know which interface to send the traffic out of.
Let’s demonstrate. Here’s R1’s routing table after configuring that route.
If R1 receives a packet destined for PC2’s address, the only match is that route we just configured. It says the next hop is 2001:db8:0:12::2 (in the red rectangle). So R1 has to look up that address. R1 finds a matching entry (shown in the big yellow rectangle), so it knows that it should send the packet out of the G0/0 interface. That’s a recursive lookup.
>The third type of static route is the fully specified static route, when both the exit interface and next hop are specified. The command is:

For example, to reach that same network from R1 we enter the command:
R1(config)#ipv6 route 2001:db8:0:3::/64 g0/0 2001:db8:0:12::2
Try to remember these three kinds of static routes, and remember that these are the same for both IPv4 and IPv6.
Now let’s look at an example IPv6 route configuration from each type in the CCNA exam topics list.
>Network route, a route to a specific subnet. We configured the route as shown in the diagram below on R1. IPv6 ROUTE 2001:db8:0:3::/64, which is the network connected to R3. Then we specified the next hop, 2001:db8:0:12::2, which is R2’s G0/0 interface. This tells R1: if you receive a packet with a destination in this network, send the packet to R2.
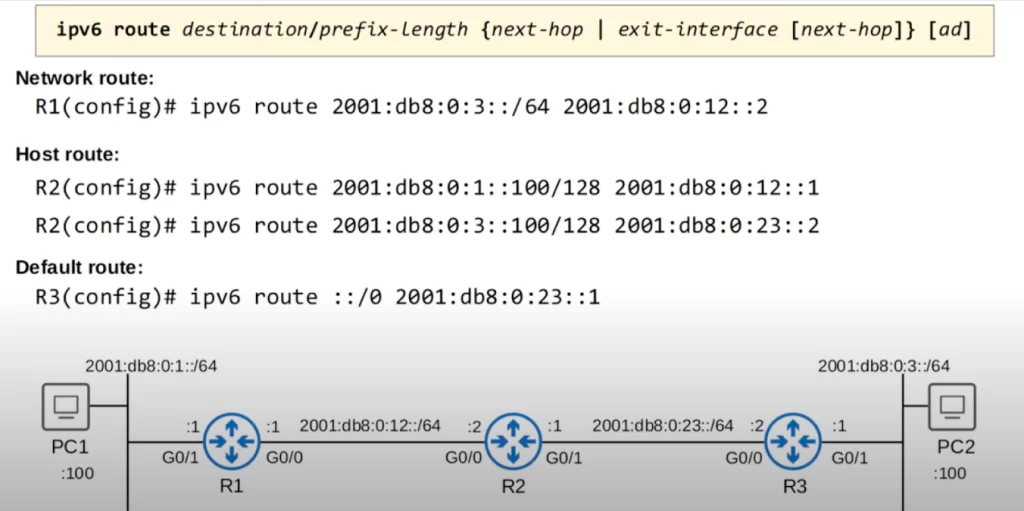
>Host route, a route to a single specific host. We configured host routes on R2, one to PC1 and one to PC2. The first entry under the heading Host route in the above diagram is the route to PC1, and the second entry right below it is the route to PC2. This demonstrates how to configure host routes in IPv6, using a /128 prefix length.
>Default route. Look at the entry under the heading Default route in the above diagram. Notice the ::/0 which is like 0.0.0.0/0 in IPv4.
The four IPv6 static routes we just configured are all recursive, they all specify only the next hop.
>Floating static route. The above example network does not need floating static routes. But we can configure a floating static route – by raising the AD, we can make static backup routes, called floating static routes.
If the main route to the destination was learned via OSPF, for example, we would need to set the static route’s AD to higher than 110, because OSPF’s AD is 110. If the main route to the destination was learned via EIGRP, we would need to set the static route’s AD to higher than 90 because EIGRP’s AD is 90. We set the AD to higher than the main route.
Link-local next hops
On R1, we tried to configure a route to R3’s network using R2’s link-local address as a next hop. We got an error message: “Interface has to be specified for a link-local nexthop”.
To use a link-local address as a next-hop of an IPv6 static route, we have to specify both the next hop address and the exit interface (so this is a fully specified static route):

We specify the exit interface because with a link-local next-hop address the router on its own is not able to know which interface the next-hop address is connected to.
Here’s that route in the routing table.
Command review
R#show ipv6 interface interface
→to identify multicast configuration in the CLI (the multicast groups the router has joined on this interface)
R#show ipv6 neighbor
→to check the router’s IPv6 neighbor table (a mapping of IPv6 addresses to link-layer addresses)
>SLAAC – Stateless Address Auto-Configuration:
When using the IPv6 address eui-64 command we have to manually enter the prefix:
R(config-if)#ipv6 address network prefix/prefix-length eui-64
However, the command for SLAAC does not need the prefix:
R(config-if)#ipv6 address autoconfig
The devices use NDP to learn the prefix used on the local link, via the router solicitation and router advertisement messages.
R(config-if)#do show ipv6 interface brief
→check the router’s link local address
>IPv6 static route configuration:
R#show ipv6 route
→to view a router’s IPv6 routing table
R(config)#ipv6 unicast-routing
→to enable IPv6 routing on the router
>How to configure IPv6 static routes:
R(config)#ipv6 route destination/prefix-length {next-hop | exit interface [next-hop]} [ad]
*A directly attached static route is a route where only the exit interface is specified. In IPv6, you cannot use directly attached static routes if the interface is an Ethernet interface.
*A recursive static route, which specifies only the next hop address.
*A fully specified static route, when both the exit interface and next hop are specified.
Let’s look at an example IPv6 route configuration from each type in the CCNA exam topics list: network route, host route, default route, and floating static route.
The four IPv6 static routes configured in the above diagram are all recursive, they all specify only the next hop.
Note, enter the AD to configure a floating static route.
R#show running-config | [include ipv6 route]
→to check whether the router has floating static route
>To use a link-local address as a next-hop of an IPv6 static route: we have to specify both the next hop address and the exit interface (so this is a fully specified static route).
Free CCNA | Configuring IPv6 (Part 3) | Day 33 Lab – Notes
Key learnings
*IPv6 address representation in RFC 5952 – the key rules for writing IPv6 addresses.
*IPv6 header structure – the key fields of the IPv6 header.
*NDP (neighbor discovery protocol) functions:
- Address resolution/neighbor discovery using NS/NA messages
- Router discovery using RS/RA messages
- SLAAC
- DAD
*How to configure an IPv6 address using SLAAC – how RS/RA messages allow hosts on the network to use SLAAC to learn the network prefix and automatically configure an IPv6 address.
*How to configure IPv6 static routes: directly attached, recursive, fully specified.
*How to configure IPv6 static routing: default, network, host, floating static.
Practice quiz questions
Quiz question 1
R2 sends a message to R1, to tell R1 about the MAC address on R2’s G0/0 interface. What kind of message does R2 send to R1?
A. RA (router advertisement)
B. NA (neighbor advertisement)
C. RS (router solicitation)
D. NS (neighbor solicitation)
The answer is B, NA. R1 would have sent a NS message to R2 to learn R2’s MAC address. In response, R2 sends a NA to R1, telling R1 about the MAC address on its interface. This is like the ARP function of IPv4. RS and RA are also part of NDP but have a different function.
You can find four more practice questions for this lesson (plus a bonus one) in Jeremy’s video lesson IPv6 Part 3, cited below.
Key references
Note: The resources cited below (in the “Key references” section of this document) are the main source of knowledge for these study notes/this lesson, unless stated otherwise.
Free CCNA | IPv6 Part 3 | Day 33 | CCNA 200-301 Complete Course
Free CCNA | Configuring IPv6 (Part 3) | Day 33 Lab | CCNA 200-301 Complete Course
Related content
Compliance frameworks and industry standards
Configuring IPv6 addresses using EUI-64
How data flow through the Internet
How to break into information security
Introduction to IPv6 for the CCNA
IT career paths – everything you need to know
Job roles in IT and cybersecurity
The GRC approach to managing cybersecurity
The penetration testing process
The Security Operations Center (SOC) career path
Back to DTI Courses


