This is an introduction to the Cisco IOS CLI and basic device security configuration. This post constitutes Issue 1 of my CCNA 200-301 study notes.
- What is a CLI?
- Connecting to a Cisco device via the console port
- Terminal Emulator (PuTTY)
- User EXEC mode
- Privileged EXEC mode
- Cisco IOS CLI shortcuts
- Command syntax conventions
- Global configuration mode
- enable password command
- show running-config and show startup-config commands
- Saving the configuration
- service password-encryption command
- enable secret command
- Canceling commands
- Review CLI command modes
- Review CLI commands
- Packet Tracer lab (basic device security)
- Key references
You may also be interested in CCNA 200-301 study notes.
What is a CLI?
Let’s get started with configuring some Cisco devices.
This lesson is about the Cisco IOS CLI. Cisco IOS is the operating system used on Cisco devices. IOS stands for Internetworking Operating System.
CLI stands for Command-Line Interface. CLI is the interface used to configure Cisco devices like routers, switches, and firewalls.
There is also a GUI or Graphical User Interface. The Cisco Adaptive Security Device Manager (ASDM) is an example of a Cisco device that uses GUI. ASDM can be used to configure Cisco’s firewalls. We are not discussing GUI in this lesson.
This is what a Cisco IOS CLI looks like:
Connecting to a Cisco device via the console port
There are a couple of methods to connect to a Cisco device to configure it with the CLI. First, remotely via Telnet or SSH. Second, locally via the console port. Here we will discuss connecting via the console port.
Connecting to a Cisco device via the console port typically involves bringing your laptop to the device and connecting to the console port of the device.
This is a Cisco Catalyst switch. Notice the two console ports: one is an RJ45 (Registered Jack), the other is a USB Mini-B.
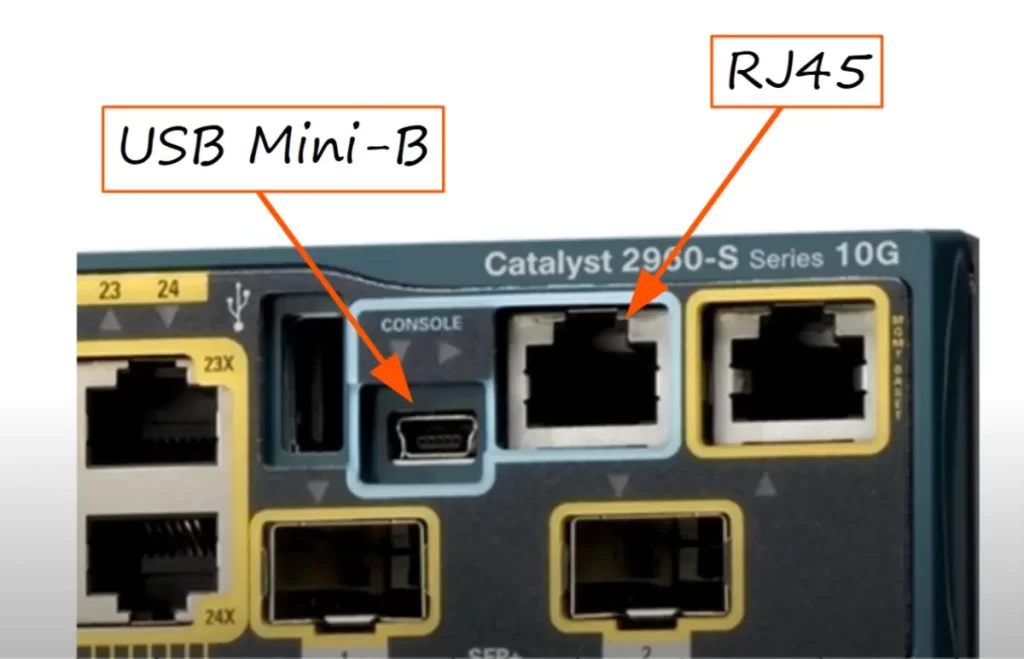
Let’s say we’re going to connect to the RJ45 port. We will need the proper cable. A rollover cable can be used to connect to the RJ45 console port on a Cisco device.
A rollover cable has on one end an RJ45 connector and on the other end a DB9 connector. Most modern laptops do not have a serial port a DB9 connector can be plugged into. So you might need an adapter to connect to a USB port on a laptop.
This image shows the wiring in a rollover cable. Like in an Ethernet UTP cable there are eight pins on each end that are used.

So we’ve connected a laptop/computer to a Cisco Catalyst device via the device’s RJ45 port.
Terminal Emulator (PuTTY)
Once you have connected your computer to the device you can access the CLI using a Terminal Emulator.
PuTTY is a popular choice. You can get PuTTY at putty.org
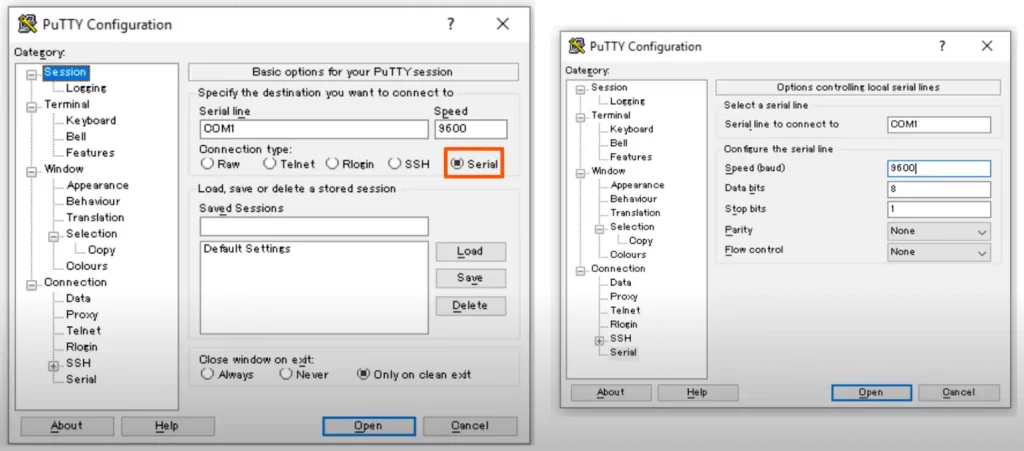
We are using PuTTY for our current demonstration. Select Serial and click Open and you should be connected to the CLI. You should be able to connect with the default settings. But you can click Serial and you can view and edit the default setting for the serial connection.
These settings match the defaults on Cisco devices. Try to remember the defaults for the CCNA test – the speed or baud rate (9600), data bits (8), stop bits (1), parity (none), and flow control (none).
Understanding data bits and stop bits is outside the scope of the CCNA, but the idea is that for each 8 bits of data 1 stop bit is sent to mark the end of the 8 bits. Parity is used to detect errors. Flow control pertains to the flow of data from transmitter to receiver.
Once you connect to the Cisco device (e.g., a Cisco ISR router) you will be greeted with a screen like this:
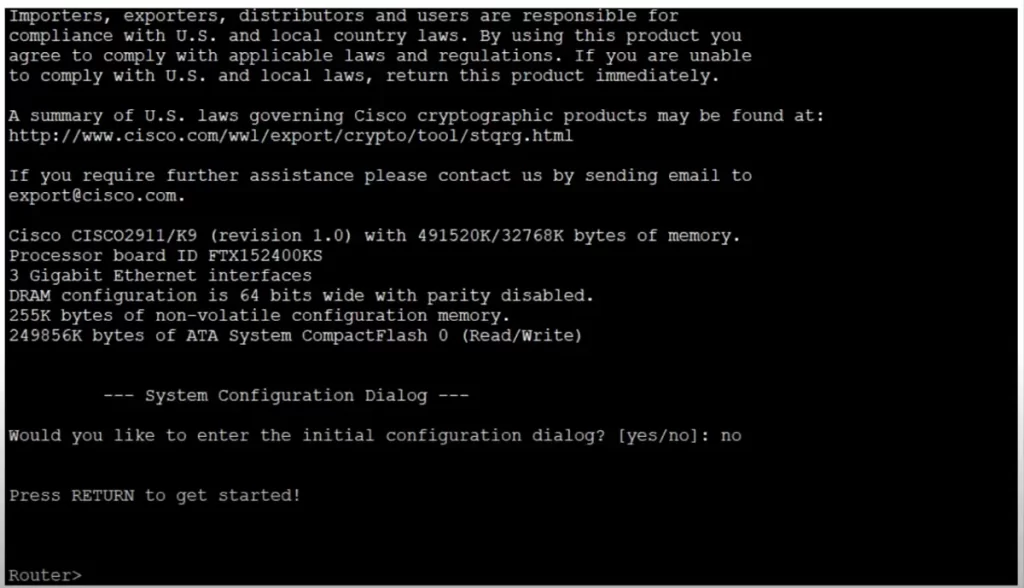
Since this is the first time booting the device, you are asked to enter the initial configuration dialogue. Answer no. As per the screen instructions, press the enter key (RETURN) to get started. Now you can start typing commands in the CLI.
FYI – The steps to connect to a Cisco device remotely using SSH:
1. Gather the necessary equipment:
- A Cisco device with SSH enabled
- A computer with an SSH client software (such as PuTTY)
- An Internet connection
2. On the computer, open the SSH client software.
- In PuTTY, select “SSH” from the “Connection type” drop-down list.
- In the “Host name” field, enter the IP address or hostname of the Cisco device.
- In the “Port” field, enter 22. This is the default port for SSH.
- Click “Open”.
3. The SSH client software will open and you will be prompted to enter a username and password. Enter the username and password that you configured on the Cisco device.
4. Once you are logged in, you will be able to use the Cisco CLI to configure the device.
User EXEC mode
When you first enter the CLI, you will be by default in the user EXEC mode (also called user mode).
User EXEC mode is indicated by the greater than symbol, after the host name of the device:
Router>
The default host name for this device is Router. The name preceding the greater than symbol always indicates the host name of the device.
User EXEC mode is very limited. Users can look at some settings but cannot make any changes to the configuration. Usually you don’t do anything in this mode.
Let’s move on to a mode with a little more power to make changes to the device.
Privileged EXEC mode
If you enter the enable command in user mode, you will be placed in privileged EXEC mode.
Router>enable (press enter to enter privileged EXEC mode)
Router#
In privileged EXEC mode, a pound sign or hashtag is displayed.
Privileged EXEC mode provides complete access to view the device’s configuration, restart the device, change the time on the device, and save the current configuration file.
But it is not the mode in which you change the configuration.
Cisco IOS CLI shortcuts
A comparison of the commands available in user mode and privileged EXEC mode:
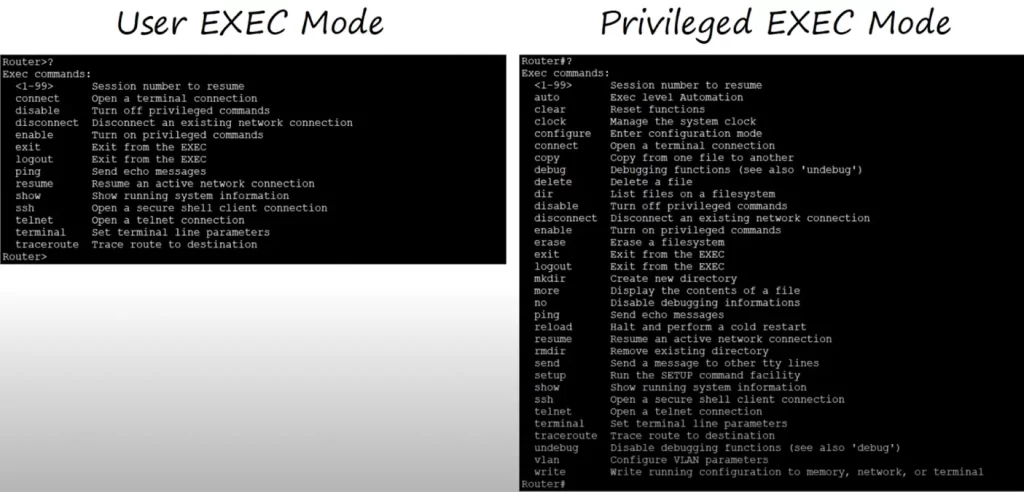
This comparison table was produced by Cisco Packet Tracer software. The tasks discussed in this lesson can be done with Packet Tracer to an adequate approximation to real, physical Cisco devices being configured by a Terminal Emulator/PuTTY.
You can use the question mark to view the commands available to you. Examples:
Router>?
and
Router#?
The tab key is a convenient feature of the CLI. If you press the tab key after typing “Router>en”, the CLI will complete the word and display the complete word on a new line:
Router>en
Router>enable
Router# (you’ve entered privileged EXEC mode)
You do not need to type the complete command. Hit enter after “Router>en” and you will be brought to privileged EXEC mode.
“en” was enough for the router to understand that what was meant by en was enable because enable was the only command that begins with en that can be entered in user mode. If we typed just e:
Router>e (and we press enter) we get a message:
% Ambiguous command: “e”
Router>
There is more than one command that begins with e. We can view the commands that begin with e by using the question mark:
Router>e?
enable exit
Router>e
The shortest form of the enable command is en. The shortest for the exit command is ex.
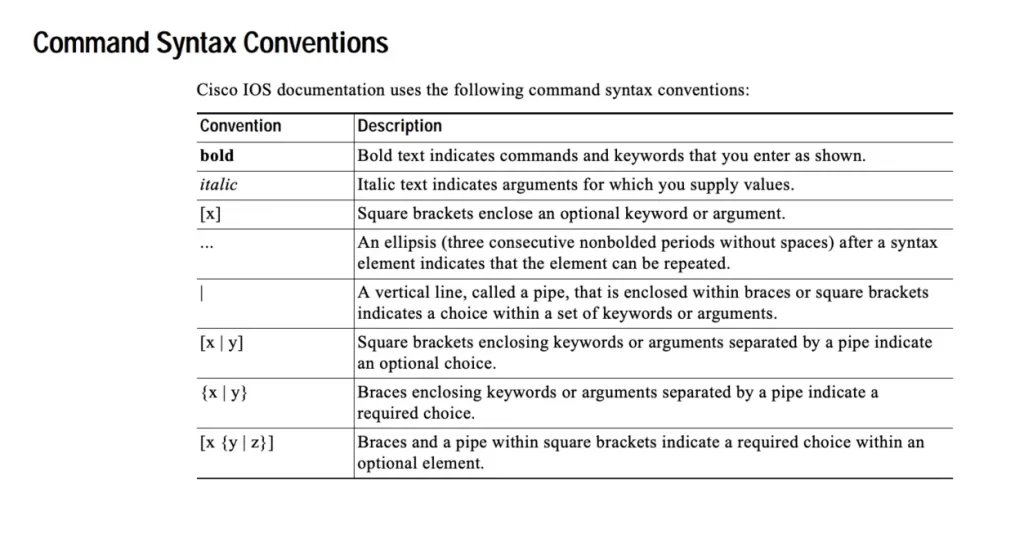
Command syntax conventions
Cisco IOS Command Reference uses certain conventions to present command syntax.
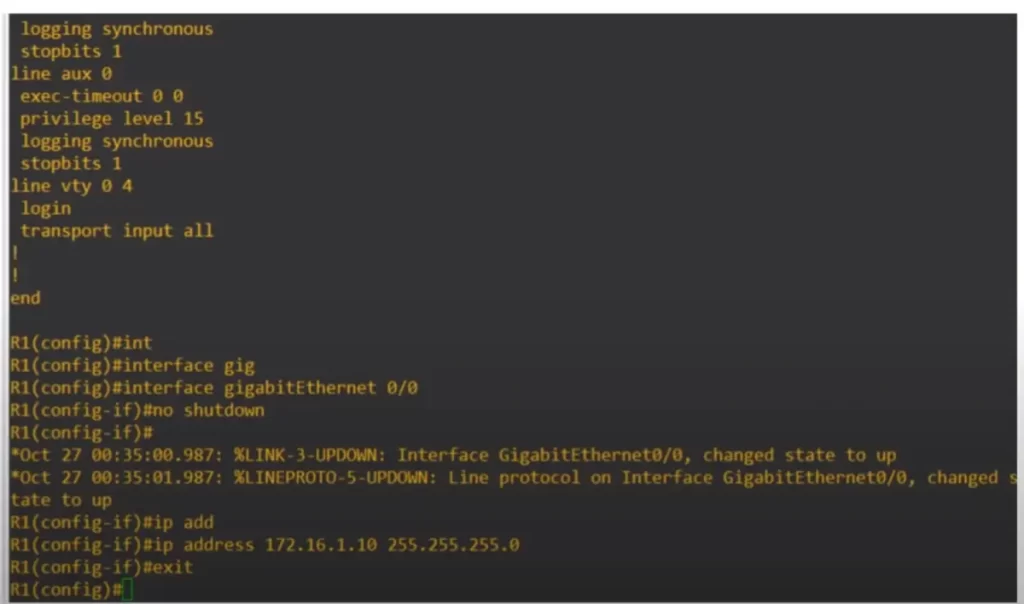
Global configuration mode
Now let’s make some changes to the router configuration. We need to enter global configuration mode.
Router#configure terminal (the command to enter global configuration mode)
Or
Router#conf t (shortcut for configure terminal)
Router(config)# (now we are in global configuration mode)
In global configuration mode, config is inserted after the host name.
enable password command
We need to restrict access to the network configuration to authorized personnel only. We can protect privileged EXEC mode with a password, so that if a user enters the enable command from the user EXEC mode they are asked for the password. This can be done with the command enable password in global configuration mode.
To know what enable password command options are available, we type the enable password command followed by a question mark:
Router(config)#enable password ?
(If we don’t leave a space between password and ? the terminal will show the command options that only contain the word password, which is only password.)
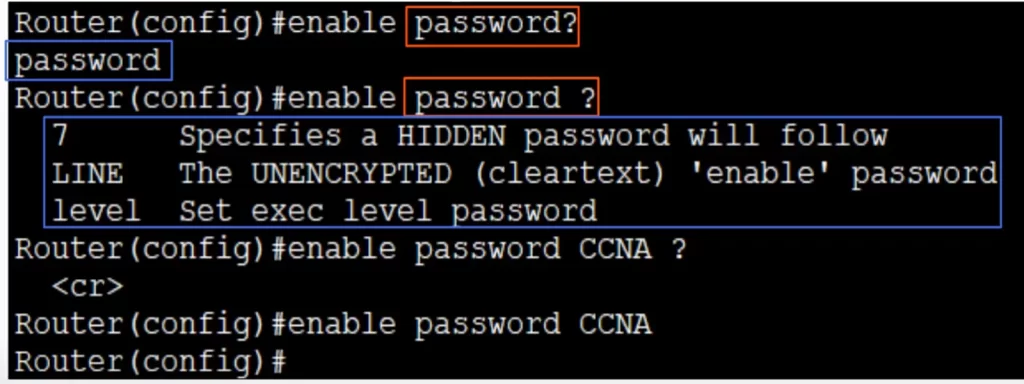
We get three possible options for password to enter in the command. We are going to use the middle option – the unencrypted cleartext password. “LINE” (all capital letters) means you type a line which will become the password.
We will type CCNA all capitals as the password. Passwords are case sensitive. We typed the question mark to know what command options exist. <cr> means there are no other options. The only option is to press enter. We press enter to set the password. And the password is set.
To return to privileged EXEC mode, type exit:
Router(config)#exit
Router#
From privileged EXEC mode, another exit command will log us out and back to the starting screen. Then if we press return, we are back in user mode. Now if we enter the enable command to enter privileged EXEC mode, we are asked for a password.
Router>enable
Password:
Router#
We enter CCNA though it does not display for security reasons, but it is accepted and we are (back) in privileged EXEC mode.
If you enter the wrong password three times you will be denied access for having bad secrets:
Router>enable
Password:
Password:
Password:
% Bad secrets
To recap–
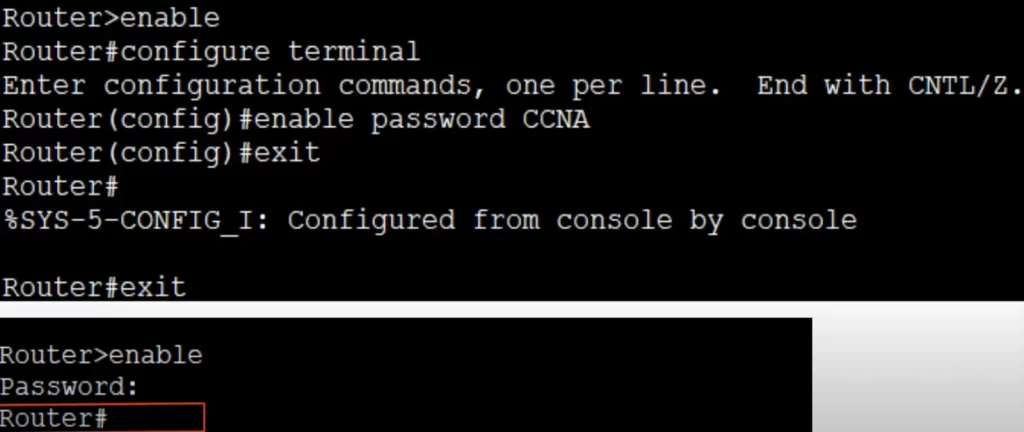
*We used the enable command to enter privileged EXEC mode from user mode.
*From privileged EXEC mode we used configure terminal to enter global configuration mode.
*In global configuration mode, we used the command enable password CCNA to protect privileged EXEC mode with a password.
*Then we typed exit to return to privileged EXEC mode.
*And exit again to return to user EXEC mode.
*We typed enable again and entered the password CCNA and we were brought back to privileged EXEC mode.
show running-config and show startup-config commands
We have confirmed the function of the password, but let’s check the configuration file.
There are two separate configuration files kept on a Cisco device at once:
- running-config – the current active configuration file. As you enter commands in the CLI, you edit the active configuration.
- startup-config – the configuration file that will be loaded upon restarting the device.
Use the show running-config command in privileged EXEC mode to view the running configuration file. The IOS CLI will return several results among them the command we entered, i.e., enable password CCNA.
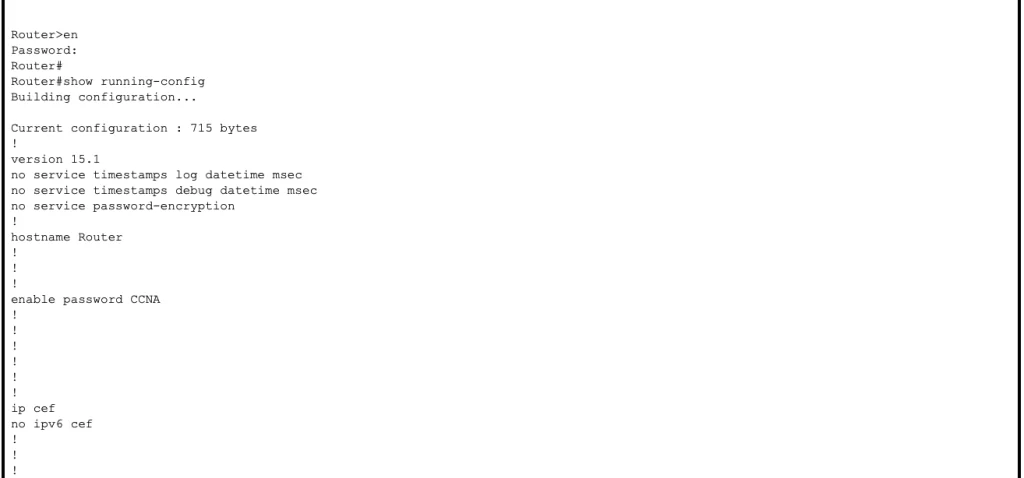
Use the show startup-config command in privileged EXEC mode to view the startup configuration file.
Note, if you did not yet save the running configuration you will get a response that startup config is not present.
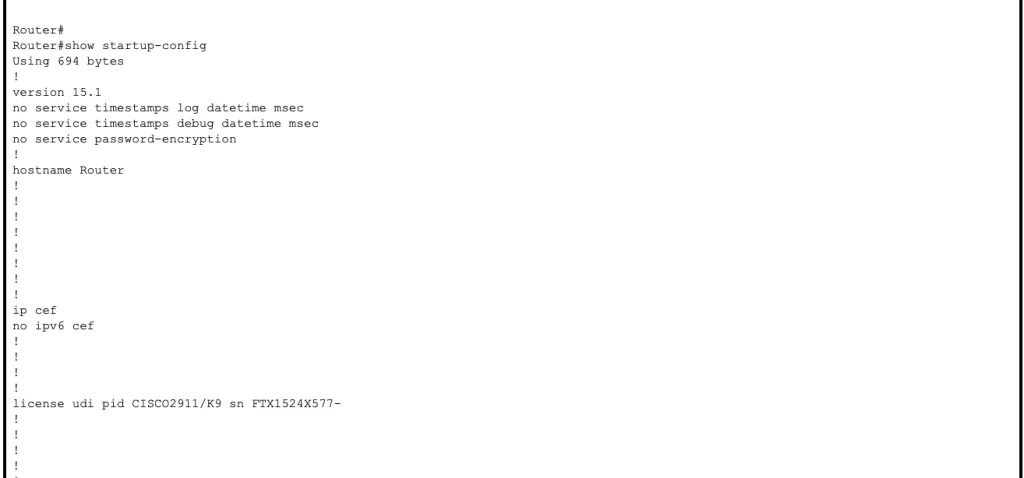
Saving the configuration
There are three commands you can use from privileged EXEC mode to save the running configuration to make it the startup configuration.

Now if we use the show startup-config command, the IOS CLI will display the same configuration as the show running-config command.
The CLI output of show running-config displays the enable password “CCNA” in plain text. This is a security risk. An unauthorized person may be able to use this knowledge to enter privileged EXEC mode and then global configuration mode and change the configuration of the router.
service password-encryption command
So how to level up the security? With the service password-encryption command in global configuration mode.
Router#conf t
Router(config)#service password-encryption
The service password-encryption command will encrypt passwords. If we run the command and enter the show running-config command again, we will see that “enable password CCNA” has become “enable password 7 08026F6028”. The 7 denotes the type of encryption applied to the password, a Cisco proprietary encryption algorithm.
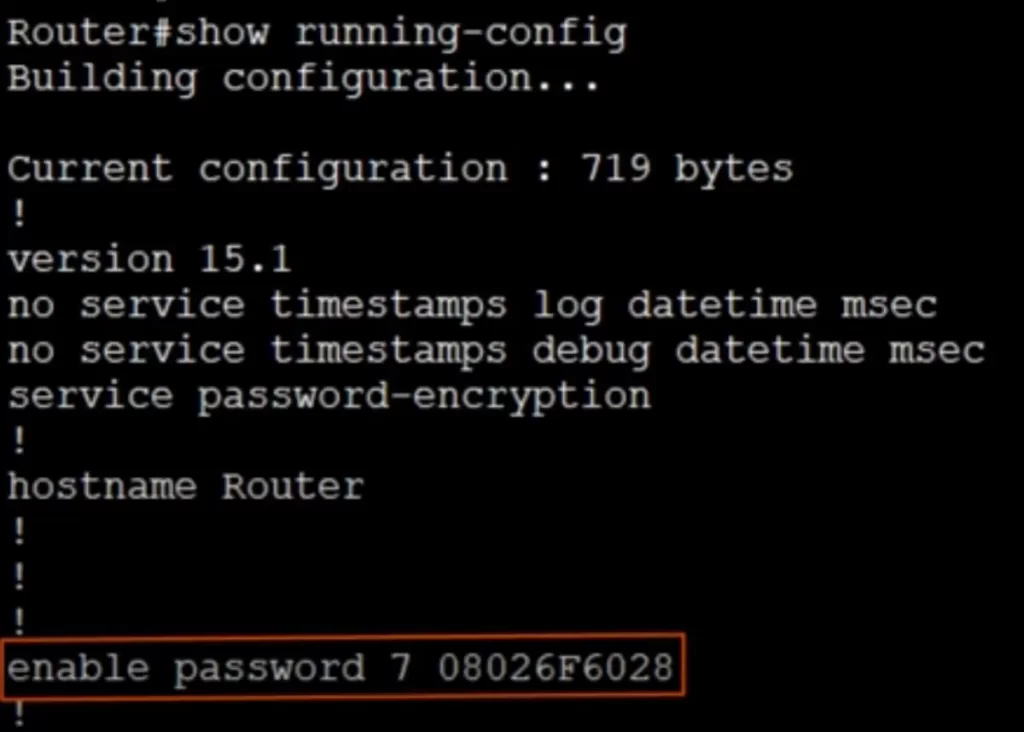
The service password-encryption command is more secure than naught, but it is not especially secure and can be cracked using an online Cisco type 7 password cracker.
enable secret command
There is a more secure enable password for Cisco devices with stronger encryption, a method called enable secret command.
Router(config)#enable secret Cisco (here the password used is “Cisco”)
Then we can review the running configuration again, but we can do this from within global configuration mode.
Router(config)#do sh run (i.e., do show running-config)
Using “do” allows us to execute privileged EXEC mode commands like show running-config in other configuration levels.
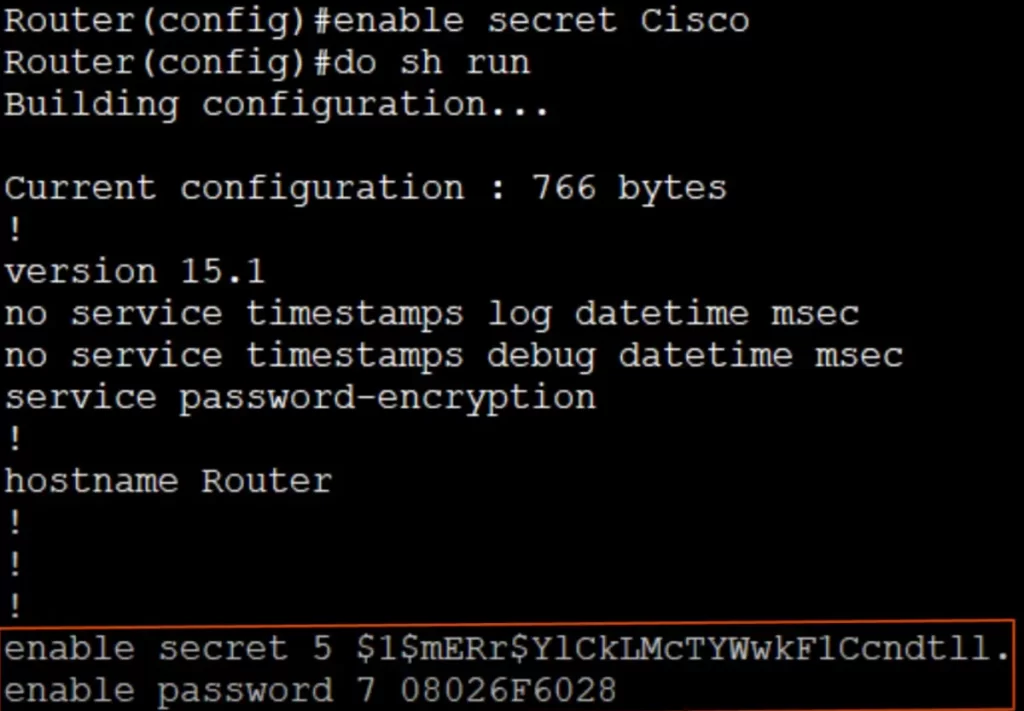
You can see the enable secret in the running configuration. The number 5 indicates MD5 type encryption which is much more secure than what we get with the service password-encryption command. The enable password command remains and is not replaced. If both commands (enable password and enable secret) are configured, the enable password will be ignored.
The service password-encryption command has no effect on the enable secret command. The enable secret command is always encrypted whether or not you entered the service password-encryption command.
So you should always use the enable secret and not the enable password, as it is always more secure.
Canceling commands
How to cancel a command:
Router(config)#no service password-encryption
Then verify:
Router(config)#do show running-config
Thus future passwords will no longer be encrypted. But passwords already encrypted will not be decrypted by disabling password-encryption. New passwords however will be in clear text.
Review CLI command modes
Router> =user EXEC mode
Router# =privileged EXEC mode
Router(config)# =global configuration mode
Review CLI commands
Router>enable
→to enter privileged EXEC mode
Router#configure terminal
→to enter global configuration mode
Router(config)#enable password password
→to configure a password to protect privileged EXEC mode
Router(config)#service password-encryption
→to encrypt the enable password (and other passwords)
Router(config)#enable secret password
→to configure a more secure enable password
Router(config)#do privileged-exec-level-command
→to execute a privileged EXEC level command from global configuration mode
Router(config)#no command
→to remove a previously configured command
Router#show running-config
→to display the current active configuration file
Router#show startup-config
→to display the saved configuration file which will be loaded if the device is restarted
Router#write
→to save the current running configuration and make it the startup configuration
Router#write memory
→to save the current running configuration and make it the startup configuration
Router#copy running-config startup-config
→to save the current running configuration and make it the startup configuration
Packet Tracer lab (basic device security)
The lab tasks involve doing some configurations on a router and a switch.
1. Set the appropriate host names for each device, R1 and SW1.
To do so use the hostname command in global configuration mode. This command was not covered in this lesson but is accomplished as follows.
First, access the CLI from which you can configure each device. Access was done through Packet Tracer directly (by clicking on the device icon in Packet Tracer then selecting CLI).
Then we enter privileged EXEC mode via the command Router>en
Now that we are in privileged EXEC mode we can use the configure terminal command to get into global configuration mode: Router#conf t
Now execute the hostname command: Router(config)#hostname R1
We get R1(config)#
The host name has changed to R1.
2. Configure an unencrypted enable password of ‘CCNA’ on both devices
From global configuration mode enter the command: R1(config)#enable password CCNA
3. Exit back to user EXEC mode and test the password
Exit twice back to user mode to check if the command was accepted.
R1(config)#exit
R1#exit
Now if we enter the enable command from user mode to enter enable mode (privileged EXEC mode), we are asked for a password.
R1>enable
Password:
R#
4. View the password in the running configuration
Use the show running-config command in privileged EXEC mode to view the running configuration file.
R1#show running-config
5. Ensure that the current password, and all future passwords, are encrypted
Run the service password-encryption command in global configuration mode.
R1#conf t
R1(config)#service password-encryption
6. View the password in the running configuration
From global configuration mode, run the command:
R1(config)#do sh run
Now we see that “enable password CCNA” has become “enable password 7 08026F6028”.
7. Configure a more secure, encrypted enable password of ‘Cisco’ on both devices
From global configuration mode:
R1(config)#enable secret Cisco
8. Exit back to user EXEC mode and then return to privileged EXEC mode. Which password do you have to use?
Cisco.
9. View the passwords in the running configuration.
What encryption type number is used for the encrypted ‘enable password’? 7
What encryption type number is used for the encrypted ‘enable secret’? 5
10. Save the running configuration to the startup configuration
Run command:
R1(config)#do write
Use R1(config)#do show startup-config to view the startup configuration file.
Follow the same procedures to configure the switch.
Key references
Note: The resources cited below (in the “Key references” section of this document) are the main source of knowledge for these study notes/this lesson, unless stated otherwise.
Free CCNA | Intro to the CLI | Day 4 | CCNA 200-301 Complete Course
Free CCNA | Basic Device Security | Day 4 Lab | CCNA 200-301 Complete Course
Other references/resources
Cisco. (April 2010). Cisco IOS Configuration Fundamentals Command Reference
Sean Douglas. (Nov 17, 2022). Top 5 Network Admin Cisco Commands Cheat Sheet (pluralsight)
Related content
Compliance frameworks and industry standards
How data flow through the Internet
How to break into information security
How to configure SSH on Cisco devices
IT career paths – everything you need to know
Job roles in IT and cybersecurity
Network security risk mitigation best practices
The GRC approach to managing cybersecurity
The penetration testing process
The Security Operations Center (SOC) career path
Back to DTI Courses


