This lesson focuses on how to configure SSH on Cisco devices. The Secure Shell Protocol (SSH) is a cryptographic network protocol used to operate network services securely over unsecured networks. The most notable applications of SSH are remote login and command-line execution.
SSH is mentioned in the CCNA exam topics list in two places. First, in Section 2 Network Access, subsection 2.8, which says you must be able to “Describe AP and WLC management access connections (Telnet, SSH, HTTP, HTTPS, console, and TACACS+/RADIUS)“. AP and WLC management access connections refer to the various methods that can be used to access and manage the configuration of APs and WLCs. Second, in Section 4 IP Services, subsection 4.8, which says you must be able to “Configure network devices for remote access using SSH“.
This lesson looks at how to configure SSH on Cisco devices for secure remote access. Three important/relevant topics are covered first: 1) how to configure and verify device access control using local passwords (login and login local) (CCNA exam topic 5.3); 2) Layer 2 switch management IP, specifically, how to configure a management IP address on Layer 2 switches so that we can remotely connect to them via SSH; and 3) Telnet (a protocol similar to SSH but simpler and less-secure) configuration. This post constitutes Issue 34 of my CCNA 200-301 study notes.
- Introduction to SSH
- Console port security – login
- Console port security – login local
- Layer 2 switch management IP
- Telnet
- Telnet configuration
- SSH (Secure Shell)
- SSH configuration – check SSH support
- SSH configuration – RSA keys
- SSH configuration – VTY lines
- SSH configuration summary
- Command summary
- Key learnings
- Practice quiz questions
- Key references
You may also be interested in CCNA 200-301 study notes.

Introduction to SSH
SSH describes an approach for securing remote login from one computer to another. SSH provides security features such as data encryption and authentication. SSH is a secure alternative to non-protected login protocols such as Telnet and rlogin, and insecure file transfer methods such as FTP.
SSH applications are based on a client–server architecture, connecting an SSH client instance with an SSH server. SSH allows us to remotely connect to network devices and configure them via the CLI. In an earlier lesson, Cisco IOS CLI and device security, we learned how to connect to a network device such as a router or switch to configure it via the console port.
Console port security – login
By default, no password is needed to access the CLI of a Cisco IOS device via the console port. You can take a new device out of the box, use a console cable to connect your laptop to it, and then start configuring it in the CLI. Anyone who has physical access to the console port can access the CLI of the device.
You can configure a password on the console line. When you do this, a user will have to enter a password to access the CLI via the console port.
To configure the console line, use the command LINE CONSOLE 0 from global config mode. The number in this command is always 0 because there is only a single console line.
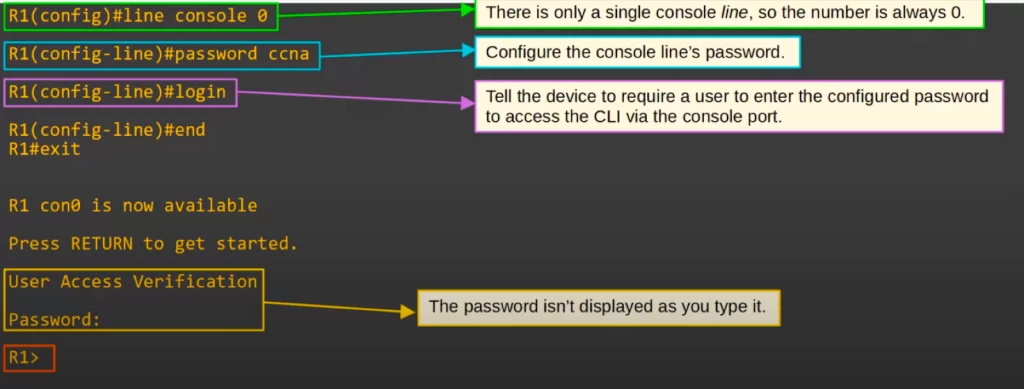
Then to configure the console line’s password, use the command PASSWORD, followed by the password (“ccna” in this case). Then use the LOGIN command to tell the device to require a user to enter the password to access the CLI via the console port.
To check, we used END and EXIT to terminate the console connection. Then we pressed enter to connect again. At this point user access verification was required. We entered the password ccna, and we were able to connect.
Console port security – login local
Instead of configuring a password on the console line for accessing the CLI, we can configure the console line to require users to authenticate using a username/password that is already configured on the device.
First, a username was created, jeremy, and given a secret password, ccnp. Then the command LINE CONSOLE 0 was used to configure the console line. Then the command LOGIN LOCAL was used to tell the device to require a user to log in using one of the configured usernames/passwords on the device.

The right side of the above diagram shows the current configuration of R1’s console line. The configured password ccna is still there, but now that the login mode has been changed from LOGIN to LOGIN LOCAL, the console line’s password of ccna can no longer be used. Users must login using an account on the device.
We logged out of the connection using END and EXIT then pressed RETURN, and as you can see we were asked for a username and password, not just a password.
The EXEC-TIMEOUT command will configure the device to log out users after a certain period of inactivity, 3 minutes and 30 seconds in this case. This is done to enhance device security.
Layer 2 switch management IP
Layer 2 switches can be assigned IP addresses that can be used to connect remotely to manage network devices. A SVI (switch virtual interface) can be assigned an IP address to allow remote connections to the CLI of the switch using Telnet or SSH.
Here is the network topology we will use for the remainder of this lesson.

A network admin using PC2 wants to remotely connect to all the devices in the network to configure them. To allow this, we need to assign IP addresses to Layer 2 switches.
First, configure the IP address on the SVI in the same way as on a multilayer switch. From global config mode enter interface configuration mode by typing INTERFACE VLAN, followed by the VLAN ID.
Then from interface configuration mode assign an IP address and subnet mask to the SVI by typing IP ADDRESS, followed by the IP address and subnet-mask. Enable the interface if it is shutdown by default. This configures the SVI.
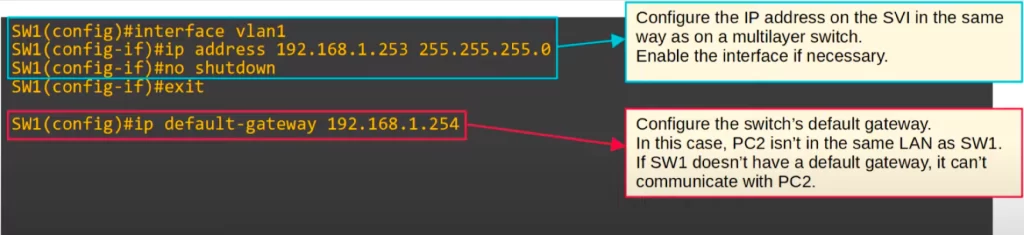
One more step is left to allow a Layer 2 switch to communicate with devices outside of its local LAN. Use the IP DEFAULT-GATEWAY command to configure the default gateway of the switch. SW1 cannot send traffic directly to PC2 because PC2 is not in the same LAN. SW1 has to send the traffic to a router, R1 in this case, which will then route the packets to their destination.
Telnet
To demonstrate Telnet and SSH concepts and configurations, we will continue configuring SW1.
Although Telnet is not commonly used today because it is not secure, it is still a good protocol to know before looking at SSH.
Telnet was developed in 1969. Telnet is a protocol used to remotely access the CLI of a remote host. Rather than plugging a PC directly into the device with a console cable, you can connect to the device on a remote network.
A Telnet client (your PC) initiates a connection to a Telnet server (a remote network device) on TCP port 23 or 2323. Even if your OS has a built-in Telnet client, you might prefer third-party options for additional features or improved security. PuTTY (Windows, macOS, Linux) is a popular open-source client software that supports both Telnet and SSH.
Telnet does not encrypt data, so all information sent over the connection is transmitted in plain text. This means that anyone with access to the network can see what is being sent, including usernames, passwords, and other sensitive data. A tool like Wireshark can be used to capture network traffic and view the data being sent over the wire. This means that if someone is using Telnet to connect to a remote server, their username, password, and any other data they enter could be easily captured by someone with malicious intent.
Here is a Wireshark capture of a Telnet packet.
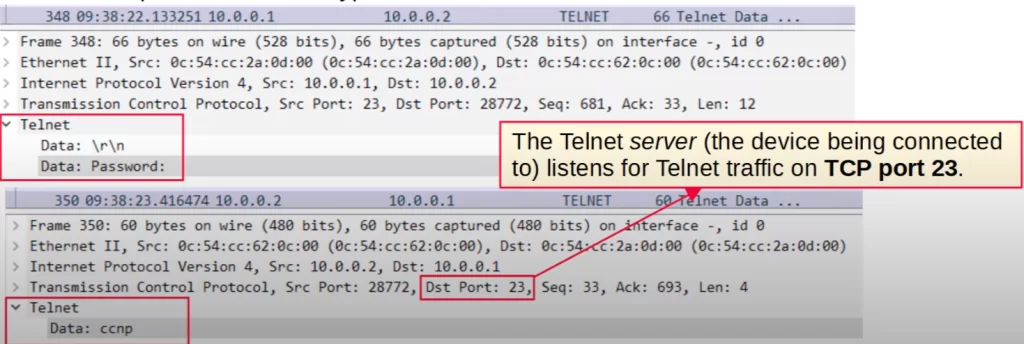
Notice the password is displayed in plain text, ccnp. Anyone able to capture the traffic can easily know what is the password.
The Telnet server, R1 in this case, listens for Telnet traffic on TCP port 23. So when our device sent the password to R1, the destination port was TCP port 23.
Telnet configuration
Let’s see how we can configure a Cisco switch so that we can connect to it using Telnet.
>First, configure an enable secret, or you will not be able to access privileged EXEC mode to connect to the device using Telnet/SSH (alternatively, you can manually set a high privileged level on the user you create).
>Next, we configured a username and password because we will later configure LOGIN LOCAL mode. To connect to a VTY line using Telnet, users must authenticate using a password (login mode) or using a username and password (login local mode). Once authenticated, users have access to the router’s CLI and can perform all of the same tasks that they could if they were connected to the router’s console port.
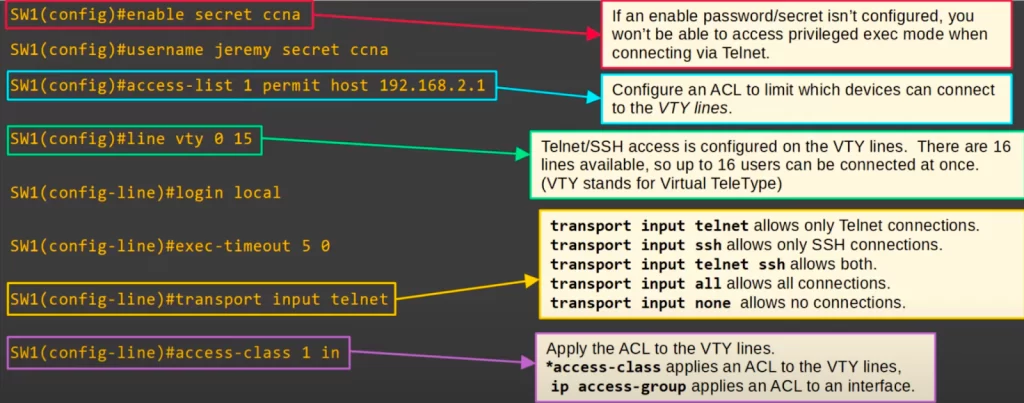
>You can configure an ACL to limit which devices can connect to the VTY lines of the device.
VTY lines are virtual lines (virtual ports) that allow connecting to network devices such as routers or switches using Telnet or Secure Shell (SSH). VTY lines are typically used for remote administration of routers and switches, but they can also be used for local administration if the router or switch does not have a console port.
VTY lines are created using the line vty command, and each VTY line is assigned a unique number. VTY lines are numbered from 0 to 15. Cisco devices can have up to 16 VTY lines. 16 users can be connected at once. By default, most Cisco devices have 5 VTY lines (0-4). You can configure more VTY lines if needed. You can determine how many VTY lines you have by issuing “line vty 0 ?” from global configuration mode.
>Next, we entered the command LINE VTY 0 15, which means we are configuring all lines, from 0 through 15. This is recommended so that all of the VTY lines have the same configuration.
>Next we configured LOGIN LOCAL, as well as EXEC-TIMEOUT. The default exec timeout of the device was 10 minutes, but we shortened it to 5 minutes.
>Next, to configure what kind of connections to the VTY lines are allowed, we used the command TRANSPORT INPUT TELNET. This command allows only Telnet connections.
You could also configure TRANSPORT INPUT SSH to allow only SSH connections, or TRANSPORT INPUT TELNET SSH to allow both. TRANSPORT INPUT ALL allows all connections, including for other protocols aside from Telnet and SSH. Configuring TRANSPORT INPUT NONE allows no connections to the VTY lines.
>Finally, we applied the ACL to the VTY lines. Only PC2 will be able to connect to SW1 using Telnet.
Note, the command to apply the ACL to the VTY lines is ACCESS-CLASS, the command to apply an ACL to an interface is IP ACCESS-GROUP, and the command to create the ACL is ACCESS-LIST or IP ACCESS-LIST.
To verify the configuration, we first tried to ping SW1 from R2. The ping was successful.

However, when we tried to Telnet to SW1 from R2, we got a message saying “Connection refused by remote host”. That’s because of the ACL we applied to SW1’s VTY lines which only permits Telnet access from PC2. Only PC2 should be able to Telnet to SW1.
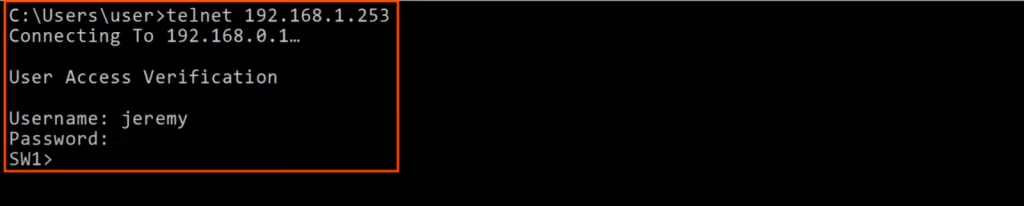
We did Telnet from PC2, and it worked.
Here is a brief walk-through of the steps involved in configuring a router for remote access using Telnet:
How to set up remote access to Cisco devices via Telnet/SSH
SSH (Secure Shell)
From Wikipedia, a shell is a computer program which exposes the operating system’s services to a human user or other program. You are using a shell any time you are accessing the CLI of a device.
SSH was developed in 1995 to replace less secure protocols like Telnet. SSH provides the following security features:
- Authentication: SSH uses public-key cryptography to authenticate the remote computer and allow it to authenticate the user if necessary.
- Integrity: SSH uses a message authentication code (MAC) to ensure that the data transmitted between the client and server has not been tampered with in transit.
- Encryption: SSH encrypts all data transmitted between the client and server. This means that even if an attacker is able to intercept the data, they will not be able to read it.
SSHv2, a successor to SSHv1, was released in 2006. Version 2 is more secure than version 1. If a device supports both version 1 and version 2, it is said to run “version 1.99”.
This is a SSH packet captured in Wireshark. Notice, the properties of the packet are obscured through encryption. Only the SSH server and client have the keys to decrypt this packet.
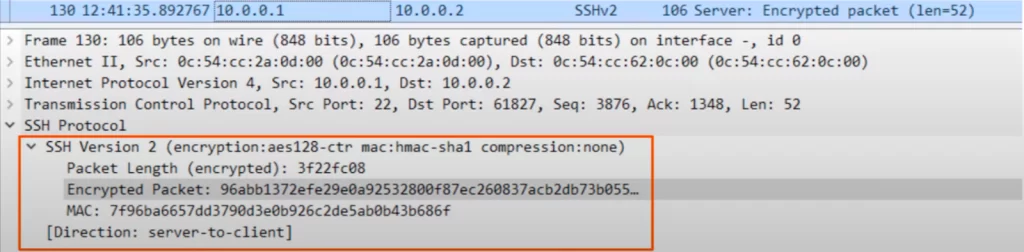
Note, SSH uses TCP port 22. In other words, the SSH server listens for SSH traffic on TCP port 22. Remember, Telnet uses TCP 23 and SSH uses TCP 22.
SSH configuration – check SSH support
Before configuring SSH, we can check if the IOS on the device supports SSH. Use the SHOW VERSION command. Note in the following output the IOS image name, and the highlighted K9 at the end. K9 indicates that the IOS supports SSH.
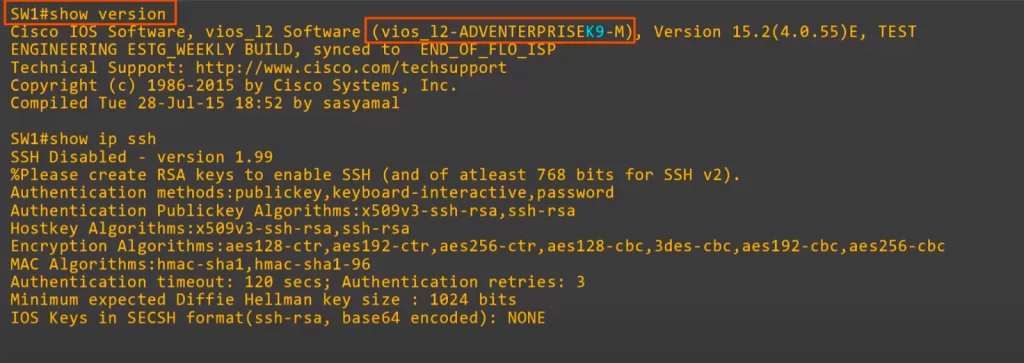
Cisco exports NPE (No Payload Encryption) IOS images to countries that have restrictions on encryption technologies. These images do not support strong payload encryption, such as the encryption used in SSH. As a result, NPE IOS images may support weaker forms of encryption than standard SSH.
We used the show ip ssh command to check the ssh configuration of the device. The device responded that SSH is disabled, and that the OS supports version 1.99, meaning versions 1 and 2.
Note the following line in the output: “%Please create RSA keys to enable SSH (and of atleast 768 bits for SSH v2)”. RSA keys provide a way to encrypt data and authenticate users in a secure way.
SSH configuration – RSA keys
After ensuring that the IOS image supports SSH, we must generate RSA keys (a public and private key pair) to enable SSH.
Here’s an example of how to do that.
First, we configured the domain name of the device, SW1 in this case, with IP DOMAIN NAME jeremysitlab.com. We need to configure the domain name because the domain name along with the host name, together called the FQDN (Fully Qualified Domain Name) of the device, will be used to name the RSA keys.
Then we generated the RSA keys using the command CRYPTO KEY GENERATE RSA. Note in the output the name of the generated keys, the FQDN of SW1, is SW1.jeremysitlab.com.
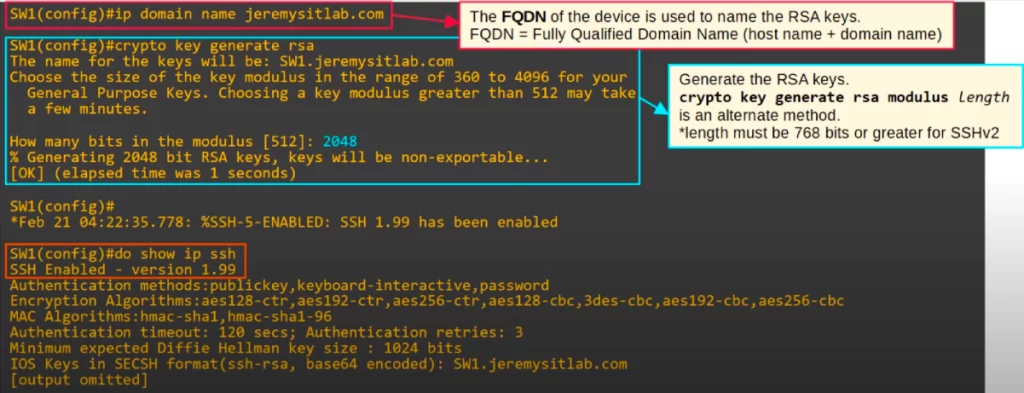
We then configured the size of the modulus, i.e., the size of the keys, as 2048 bits, as highlighted in the CLI output. The length of the keys must be 768 bits or greater to use SSHv2. Alternatively, you can use the command CRYPTO KEY GENERATE RSA MODULUS, followed by the length.
After generating the keys, a Syslog message is displayed indicating that SSH has been enabled. We checked again with SHOW IP SSH. SSH has been enabled.
SSH configuration – VTY lines
After enabling SSH, let’s configure it.
First, we configured the enable secret, a username and password, and an ACL to restrict connections to only allow PC2 access.

Then we used the command IP SSH VERSION 2 to enable only SSH version 2. This is best practice.
Then we used the command LINE VTY 0 15 to configure all 16 VTY lines.
Then we enabled local authentication. You cannot use LOGIN for SSH, only LOGIN LOCAL will work. You have to authenticate using a username. (You can also authenticate to an external authentication service such as AAA server, Radius, TACACS.)
Then we configured the exec timeout.
Then we used TRANSPORT INPUT SSH to limit VTY line connections to SSH only, disabling Telnet because it is less secure.
Finally we applied the ACL. Like for Telnet, this is optional but recommended because it adds security.
SSH configuration summary
1) Configure the device host name
2) Configure domain name
3) Generate RSA key pair
4) Configure enable password/enable secret, and local username and password
5) Enable SSHv2 (only)
6) Configure VTY lines
First, configure the device host name. This was not mentioned earlier because we had already configured the host name. The device hostname cannot be the default “Router”, “Switch”, etc.
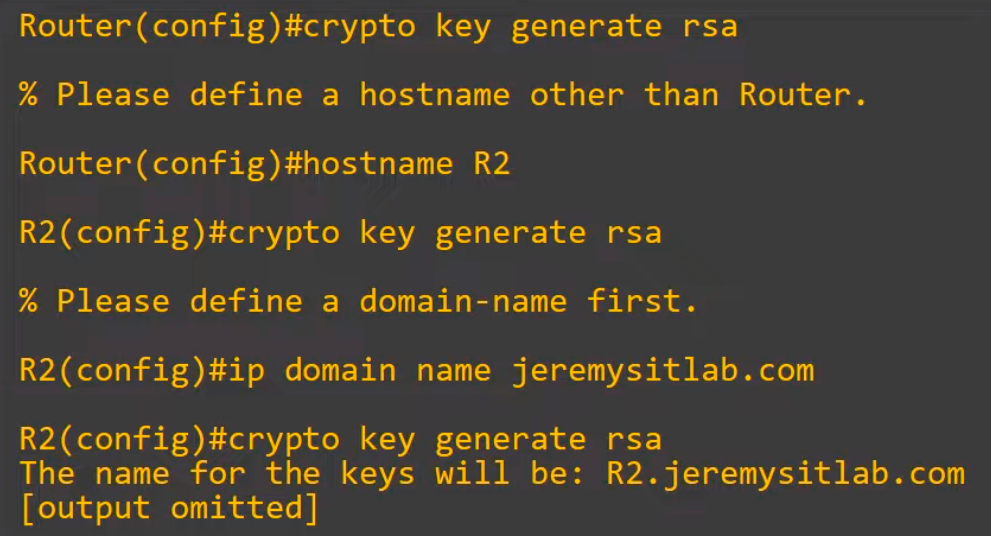
We configured R2 as the hostname and tried again to generate the RSA key pair. But we get a message asking to define a domain name first. So we did: IP DOMAIN NAME jeremysitlab.com.
The next step is to generate the RSA key pair. Again we used the command crypto key generate rsa. It worked.
The next step is to configure enable password/enable secret, and local username and password.
Then enable SSH version 2 only.
Then configure the VTY lines. The most important step is enabling TRANSPORT INPUT SSH to limit VTY line connections to SSH only, and then you can do any other VTY line configurations needed, such as exec timeout, applying an ACL, etc.
SSH should now work. From a PC you can connect using the command SSH -L, followed by the username and IP address, or using the command SSH username@IP address.
ssh -l username ip-address
ssh username@ip-address
ssh is the command to initiate an SSH connection. username is the username you will use to log in to the remote server. ip-address is the IP address of the remote SSH server you want to connect to.
Command summary
>Console port security – login:
To configure a password on the console line for accessing the CLI via the console port.
R(config)#line console 0
→to enter line configuration mode for the console port to configure various console port settings such as login authentication. The number in this command is always 0 because there is only a single console line
R(config-line)#password password
→to configure the console line’s password
R(config-line)#login
→to tell the device to require a user to enter the configured password to access the CLI via the console port
>Console port security – login local:
To configure the console line to require users to authenticate using a username and password already configured on the device.
In LOGIN LOCAL mode, users must login using an account on the device.
R(config)#username username secret password
→to create a local username and password
R(config)#line console 0
R(config-line)#login local
→to tell the device to require a user to login using one of the configured usernames/passwords on the device
R(config-line)#exec-timeout minutes seconds
→to configure the device to log out users after a certain period of inactivity
>Layer 2 switch management IP:
SW(config)#interface vlan vlan-id
→to enter interface configuration mode to assign an IP address to a L2 switch for remote access
SW(config-if)#ip address ip-address subnet-mask
→to assign an IP address and subnet mask to the SVI
SW(config-if)#no shutdown
→to enable the interface (if necessary)
SW(config)#ip default-gateway ip-address
→to configure the default gateway for the switch to allow a L2 switch to communicate with devices outside of its local LAN
Example:
SW1(config)#interface vlan1
SW1(config-if)#ip address 192.168.1.253 255.255.255.0
SW1(config-if)#no shutdown
SW1(config)#ip default-gateway 192.168.1.254
1. Telnet configuration (with examples)
SW(config)#enable secret password
→to configure an enable secret to access privileged EXEC mode to connect to the device using Telnet
SW(config)#username username secret password
→to create a local username and password because we will configure LOGIN LOCAL mode
To connect to a VTY line using Telnet, users must authenticate using a password (login mode) or using a username and password (login local mode). Once authenticated, users have access to the router/switch CLI.
SW(config)#access-list number {deny | permit} src-ip wildcard-mask
→to configure an ACL (standard numbered ACL in this case) to limit which devices can connect to the VTY lines
SW1(config)#access-list 1 permit host 192.168.2.1
→you can use the host option or specify the wildcard mask (host = PC2, in this case)
SW(config)#line vty line-range
→to configure Telnet/SSH access/create VTY lines/enter line configuration mode. Each VTY line is assigned a unique number. The range of lines to configure is represented by two integers separated by a hyphen or space
SW1(config)#line vty 0 15
→to configure VTY lines 0 through 15, which means we are configuring all lines, from 0 through 15. This is recommended so that all of the VTY lines have the same configuration
SW(config-line)#login local
→to enable local user authentication
SW(config-line)#exec-timeout minutes seconds
SW1(config-line)#exec-timeout 5 0
The default exec timeout of the device was 10 minutes, but we shortened it to 5 minutes and 0 seconds (exec-timeout is an optional but recommended configuration).
SW(config-line)#transport input [protocols | all | none]
→to configure what kind of connections to the VTY lines are allowed
SW1(config-line)#transport input telnet
→to allow only Telnet connections
SW(config-line)#access-class acl-id in
→to apply the ACL to inbound traffic to restrict VTY line connections
SW1(config-line)#access-class 1 in
→thus only PC2 will be able to telnet to SW1
C:\Users\user>telnet ip-address
→to instruct a computer to establish a Telnet connection to a remote device specified by the ip-address
2. SSH configuration (with examples)
>SSH configuration – check SSH support
SW#show version
→to check the IOS image name. K9 indicates that the IOS supports SSH
SW#show ip ssh
→to check the ssh configuration of the device. Version 1.99 means the device supports ssh versions 1 and 2
>SSH configuration – RSA keys
We must generate RSA keys (a public and private key pair) to enable SSH. We need to configure a domain name to generate the RSA key pair.
SW1(config)#ip domain name jeremysitlab.com
→to configure the domain name of SW1
The domain name along with the host name, the FQDN of the device, will be used to name the RSA keys.
SW1(config)#crypto key generate rsa
→to generate the RSA key pair. The name of the keys (the FQDN of SW1) will be SW1.jeremysitlab.com. Choose the size of the key modulus in the range of 360 to 4096 for the general purpose keys
Alternatively, you can use the command CRYPTO KEY GENERATE RSA MODULUS, followed by the length.
SW1(config)#crypto key generate rsa modulus 2048
The length of the keys must be 768 bits or greater to use SSHv2. We configured the size of 2048 bits.
SW#showcrypto key mypubkey rsa
→to verify the generated key’s size
After generating the keys, a Syslog message will be displayed indicating whether SSH has been enabled. Check again with SHOW IP SSH.
SW#show ip ssh
→to display information about the SSH server running on the device, i.e., whether SSH is enabled or disabled, and version of the SSH server
>SSH configuration – VTY lines
After enabling SSH, let’s configure it.
First, we configure the enable secret, a username and password, and an ACL to limit which devices can connect to the VTY lines.
SW(config)#enable secret password
→to configure an enable secret to access privileged EXEC mode to connect to the device using ssh
SW(config)#username username secret password
→to create a local username and password because we will configure LOGIN LOCAL mode
SW1(config)#access-list 1 permit host 192.168.2.1
SW1(config)#ip ssh version 2
→to restrict ssh to version 2 only (recommended)
SW1(config)#line vty 0 15
→to configure VTY lines 0 through 15, which means we are configuring all lines, from 0 through 15. This is recommended so that all of the VTY lines have the same configuration
SW(config-line)#login local
→to enable local user authentication (you cannot use login for ssh, only login local)
SW1(config-line)#exec-timeout 5 0
SW(config-line)#transport input ssh
→to allow only ssh connections
SW(config-line)#access-class acl-id in
→to apply the ACL to the VTY lines
Free CCNA | SSH | Day 42 Lab – Notes
Key learnings
*Console port security: 1) login, how to configure a password on the console line to tell the device to require a user to enter the password to access the CLI, and 2) login local, how to configure the console line to require users to authenticate using a username/password.
*Configure a Layer 2 switch management IP – how to configure an IP address on SVIs to allow remote connections to the CLI of the device using Telnet or SSH.
*Telnet configuration – how to configure a device so that you can connect to it using Telnet.
*SSH configuration – how to configure a device so that you can connect to it using SSH.
Practice quiz questions
Quiz question 1
You issue the crypto key generate rsa command on a Cisco router, but the command is rejected. What might be the reason? Select two.
a) A host name has not been configured
b) The ip ssh version 2 command has not been configured
c) The transport input ssh command has not been configured
d) Only switches can generate RSA keys
e) A DNS domain name has not been configured
f) SSH version 1.99 is enabled
The answers are a), a host name has not been configured, and e), a DNS domain name has not been configured. The FQDN of the device, which consists of the device’s host name and its domain name, is used to name the RSA key pair.
You can find four more practice questions for this lesson (plus a bonus one) in Jeremy’s SSH video lesson, cited below.
Key references
Note: The resources cited below (in the “Key references” section of this document) are the main source of knowledge for these study notes/this lesson, unless stated otherwise.
Free CCNA | SSH | Day 42 | CCNA 200-301 Complete Course
Free CCNA | SSH | Day 42 Lab | CCNA 200-301 Complete Course
Related content
Cisco IOS CLI and device security
Compliance frameworks and industry standards
How data flow through the Internet
How to break into information security
IT career paths – everything you need to know
Job roles in IT and cybersecurity
Network security risk mitigation best practices
The GRC approach to managing cybersecurity
The penetration testing process
The Security Operations Center (SOC) career path
Back to DTI Courses


