This lesson focuses on static NAT configuration on Cisco IOS devices. NAT (network address translation) is an important topic for the CCNA exam and for network engineering. NAT is used to translate the source and/or destination IP address of a packet to a different IP address. NAT is covered in Section 4 of the CCNA exam topics list, IP Services, subsection 4.1, which says you must be able to “Configure and verify inside source NAT using static and pools”. Further, Section 1, Network Fundamentals, states you should be able to “Describe the need for private IPv4 addressing.”
There are different types of NAT, such as static NAT, dynamic NAT, and port address translation (PAT). Static NAT maps a private IP address to a fixed public IP address. Dynamic NAT assigns a public IP address from a pool of available addresses to a private IP address on demand. PAT uses a single public IP address and different port numbers to distinguish between multiple private IP addresses. NAT will be covered in two parts. This lesson (NAT Part 1) focuses on the following four topic areas: 1) the need for private IPv4 addressing, 2) NAT purpose in networks, 3) how NAT works, and 4) static NAT configuration. This post constitutes Issue 35 of my CCNA 200-301 study notes.
- Private IPv4 addresses (RFC 1918)
- NAT (Network Address Translation) introduction
- Static NAT configuration – introduction
- Static NAT configuration
- Cisco NAT terminology
- clear ip nat translation
- show ip nat statistics
- Command review
- Key learnings
- Practice quiz questions
- Key references
You may also be interested in CCNA 200-301 study notes.
Private IPv4 addresses (RFC 1918)
IPv4 does not provide enough addresses for all devices that need an IP address in the world. The long-term solution to this problem is to switch to IPv6. But changing networks all over the world from IPv4 to IPv6 is a tremendous undertaking.
There are three main short-term solutions which have extended the lifespan of IPv4:
1) CIDR (Classless Inter-Domain Routing). CIDR allows us to forget about the rigid IPv4 addressing convention and freely use any prefix length with any address.
2) Private IPv4 addresses – these are IP addresses you can freely use in your internal networks. These IP addresses do not have to be globally unique.
3) NAT (network address translation). NAT translates private IP addresses to the public IP for outbound traffic and back to the corresponding private IP for inbound traffic. Static NAT offers dedicated public IP assignment for specific devices. Dynamic PAT (Port Address Translation) allows multiple devices on a private network to share a single public IP address.
We are going to focus on solutions 2 and 3. CIDR is covered in the lesson Classless IPv4 addressing and subnetting.
Private IPs were originally meant for security because they are not routable over the Internet, but they also proved valuable in saving public IP address space. Without private IP addressing we would not have any more public IP addresses to assign to new devices.
RFC 1918 specifies the following IPv4 address ranges as private:
10.0.0.0/8 (10.0.0.0 to 10.255.255.255) → Class A
172.16.0.0/12 (172.16.0.0 to 172.31.255.255) → Class B
192.168.0.0/16 (192.168.0.0 to 192.168.255.255) → Class C
You will notice, RFC 1918 has moved past the classic IP addressing convention, where Class A range is /8, Class B range is /16, and Class C range is /24.
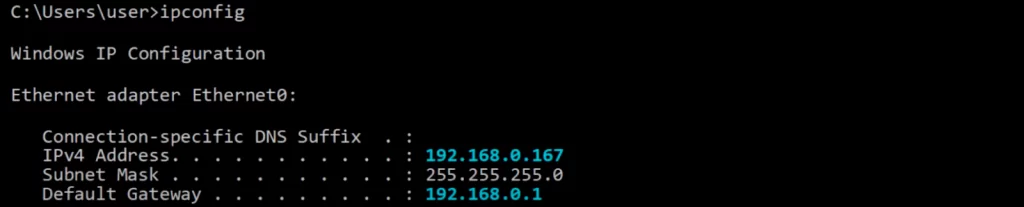
You can freely use these private IPv4 addresses in your network. If you are watching a YouTube video from a PC in your home, very likely you are using a private IP address. For example, our home PC here has the IP address 192.168.0.167, and its default gateway, our router, is 192.168.0.1.
A different PC might have the exact same IP address as this PC, or it might be in the same subnet, 192.168.0.0/24.
Private IP addresses are not routable on the public Internet, so they cannot be used to directly connect to websites or other devices on the Internet. Your ISP will drop traffic to or from private IP addresses. NAT allows you to use private IP addresses on your network to access the Internet by translating private IP addresses to public IP addresses when traffic leaves your network.
Let’s demonstrate. On the left is our demo PC, 192.168.0.167, connected to our router, 192.168.0.1. Somewhere across the Internet there is another PC connected to a router, and they have the same IP addresses.

There are two problems here. The first problem is that there are duplicate addresses. If there is a packet traveling over the Internet with the destination address 192.168.0.167, which PC will it go to? The second problem is that private IP addresses cannot even be used over the Internet, so the PCs can’t access the Internet.
NAT solves both of these problems.
Private IP addresses do not have to be unique, but public IP addresses must be unique. When our PC needs to reach destinations over the Internet, NAT will allow it to borrow the unique public IP address of our router, or another public IP address configured for NAT.
Beside the PC, all other home devices can use the same public IP address to access the Internet, all at the same time.
So our PC can borrow our router’s public IP address and communicate over the Internet using 203.0.113.1, and the other PC can communicate over the Internet using 203.0.113.5.
NAT (Network Address Translation) introduction
NAT is used to modify the source and/or destination IP addresses of packets. Source NAT translates the source IP address of a packet. Destination NAT translates the destination IP address of a packet.
There are various reasons to use NAT. The most common reason is to allow hosts with private IP addresses to communicate with other hosts over the Internet. Further, NAT allows multiple internal hosts to share a single public IP address.
There are several types of NAT. For the CCNA you have to understand source NAT and how to configure it on Cisco routers.
Source NAT is used to allow hosts with private IP addresses to access a public network.
Let’s see an illustration of how source NAT works.
PC1’s IP address is 192.168.0.167. PC1 wants to communicate with the server at 8.8.8.8.

PC1 creates a packet with source IP 192.168.0.167 and destination 8.8.8.8. PC1 sends the packet to its default gateway, R1. This is where NAT happens. R1 translates the source IP address of the packet from 192.168.0.167 to 203.0.113.1, the IP address of its external interface. R1 then sends the packet out to the Internet and it arrives at its destination, 8.8.8.8.
Now the server will send a reply. The source is 8.8.8.8, and the destination is 203.0.113.1. The server sends the packet to R1, which then reverses the translation. 203.0.113.1 is translated back to 192.168.0.167. Although in this case the destination IP is being changed, this is not a destination NAT process. R1 is just reverting the previously translated address back to PC1’s actual IP address. Finally the server’s response reaches PC1. Destination NAT is beyond the scope of the CCNA exam.
In this case R1 translated PC1’s IP to the IP address of its own external interface, 203.0.113.1. But this is not the only option.
Source NAT where the router’s interface IP address is used to route packets is covered in NAT Part 2. In this lesson, up next, we will cover a specific kind of NAT called static source NAT.
Static source NAT is a type of source NAT which involves manually configuring one-to-one mappings of private IP addresses to global IP addresses.
Static NAT configuration – introduction
Static source NAT does not use the router’s IP address. It uses a separate address, called an inside global IP address. The inside global IP address is a public IP address that is statically assigned to a specific device on the internal network. When the device sends a packet to the Internet, the router will translate the device’s private IP address to the inside global IP address as the source IP address of the packet.
Static NAT involves statically configuring one-to-one mappings of IP addresses. You can NAT any address to any other address, but to keep things simple let’s think of it as mapping one private IP to one public IP.
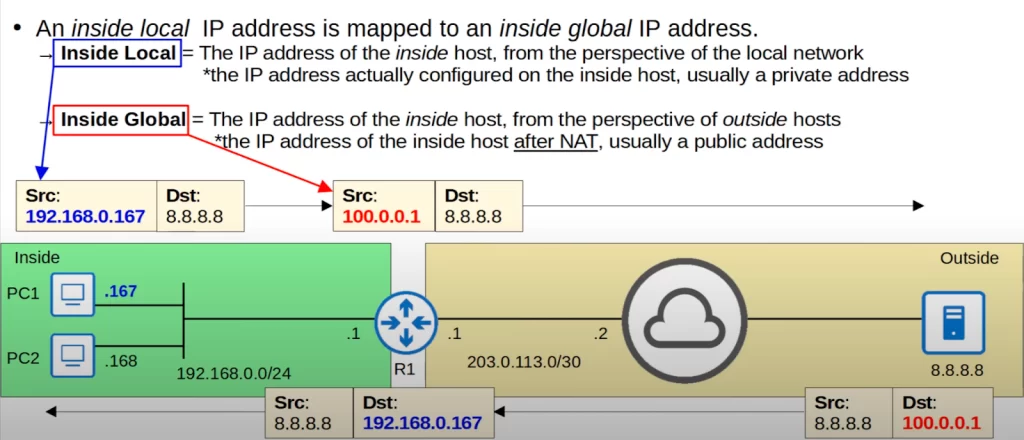
For example, an inside local IP address is mapped to an inside global IP address.
“Inside” refers to the router’s internal network, as opposed to “outside” networks such as the Internet.

An inside local address is the IP address of the inside host, from the perspective of the local network. It is the IP address actually configured on the inside host, which is usually a private IP address.
That inside local address is translated to an inside global address, which is the IP address of the inside host from the perspective of outside hosts, hosts outside of the local network. It is the IP address of the inside host after NAT, and is usually a public IP address.
Let’s demonstrate.
PC1 wants to communicate with the server at 8.8.8.8. PC1 constructs a packet with destination IP address 8.8.8.8 and source IP address 192.168.0.167. This is the inside local address, the IP address actually configured on PC1, and it is a private IP address.
PC1 sends the packet to its default gateway R1, which performs source NAT to change the source IP address to 100.0.0.1.
100.0.0.1 is a public IP address reserved just for PC1 (we are not using R1’s interface IP). 100.0.0.1 is the inside global IP of PC1. 100.0.0.1 is PC1’s IP address after NAT is performed.
R1 then sends the packet over the Internet to 8.8.8.8, which then sends the reply. Note that from the server’s perspective it’s communicating with IP address 100.0.0.1, even though PC1’s actual IP address is 192.168.0.167. That’s why we say the inside global address is the IP address of the inside host, PC1 in this example, from the perspective of outside hosts, the server in this example. R1 reverses the translation back to PC1’s inside local address, and sends it to PC1.
We defined static NAT as being one-to-one mapping of IP addresses. On R1 we mapped PC1’s private IP address 192.168.0.167 to the public IP address 100.0.0.1. That’s a one-to-one mapping. If PC2 also wants to reach 8.8.8.8, PC2 will need its own IP address. The router would not allow us to map both PC1’s and PC2’s actual/inside local IP addresses to 100.0.0.1 using static NAT.
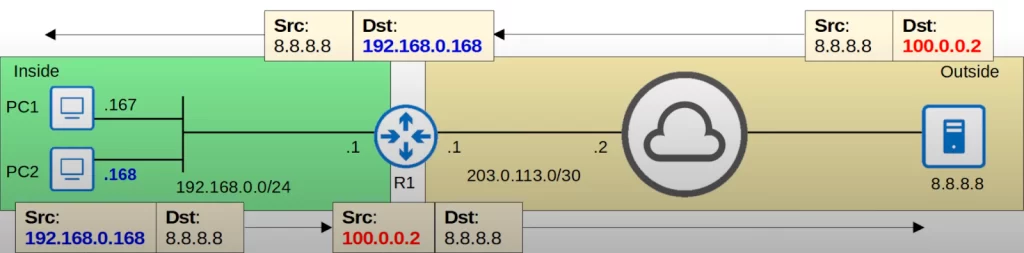
So we configured R1 to translate PC2’s IP address, 192.168.0.168, to 100.0.0.2. The server sends the reply to 100.0.0.2, and R1 translates it back to 192.168.0.168 and sends the reply back to PC2.
192.168.0.168 is the inside local address, the actual IP address configured on PC2. And 100.0.0.2 is the inside global address, PC2’s IP address after NAT.
Note that this one-to-one mapping of IP addresses does not only allow the internal host to access external resources, it also allows external hosts to access the internal host via the inside global address. So without PC1 initiating communication with the server, the server could send a packet to destination IP 100.0.0.1, and because of that one-to-one IP address mapping R1 would translate it to 192.168.0.167 and forward it to PC1, and then PC1 would reply. So, it works two-ways, not just from inside to outside, but also from outside to inside.
Static NAT allows devices with private IP addresses to communicate over the Internet. However, because it requires a one-to-one IP address mapping, it does not really help preserve IP addresses. If each internal device needs its own public IP address anyway, we might as well just configure a public IP address on the device itself.
Static NAT configuration
First, define the inside interface or interfaces by using the IP NAT INSIDE command from interface configuration mode. In the sample network below, R1’s inside interface is G0/1, connected to the internal network.
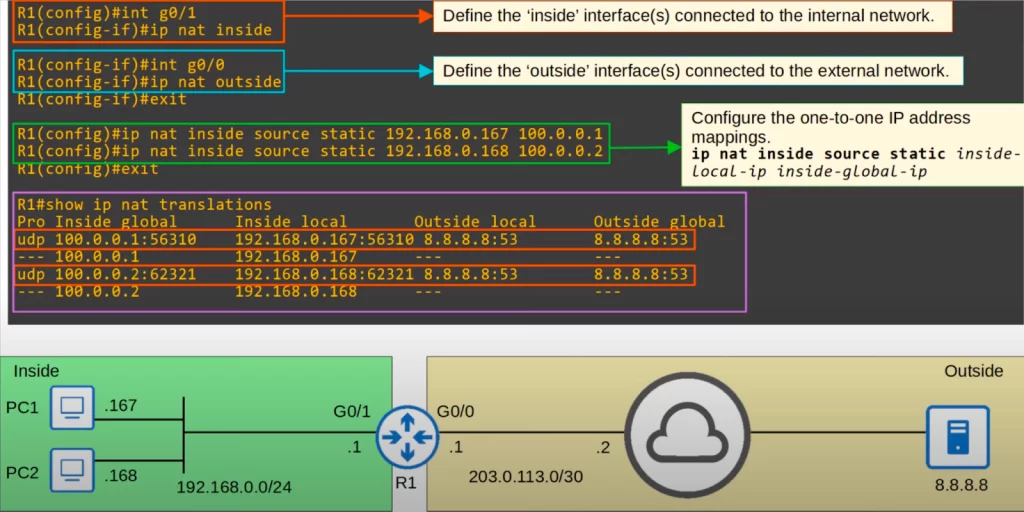
Then we used the IP NAT OUTSIDE command on G0/0 to define it as the outside interface. R1 will perform NAT on traffic traveling from the inside interface, G0/1, to the outside interface, G0/0.
Then we configured the one-to-one IP address mappings using the command IP NAT INSIDE SOURCE STATIC, followed by the inside local IP address and then the inside global IP address. We mapped 192.168.0.167 to 100.0.0.1, and 192.168.0.168 to 100.0.0.2. So PC1’s IP address will be translated to 100.0.0.1, and PC2’s will be translated to 100.0.0.2.
Finally we used the command SHOW IP NAT TRANSLATIONS. When static NAT is used you will see the entries permanently displayed in the translations table. You can see entries for traffic sent from PC1 and PC2 to 8.8.8.8.
Let’s look at each column, from left to right. On the left is the Pro, protocol column, indicating that UDP was used. Next is the inside global address column. Notice, next to each IP address there is a colon followed by a number, the port number. In the context of static NAT, port numbers are not important. Next is the inside local address column. Notice that R1 does not translate the port numbers when using static NAT. The last two columns introduce two new terms, outside local and outside global. Let’s discuss.
Cisco NAT terminology
Look at the following diagram. The outside local address is the IP address of the outside host from the perspective of the local network. For example, from PC1’s perspective, the server’s IP address 8.8.8.8 is an outside local IP address. The outside global address is the IP address of the outside host from the perspective of the outside network, the outside hosts. In this case, the server’s actual IP address is 8.8.8.8. So both the outside local address and the outside global address are the same. Unless destination NAT is used, these two addresses will always be the same.
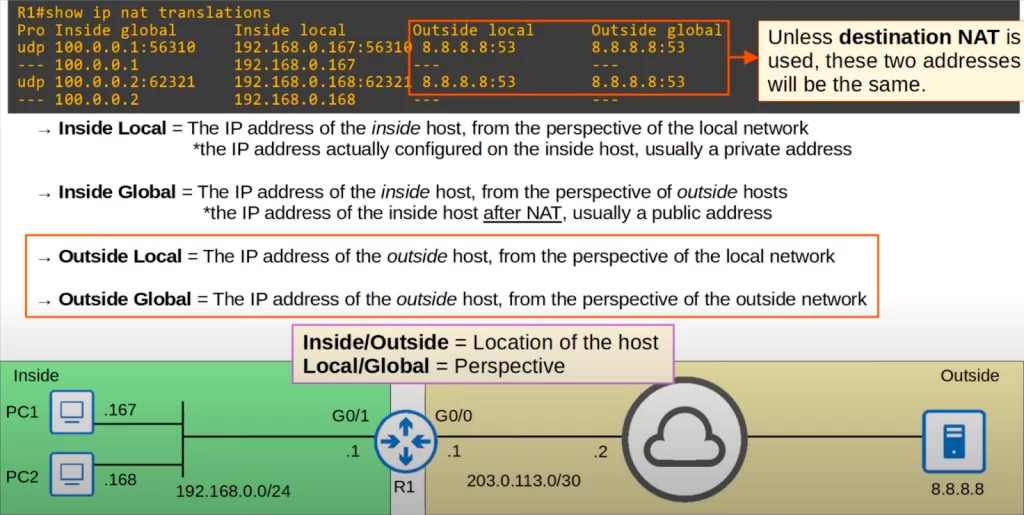
Notice that the port number is also indicated for these services. In this case, PC1 and PC2 used DNS to access the server, as indicated by the port number. DNS uses UDP port 53, and sometimes TCP port 53.
The four terms – inside local, inside global, outside local, and outside global – can be a little confusing.
“Inside” and “outside” indicate the location of the host, on the inside network or the outside network. PC1 and PC2 are inside, and the server at 8.8.8.8 is outside.
“Local” and “global” indicate the perspective. Local means from the perspective of the local, inside network. Global means from the perspective of the global, outside network. For example, 192.168.0.167 is PC1’s IP address from the perspective of the local network, and 100.0.0.1 is PC1’s IP address from the perspective of the global network.
clear ip nat translation
Each time the static NAT entries are used, dynamic entries are added to the NAT translation table for those translations, as you can see in the following CLI output, as an example. These dynamic entries will eventually time out and be removed from the NAT translation table after PC1 and PC2 stop communicating with 8.8.8.8.
You can clear all of the dynamic translations in the NAT translation table with CLEAR IP NAT TRANSLATION, and then an asterisk.
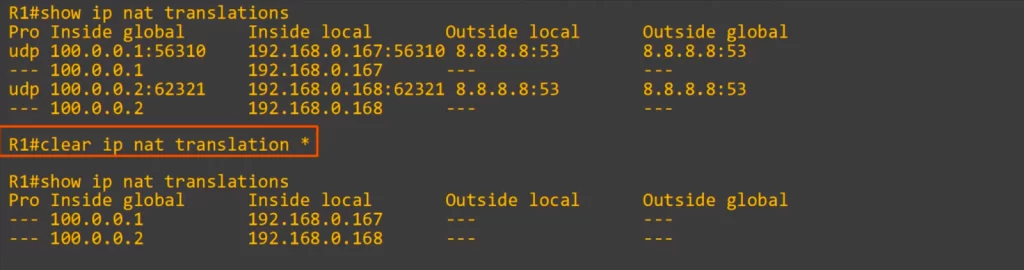
After using that command the two dynamic entries disappeared, but the static entries remained. These static NAT entries will not time out and cannot be deleted.
show ip nat statistics
The show ip nat statistics command displays the statistics for NAT on a router. This command is a useful tool for troubleshooting NAT problems and for monitoring the performance of NAT. The output of this command includes information such as the number of active translations, the number of expired translations, the number of translations using a pool, the number of translations using a static mapping, the interfaces that are marked as inside and outside, and the access lists that are used for NAT.
Let’s walk through the first few lines of a CLI output.
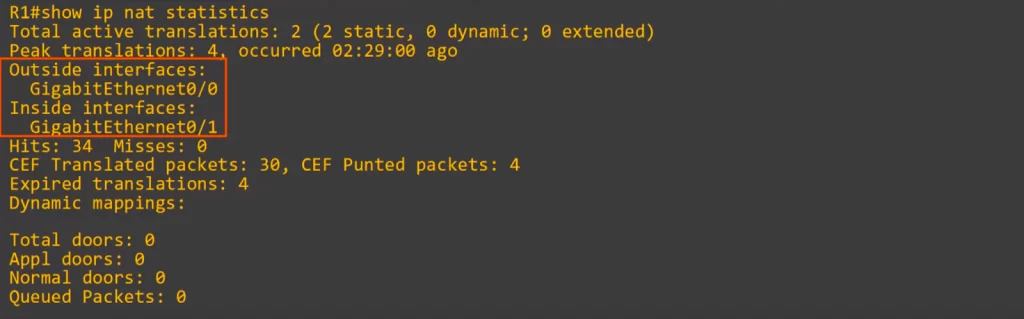
Total active translations: 2, and both of them are static. There are 0 dynamic entries, since we just cleared the dynamic entries. Extended entries are covered in NAT Part 2. Peak translations is 4, that’s the highest number of translations that has been in R1’s NAT table. Note, the outside interface is g0/0, and the inside interface is g0/1.
Command review
>Define the inside and outside interfaces:
First, define the inside interface or interfaces connected to the internal network.
R(config)#interface interface
R(config-if)#ip nat inside
Second, define the outside interface or interfaces connected to the external network.
R(config)#interface interface
R(config-if)#ip nat outside
R will perform NAT on traffic traveling from the inside interface to the outside interface.
>Configure the one-to-one IP address mappings:
R(config)#ip nat inside source static inside-local-ip inside-global-ip
Example:
R1(config)#ip nat inside source static 192.168.0.167 100.0.0.1
This command maps 192.168.0.167 (PC1) to 100.0.0.1. R1 (PC1’s default gateway) performs source NAT to change the source IP address to 100.0.0.1.
>Show translations table:
R#show ip nat translations
When static NAT is used you will see the entries permanently displayed in the translations table. You can see entries for traffic sent from hosts inside the network to servers outside the network.
The translations table displays information about used protocols (e.g., UDP), inside global addresses and inside local addresses (and associated port numbers), and outside local addresses and outside global addresses (and associated port numbers, e.g., 53 to indicate DNS services).
>clear ip nat translation:
R#clear ip nat translation *
→to clear all the dynamic translations in the NAT translation table (the asterisk is part of the command)
>show ip nat statistics:
R#show ip nat statistics
→to display information about the number of active translations, the number of expired translations, and the outside and inside interfaces within the NAT configuration
Free CCNA | Static NAT | Day 44 Lab – Notes
Key learnings
*Introduction to private IPv4 addresses – the need for private IPv4 addressing, and the three private IP address ranges, 10.0.0.0/8, 172.16.0.0/12, and 192.168.0.0/16.
*Introduction to NAT in general. The function of NAT in a network, and how static source NAT functions.
*How to configure static NAT – specify the inside and outside interfaces, and then configure the IP address mappings.
Practice quiz questions
*You can find five practice questions for this lesson (plus a bonus one) in Jeremy’s NAT (Part 1) video, cited below.
*You can find five practice questions for NAT (including dynamic NAT and PAT) in Odom, 2020, pp. 521-523. See citation below.
Key references
Note: The resources cited below (in the “Key references” section of this document) are the main source of knowledge for these study notes/this lesson, unless stated otherwise.
Free CCNA | NAT (Part 1) | Day 44 | CCNA 200-301 Complete Course
Free CCNA | Static NAT | Day 44 Lab | CCNA 200-301 Complete Course
Other references/resources
NAT – Practical Networking — CCNA Topics
Odom, W. (2020). CCNA 200-301 Official Cert Guide, Volume 2. Cisco Press.
Related content
Compliance frameworks and industry standards
How data flow through the Internet
How to break into information security
IT career paths – everything you need to know
Job roles in IT and cybersecurity
Network security risk mitigation best practices
The GRC approach to managing cybersecurity
The penetration testing process
The Security Operations Center (SOC) career path
Back to DTI Courses


