This is Part 2 of 2 of NAT (Network Address Translation) study notes for the CCNA 200-301 exam. NAT study notes Part 1 introduced NAT and covered static NAT configuration. This lesson covers dynamic NAT configuration and dynamic PAT configuration.
In static NAT, the router maps a private IP address to a fixed public IP address. In dynamic NAT, the router assigns a public IP address from a pool of available addresses to a private IP address on demand. In dynamic PAT (port address translation), the router uses a single public IP address and assigns unique combinations of public IP address and port number to differentiate between multiple private IP addresses. Dynamic PAT is very useful because it allows many devices to share a single public IP address. This post constitutes Issue 36 of my CCNA 200-301 study notes.
- Dynamic NAT
- Dynamic NAT configuration
- PAT (NAT overload)
- Dynamic PAT configuration (pool)
- Dynamic PAT configuration (interface)
- Command review
- Key learnings
- Practice quiz questions
- Key references
You may also be interested in CCNA 200-301 study notes.
Dynamic NAT
In dynamic NAT, the router dynamically maps inside local addresses to inside global addresses as needed. Rather than manually mapping one IP address to another IP address, the router makes those mappings automatically, and then clears the mappings when they are no longer needed.
When configuring dynamic NAT on Cisco devices, an access control list (ACL) is used to identify which traffic should be translated. ACLs can be used to indicate which traffic should be forwarded and which should be blocked. But ACLs can also be used just to identify traffic.
If the source IP of a packet is permitted by the ACL, the source IP will be translated by NAT. If the source IP is denied by the ACL, the source IP will not be translated. In this case, we are using the ACL just to identify which traffic should be translated, we are not using ACL to drop packets.
Then a NAT pool is used to define the available inside global addresses that can be used for translation.
For example, on R1 we configured ACL 1, which permits 192.168.0.0/24 and denies all other traffic. We also configured NAT POOL1 on R1, with a range from 100.0.0.1 to 100.0.0.10. That means if a packet with a source IP permitted by ACL 1 arrives at R1, R1 will translate the source IP to an address from POOL1.
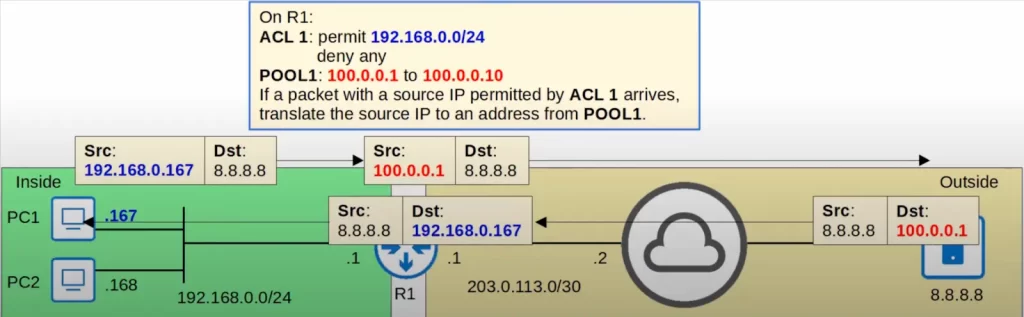
PC1 sends a packet. The source IP address of the packet is permitted by ACL 1. Then R1 translates the source IP to an address from POOL1, 100.0.0.1. The server sends a reply, and R1 translates the address back to the actual address.
This looks like the same process as in static NAT. The difference is that instead of manually configuring a mapping from 192.168.0.167 to 100.0.0.1, R1 did it automatically when the packet from PC1 arrived.
The dynamically assigned mappings are still one-to-one, one inside local IP address to one inside global IP address.
We have NAT pool exhaustion when all inside global IP addresses are being used. In the previous example, the ACL specified a /24 subnet of inside local addresses, but the NAT pool only had 10 inside global addresses. So there can only be 10 translations active at a time.
If one more packet from an inside host arrives and needs NAT but there are no available addresses, the router will drop the packet.
The host will be unable to access outside networks until one of the inside global IP addresses becomes available. Dynamic NAT translation entries can be manually cleared. You can use the CLEAR IP NAT TRANSLATION command anytime to manually clear translations. Or, dynamic NAT translation entries will time out automatically. In our previous example if PC1 stops communicating with external hosts for sometime, the inside global address 100.0.0.1 would become available again for a different host to use.
Dynamic NAT configuration
First we must define the router’s inside and outside interfaces, just like in static NAT.
Then we define the traffic that should be translated using an ACL. The ACL in the following example tells R1 to translate all traffic from 192.168.0.0/24.
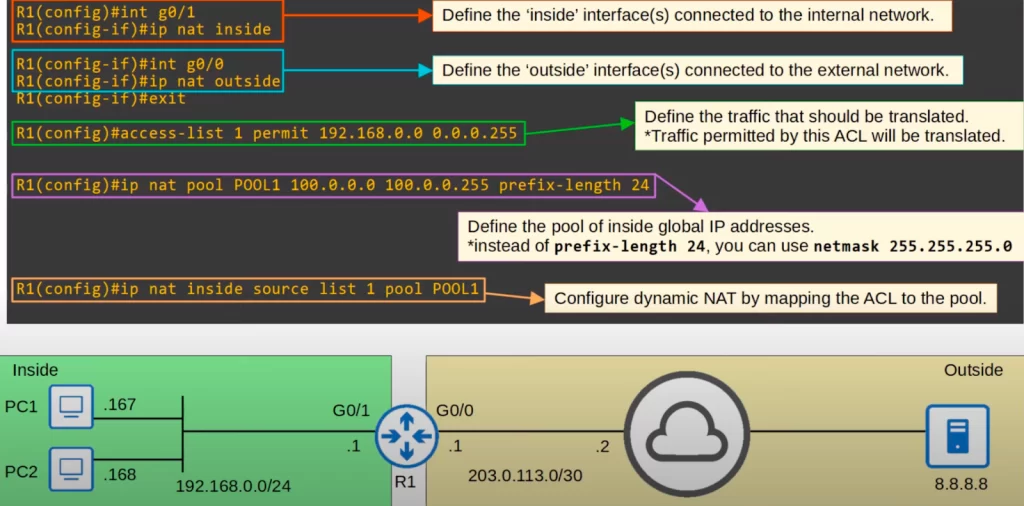
Then define the pool of inside global IP addresses using the command IP NAT POOL, followed by the pool name, the first IP address in the range, and the last IP address in the range. We specified a range from 100.0.0.0 to 100.0.0.255. Then specify the prefix length, either with the PREFIX-LENGTH option or the NETMASK option. IOS uses this information to check if both the first and last address of the range are in the same subnet. If they are not, the command will be rejected.
Finally, configure dynamic NAT by mapping the ACL to the pool, with IP NAT INSIDE SOURCE, and then (instead of STATIC) use LIST, followed by the ACL number or name, and then POOL, followed by the pool name.
With the configurations complete we sent some traffic from PC1 and PC2 to 8.8.8.8.

Let’s check out R1’s translation table.
Here’s R1’s translation table after sending pings and DNS traffic to the server at 8.8.8.8.
The router dynamically created the inside local to inside global mappings.

Three entries for each mapping were created: three for 192.168.0.167 to 100.0.0.1, and three for 192.168.0.168 to 100.0.0.2.
The UDP and ICMP entries will be cleared after about a minute, but the original dynamic mappings themselves have a default timeout value of 24 hours, and each time a translation is made the timer resets. The default timers can be changed if needed.
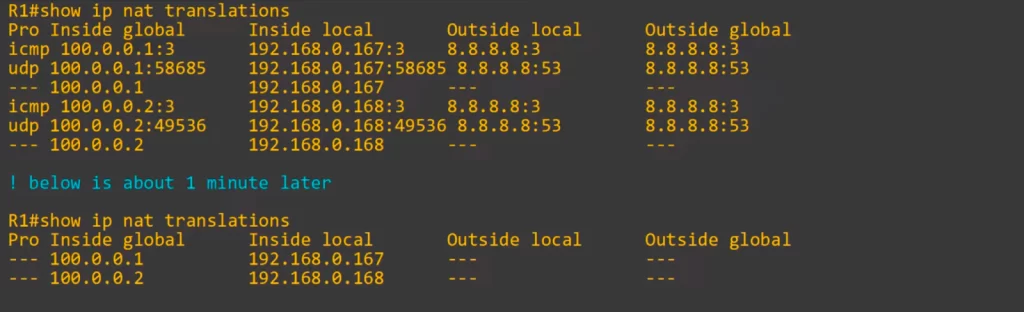
These entries look like the static NAT entries we saw in NAT Part 1. But these entries will be cleared if we used the CLEAR IP NAT TRANSLATION command because they are entries for dynamic operations, not static.
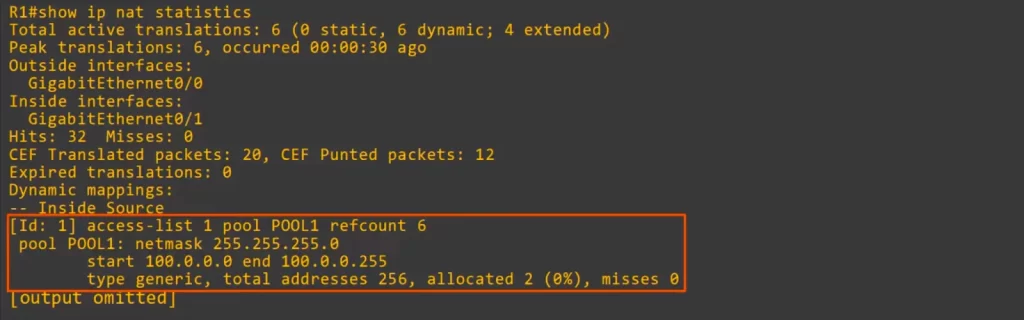
Like with static NAT, the two SHOW commands you should know for dynamic NAT are SHOW IP NAT TRANSLATIONS and SHOW IP NAT STATISTICS.
Let’s look at the SHOW IP NAT STATISTICS. We entered this command when all 6 translation entries were active, so the CLI displays 6 total active translations, all dynamic and they include 4 extended translation entries (those UDP and ICMP temporary entries that were cleared after a minute). Extended entries are beyond the scope of the CCNA.
You can confirm the dynamic mapping from ACL 1 to POOL1 here.
Although both static NAT and dynamic NAT are one-to-one mappings, static NAT mappings are permanent while dynamic NAT mappings are temporary. Dynamic NAT mappings will time out when they are no longer needed, then another host can use the released public IP address. However, hosts are still unable to use the same public IP address at the same time. To do that, you have to use PAT, Port Address Translation.
PAT (NAT overload)
PAT, also known as NAT overload, uses a single public IP address and different port numbers to distinguish between multiple private IP addresses. PAT translates both the IP address and the port number of a packet. Port numbers are 16 bits in length, so there are over 65,000 port numbers (2 to the power of 16 is 65536).
By using a unique port number for each communication flow between internal hosts and external hosts, a single public IP address can be used by many different internal hosts. By using a unique port number for each communication flow, the router can keep track of which inside local address is using which inside global address and port.
Let’s demonstrate.
PC1 sends a DNS message to 8.8.8.8. PC1’s source IP is 192.168.0.167, and it selects a random source port, 54321. PC2 also sends a DNS message to 8.8.8.8, with source IP 192.168.0.168. PC2 also selects a random source port, and it happens to choose the same source port as PC1, 54321.
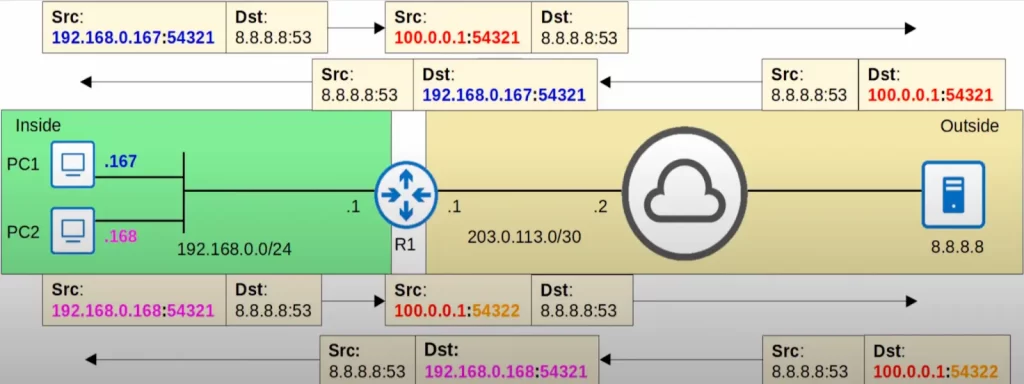
R1 translates the source IP of PC1’s message to 100.0.0.1, and keeps the source port the same, 54321. For PC2’s message, R1 also translates the source IP to 100.0.0.1, but it changes the source port to 54322. R1 does this so it can keep track of the communication flows. If both flows use the same source IP and source port, when the replies come from the server, R1 will not know which reply is meant for which PC.
The server sends the replies to R1. Both have destination IP 100.0.0.1, but one has destination port 54321, and the other 54322. Because of the unique port numbers, R1 knows which reply to send to PC1 and which reply to send to PC2.
In this example, both PCs selected the same random source port number. However, if PC2 selected a different random source port than PC1, then R1 would have no need to translate the source port. It would simply use the source port PC2 selected and use that to keep track of the sessions.
PAT allows many inside hosts to use a single public IP address because the router can keep track of communication flows using the Layer 4 port number. This means most networks only need a single public IP address instead of each device requiring a unique public IP address. So NAT overload is the NAT type that best fulfills the goal of preserving public IPv4 addresses.
Dynamic PAT configuration (pool)
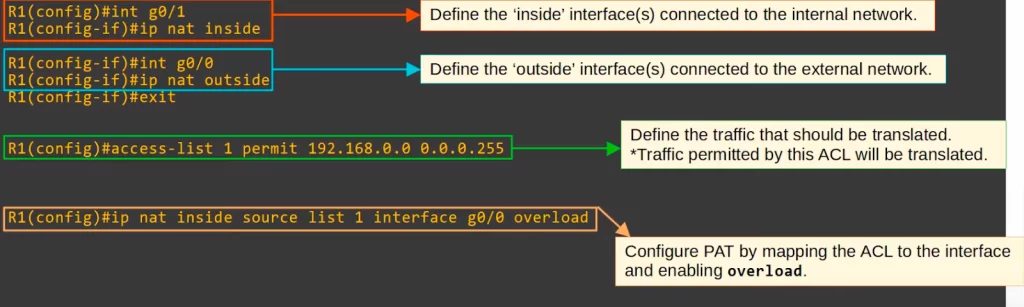
PAT configuration is similar to dynamic NAT configuration, you just add one keyword, overload.
First define the inside and outside interfaces.
Then define which traffic should be translated by using an ACL. Traffic permitted by the ACL will be translated.

Then define the pool of inside global IP addresses. This time we defined a smaller range, from 100.0.0.0 to 100.0.0.3. A single IP address should be enough, unless the internal network is very large. However, specifying a range provides some scalability.
Finally, the NAT statement itself. It’s the same as for dynamic NAT, except at the end you use the keyword OVERLOAD. IP NAT INSIDE SOURCE LIST 1 POOL POOL1 OVERLOAD.
PC1 and PC2 both send DNS requests to 8.8.8.8.

Let’s look at the NAT translations and statistics on R1.
First, here are the translations on R1. One big difference compared to regular dynamic NAT is that those one-to-one dynamic mapping entries are not displayed. That’s because when using PAT, there are no one-to-one mappings, they are many to one. Many inside local addresses to one inside global address. As you can see, both 192.168.0.167 and 192.168.0.168 are using 100.0.0.1.
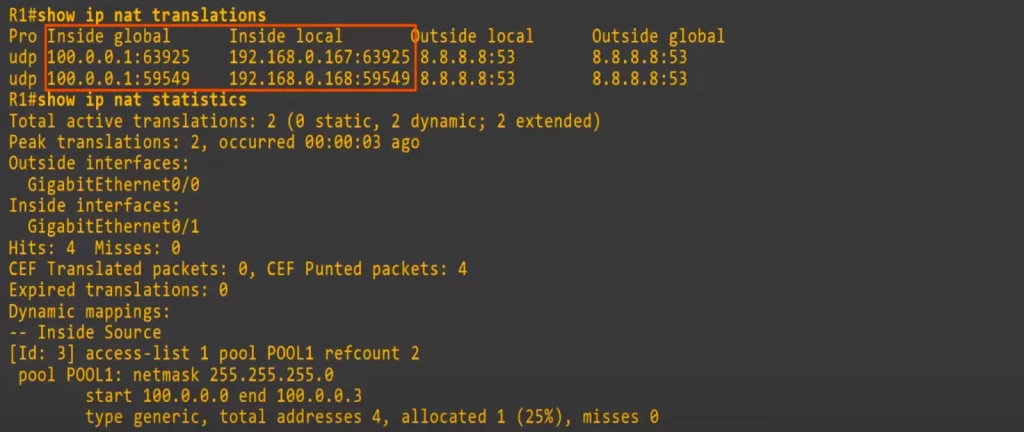
Both 192.168.0.167 and 192.168.0.168 selected different source port numbers, so R1 did not need to translate the port numbers. R1 will use port number 63925 to track the communication flow between PC1 and 8.8.8.8, and it will use port number 59549 to track the communication flow between PC2 and 8.8.8.8.
Dynamic PAT configuration (interface)
One more way to configure PAT, and probably the more common way, is to configure the router to use its own public IP address when translating the source IP of packets.
Like before, we must configure the inside and outside interfaces on the router.
Then we use an ACL to define which traffic should be translated.
Here’s the difference with the previous method of configuring PAT: instead of specifying a POOL and then the OVERLOAD keyword, we specify INTERFACE, then the outside interface, g0/0 in R1’s case, and then OVERLOAD.
So R1 will translate the source IP address of packets from 192.168.0.0/24 to the IP address of its G0/0 interface, 203.0.113.1. R1 will also use a unique source port number for each traffic flow so it can keep track of traffic flows and multiple internal hosts can share that single IP address.
Let’s demonstrate that. PC1 and PC2 both send DNS requests to 8.8.8.8.
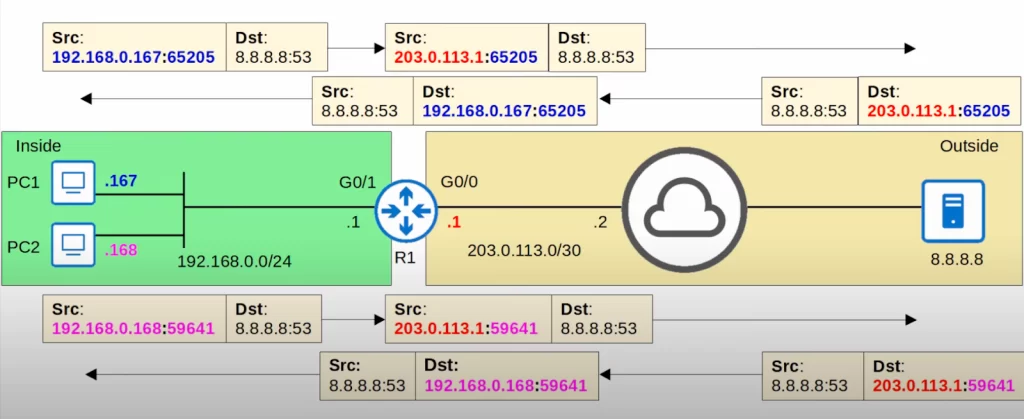
Notice that they both selected a different random source port. 65205 for PC1 and 59641 for PC2.
R1 translates the source IP address of both packets, changing them to the IP of R1’s G0/0 interface, 203.0.113.1. Because both source port numbers are already different, there is no need to translate the port numbers.
The server sends the replies, and R1 translates them back and sends them to their correct destinations. Because of the unique port numbers, R1 knows which reply to translate back to 192.168.0.167 and which reply to translate back to 192.168.0.168.
Next, here are R1’s NAT translations and statistics.
Notice in R1’s NAT translation table, both 192.168.0.167 and 192.168.0.168 are using R1’s IP address, 203.0.113.1.
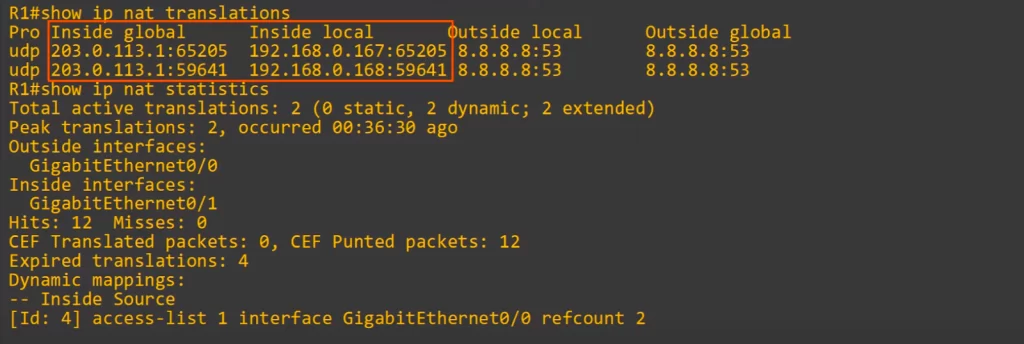
Also note that there was no need for R1 to translate the source port numbers because they were already unique.
Command review
>Dynamic NAT configuration:
First we must define the router’s inside and outside interfaces, just like in static NAT.
R(config)#interface interface
R(config-if)#ip nat inside
R(config)#interface interface
R(config-if)#ip nat outside
Then we define the traffic that should be translated using an ACL (traffic permitted by the ACL will be translated).
The ACL in the following example tells R1 to translate all traffic from 192.168.0.0/24.
R1(config)#access-list 1 permit 192.168.0.0 0.0.0.255
Then we define the pool of inside global IP addresses.
R(config)#ip nat pool pool-name start-ip end-ip prefix-length prefix-length
Or,
R(config)#ip nat pool pool-name start-ip end-ip netmask subnet-mask
Finally, configure dynamic NAT by mapping the ACL to the pool.
R(config)#ip nat inside source list access-list pool pool-name
>Dynamic PAT configuration (pool):
PAT configuration is similar to dynamic NAT configuration, you just add one keyword, overload.
First define the inside and outside interfaces.
R(config-if)#ip nat inside
R(config-if)#ip nat outside
Then define which traffic should be translated by using an ACL. Traffic permitted by the ACL will be translated. For example,
R1(config)#access-list 1 permit 192.168.0.0 0.0.0.255
Then define the pool of inside global IP addresses.
R(config)#ip nat pool pool-name start-ip end-ip prefix-length prefix-length
Finally, configure PAT by mapping the ACL to the pool and using the OVERLOAD keyword at the end.
R(config)#ip nat inside source list access-list pool pool-name overload
>Dynamic PAT configuration (interface):
This is probably the more common way to configure PAT. The router is configured to use its own public IP address when translating the source IP of packets.
Like before, we must configure the inside and outside interfaces on the router.
Then we use an ACL to define which traffic should be translated.
Finally, configure PAT by mapping the ACL to the interface and enabling overload. Instead of specifying a POOL and then the OVERLOAD keyword, we specify INTERFACE, then the router’s outside interface, and then OVERLOAD.
R(config)#ip nat inside source list access-list interface interface overload
Free CCNA | Dynamic NAT | Day 45 Lab – Notes
Key learnings
*What is dynamic NAT and how to configure it in Cisco IOS.
*What is dynamic PAT and how to configure it in Cisco IOS.
Practice quiz questions
*You can find five practice questions for this lesson (plus a bonus one) in Jeremy’s NAT (Part 2) video, cited below.
*You can find five practice questions for NAT (including dynamic NAT and PAT) in Odom, 2020, pp. 521-523. See citation below.
Key references
Note: The resources cited below (in the “Key references” section of this document) are the main source of knowledge for these study notes/this lesson, unless stated otherwise.
Free CCNA | NAT (part 2) | Day 45 | CCNA 200-301 Complete Course
Free CCNA | Dynamic NAT | Day 45 Lab | CCNA 200-301 Complete Course
Other references/resources
NAT – Practical Networking — CCNA Topics
Odom, W. (2020). CCNA 200-301 Official Cert Guide, Volume 2. Cisco Press.
Related content
Compliance frameworks and industry standards
How data flow through the Internet
How to break into information security
IT career paths – everything you need to know
Job roles in IT and cybersecurity
Network security risk mitigation best practices
The GRC approach to managing cybersecurity
The penetration testing process
The Security Operations Center (SOC) career path
Back to DTI Courses


