This is Part 1 of 2 of ACLs study notes for the CCNA. The CCNA exam topics list mentions ACLs (Access Control Lists) in Section 5, Security Fundamentals, subsection 5.6, which says you must be able to “configure and verify access control lists”. This subsection refers to IPv4 ACLs. This lesson focuses on how to configure standard ACLs on Cisco routers. The next lesson, ACLs Part 2, focuses on how to configure extended ACLs on Cisco routers.
This lesson looks at what are ACLs and what is their purpose, how ACLs work/how to build ACLs, ACL logic/how the router processes ACLs, and ACL types used on Cisco routers. Further, we learn how to configure and verify two kinds of ACLs, standard numbered ACLs, and standard named ACLs. This post constitutes Issue 28 of my CCNA 200-301 study notes.
- What are ACLs (Access Control Lists)?
- How ACLs work
- ACL logic
- Implicit deny
- ACL types
- Configuring standard numbered ACLs on Cisco routers
- Configuring standard named ACLs on Cisco routers
- Command review
- Key learnings
- Practice quiz questions
- Key references
You may also be interested in CCNA 200-301 study notes.
What are ACLs (Access Control Lists)?
ACLs are a set of rules that define what traffic is allowed or denied in a network based on source and destination IP addresses and based on source and destination L4 port numbers.
ACLs are used to identify and control traffic in a network. ACLs are used to control which devices have access to which parts of the network. For example, Host A should be allowed to access Server A, but Host B should not be allowed to access Server A.
ACLs can be used to implement a variety of security policies, such as:
- Preventing unauthorized access to the network. ACLs can be used to block traffic from certain IP addresses or networks, preventing unauthorized users from accessing the network.
- Controlling traffic flow. ACLs can be used to control the flow of traffic between different parts of the network, for example, to prevent users on one subnet from accessing resources on another subnet.
- Protecting against malicious traffic. ACLs can be used to block traffic from known malicious sources, such as known botnets or malware C&C (Command and Control) servers.
This lesson, How to configure standard ACLs on Cisco routers, and the next, How to configure extended ACLs on Cisco routers, focus only on ACLs from a security perspective, controlling which clients or hosts have access to different parts of the network.
In the context of security, ACLs function as a packet filter, instructing the router to permit or discard specific traffic. When a router receives a packet and the router has a route to the packet’s destination, the router will forward the packet according to its routing table. However, ACLs can override this default process. ACLs configured on a router act as gatekeepers, permitting certain traffic flows and denying others.
Let’s use the following network to demonstrate how ACLs work.
R1 and R2 are linked through a point-to-point connection. The 192.168.1.0/24 network is connected to R1. PC1 and PC2 reside in this subnet. Notice that instead of including a switch in the diagram and showing the PCs connected to the switch, the network segment is represented as shown, with a bar or pipe in-between and connecting R1 and PC1 and PC2. In reality, all the PCs in the 192.168.1.0/24 network are connected to a switch, and the switch is connected to R1. This method of topology representation is common in network diagrams.
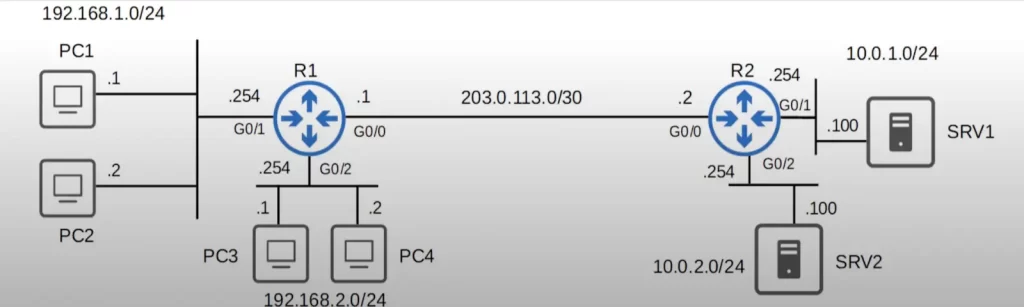
The 192.168.2.0/24 network with PC3 and PC4 is connected to R1. The 10.0.1.0/24 network with SRV1 is connected to R2. And the 10.0.2.0/24 network with SRV2 is connected to R2.
How ACLs work
ACLs are used to achieve a certain requirement. We need to be clear about the requirement before configuring ACLs on routers.
Let’s build an ACL so we can see how it works.
Let’s say we want hosts in 192.168.1.0/24 to be able to access the 10.0.1.0/24 network. They should be able to access files on SRV1. And we do not want hosts in the 192.168.2.0/24 network to be able to access 10.0.1.0/24. PC3 and PC4, for example, should not be able to access files on SRV1.
Let’s formulate these needs as a requirement.
Requirement:
Hosts in 192.168.1.0/24 can access the 10.0.1.0/24 network.
Hosts in 192.168.2.0/24 cannot access the 10.0.1.0/24 network.
How can we use ACLs to achieve this?
ACLs are made up of an ordered sequence of ACEs, access control entries.
To fulfill our example requirement, we could configure ACL 1 like this on R1 or R2, as three ACEs:
ACL 1:
1: if source IP = 192.168.1.0/24, then permit
2: if source IP = 192.168.2.0/24, then deny
3: if source IP = any, then permit
ACE 1 says if source IP equals 192.168.1.0/24, then permit the packet, let the router forward it. ACE 2 says if source IP equals 192.168.2.0/24, deny the traffic. ACE 3 says that all other traffic should be permitted. The order of these entries is very important.
Standard numbered ACLs are configured globally on the router. However, configuring an ACL (deny and permit entries) in global config mode will not make the ACL take effect. After being created, the ACL must be applied to an interface.
ACLs are applied either inbound or outbound.
Let’s see how that works.
Let’s say we configured ACL 1 on R1. ACL 1 has been created, but it has not been applied yet. Let’s walk through some examples of applying ACL 1 to different interfaces in different directions.
We will succeed or fail in meeting the requirement depending on which interface we apply the ACL to, and which direction we apply it in.
For example, if we applied ACL 1 outbound on R1’s G0/2, ACL 1 it will only take effect on traffic exiting G0/2. Does that fulfill the requirements? No, because hosts in 192.168.2.0/24 can access the 10.0.1.0/24 network.
With this configuration, R1 will only use the ACL to filter traffic exiting G0/2, not entering it. If PC3 tries to ping SRV1, when the ping reaches R1, R1 will not even check the ACL because the traffic is entering G0/2, not exiting it. So R1 will forward the traffic to R2, which will forward it to SRV1.
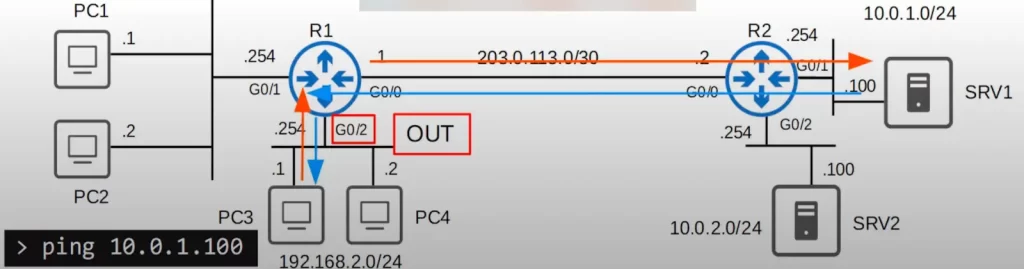
When SRV1 sends the reply to PC3 and the reply reaches R1, R1 will check the ACL to decide if the traffic should be forwarded out of G0/2. It will check the entries of ACL 1 in sequence.
ACL 1:
1: if source IP = 192.168.1.0/24, then permit
2: if source IP = 192.168.2.0/24, then deny
3: if source IP = any, then permit
If source IP = 192.168.1.0/24. This ACE does not apply. If source IP = 192.168.2.0/24. This ACE also does not apply. R1 reaches the last entry which says permit all other traffic, so it forwards the reply to PC3. PC3 was able to access SRV1. So this configuration is a no go.
What if we applied the ACL inbound on R1’s G0/2? That means R1 will check the ACL for all traffic entering G0/2.
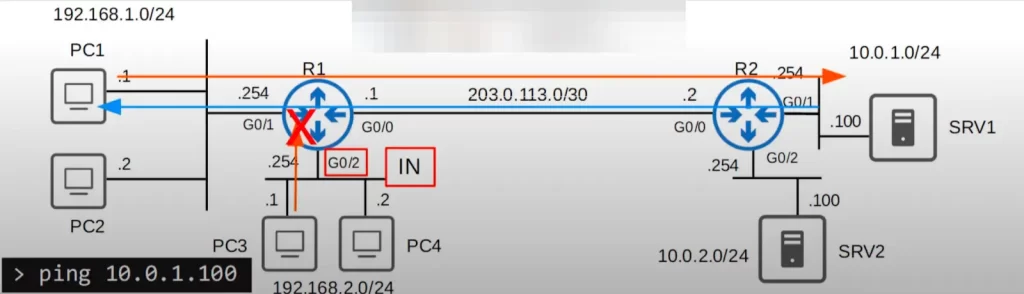
So if PC3 tries to ping SRV1, R1 will check the ACL entries, in order, from top to bottom. ACE 1, if source IP = 192.168.1.0/24, is no match. ACE 2, if source IP = 192.168.2.0/24, is a match. The source is 192.168.2.1, which is in 192.168.2.0/24.
So R1 will deny traffic flow from 192.168.2.1 into its G0/2. R1 drops the traffic.
Once a router finds a match and takes an action, it stops checking the other entries in the ACL, so ACE 3 (permit all other traffic) is ignored.
So, does this fulfill our requirements? Yes, but we are being too restrictive with this ACL configuration, by applying the ACL inbound on G0/2. Hosts in 192.168.2.0/24 are prevented from accessing the 10.0.1.0/24 subnet. Hosts in 192.168.2.0/24 are blocked from communicating with all other networks outside of their local LAN. PC3 and PC4 can communicate with each other, but that’s it.
So this is not the best way to apply ACL 1. There are some other possibilities we could try, such as applying ACL 1 to R1’s G0/0 or R2’s G0/0.
That said, the best location to place ACL 1 is outbound on R2’s G0/1 interface. Let’s see.
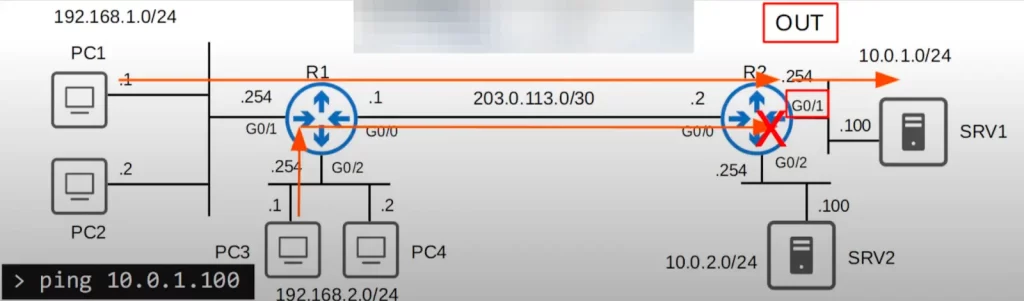
If PC3 tries to ping SRV1, R2 will check the ACL before forwarding the packet out of its G0/1 interface. The first entry says if source IP = 192.168.1.0/24, then permit. This ACE does not apply. Next, R2 checks the next entry. If source IP = 192.168.2.0/24, then deny. The source is indeed in that subnet, so the packet will be denied exit from R2’s G0/1. So, that satisfies the second requirement, hosts in 192.168.2.0/24 cannot access 10.0.1.0/24.
What if PC1, in 192.168.1.0/24, tried to ping SRV1? Before forwarding the packet out of its G0/1 interface, R2 will check the ACL. If the source IP is in 192.168.1.0/24, then permit. The source is 192.168.1.1, so the packet is permitted and R2 forwards it to SRV1. Both requirements have been satisfied, and there is no effect on other traffic.
As a rule of thumb, standard ACLs should be applied as close as possible to the destination. We are trying to control access to the 10.0.1.0/24 network, so that is the destination.
ACL logic
Standard numbered ACLs are configured in global config mode.
Standard named ACLs are configured from standard named ACL config mode, by configuring each entry within that config mode.
For an ACL to take effect you must apply it to an interface. When applying an ACL to an interface, you specify a direction, inbound or outbound. This tells the router to either check packets that enter the interface, or check packets that exit the interface.
ACLs are made up of one or more ACEs. When the router checks a packet against the ACL, the router processes the ACEs in order, from top to bottom. If the packet matches one of the entries in the ACL, the router takes the action and stops processing the ACL. All entries below the matching entry will be ignored.
A maximum of one ACL can be applied to a single interface per direction. One inbound ACL is allowed and one outbound ACL is allowed, for a maximum of two ACLs per interface. A second ACL applied to an interface in the same direction replaces the previous ACL.
Let’s see another example of how ACLs work.
Here we have a router and another ACL, ACL 2. The first entry in ACL 2 says if source IP = 192.168.1.0/24, then permit. The second entry says if source IP = 192.168.0.0/16, then deny. What effect will this ACL have if applied outbound on the G0/0 interface of this router?

If a packet with a source IP of 192.168.1.1 arrives on G0/1, before forwarding the packet out of G0/0 the router will check it against the ACL. The source is 192.168.1.1, which matches the first entry, so the router will forward the packet as normal. The second entry will be ignored.
Now we have reversed entries 1 and 2 in ACL 2. Now if the same packet with a source IP of 192.168.1.1 arrives on G0/1, before forwarding the packet out of G0/0, the router checks ACL 2’s ACE 1. The entry tells the router to deny the packet, so R1 discards the packet. Entry 2, which tells the router to permit that packet, is ignored.

Implicit deny
What happens if a packet does not match any of the entries in an ACL?
Here’s the same ACL, ACL 2, and the same router. This time the router receives a packet with source IP 10.0.0.1. Before forwarding the packet out of G0/0, the router checks the ACL. 10.0.0.1 does not match the first entry. And it does not match the second entry either. What happens? The router will discard the packet, it will not forward it, because of an implicit deny.
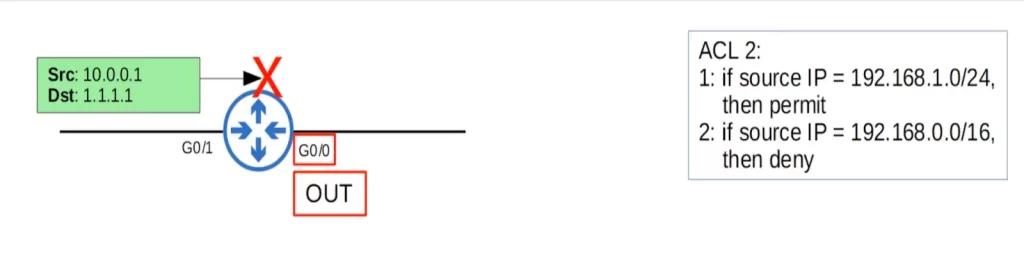
Even though there is no entry in the ACL telling the router to deny the packet, it is as if there is an invisible entry at the end, if source IP = any, then deny.
ACL 2:
1: if source IP = 192.168.1.0/24, then permit
2: if source IP = 192.168.0.0/16, then deny
3: if source IP = any, then deny → implied
This is true for all ACLs.
To summarize this point, there is an implicit deny at the end of all ACLs. The implicit deny tells the router to deny all traffic that does not match any of the configured entries in the ACL.
ACL types
There are two main types of ACLs, standard ACLs and extended ACLs. Each of those two types have two sub-types.
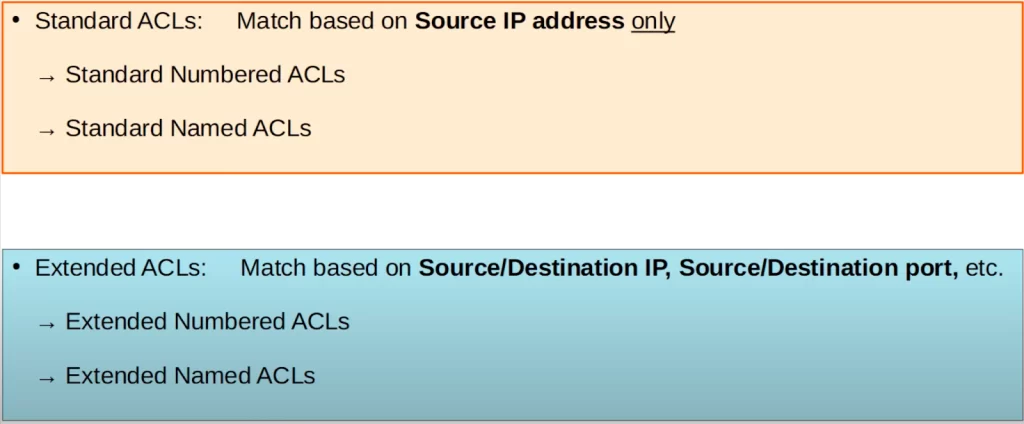
The first type is standard ACLs. These match based on source IP address only, so they are quite simple. The two sub-types of standard ACLs are standard numbered ACLs, which are identified with a number like 1, 2, etc. And there are standard named ACLs, which are identified with a name. There are differences in how you configure numbered and named ACLs.
The second main type of ACLs is extended ACLs. These are more complex and can match based on source and/or destination IP address, source and/or destination port numbers, as well as some other parameters. Like standard ACLs, there are numbered and named versions of extended ACLs.
All the examples so far have been standard ACLs, filtering packets only based on their source IP address. This lesson only covers standard ACLs. Extended ACLs are covered in the lesson How to configure extended ACLs on Cisco routers.
Configuring standard numbered ACLs on Cisco routers
Standard ACLs match traffic based only on the source IP address of the packet. The router does not check the destination IP, the source L4 port, or the destination L4 port. The router just looks at the source IP address of the packet and decides to forward or block it.
Numbered ACLs are identified with a number such as ACL 1, ACL 2, etc. There are also named ACLs.
The type of ACL you have to learn for the CCNA is IP ACL. There are lots of different types of ACLs, and each have their own range of numbers that can be used.
Standard ACLs can use 1 to 99 and 1300 to 1999. The ACL number has to be in one of these ranges. You cannot configure a standard ACL with the number 100, for example.
Here is a list of different ACL types and the different number ranges that identify them.

The command syntax to configure a standard numbered ACL is:
R(config)#access-list number {deny | permit} src-ip wildcard-mask
The ACL number must be in the range 1 to 99 or 1300 to 1999. Then we specify either deny or permit, and then the IP address and wildcard mask to match against.
Feel free to review wildcard masks from the lesson on RIP & EIGRP: RIP & EIGRP function and configuration
Here are some examples of how to configure a single entry in access-list 1.
Method 1:
R1(config)#access-list 1 deny 1.1.1.1 0.0.0.0
This denies 1.1.1.1/32, meaning only 1.1.1.1, a single host.
Method 2:
When you specify a /32 mask in an ACL, you do not have to specify the wildcard mask. You can just specify 1.1.1.1, and the router will understand that it’s /32.
R1(config)#access-list 1 deny 1.1.1.1
Method 3:
You can use the HOST keyword before the IP address.
R1(config)#access-list 1 deny host 1.1.1.1
These are three different ways of configuring the exact same thing. All three commands have the same effect.
But if you are matching anything other than a /32 mask you have to use the first method, you have to specify the wildcard mask, e.g., 0.0.0.255, for a /24 network.
Let’s say we used one of those options to configure an entry in access list 1 (ACL 1) that blocks 1.1.1.1/32. But there is an implicit deny. If we leave the ACL configuration as is, all other traffic will be blocked too.
So let’s make another entry in this ACL to permit traffic. Here it is.
R1(config)#access-list 1 permit any
This entry tells the router to permit all traffic, with any source IP. We can achieve the same effect using a different entry, by specifying an IP address and wildcard mask that matches all addresses.
R1(config)#access-list 1 permit 0.0.0.0 255.255.255.255
You can also configure a remark for an ACL, e.g., to help you remember the purpose of the ACL. Adding a description will not have any effect on the ACL.
The command is ACCESS-LIST 1 REMARK, followed by the remark.
R1(config)#access-list 1 remark ## BLOCK BOB FROM ACCOUNTING ##
The hashtags are not part of the command. Using them just makes it easier to see the remark when looking at the config.
We tried configuring that ACL, let’s check it out. For both the deny and permit entries we entered the whole IP address and wildcard mask.
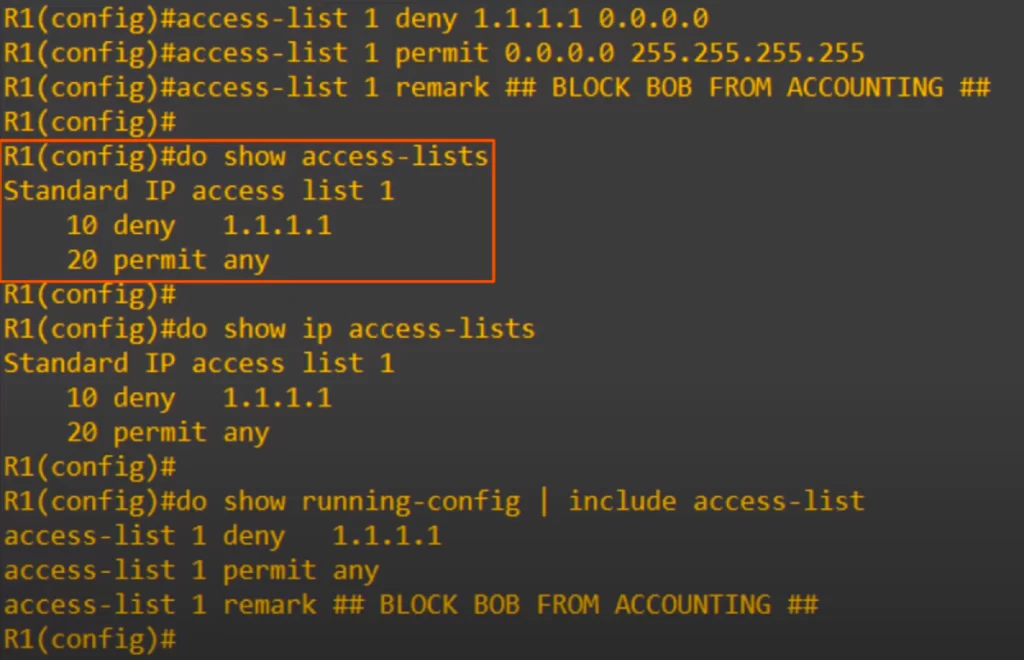
Notice that the router automatically converted DENY 1.1.1.1 0.0.0.0 to just DENY 1.1.1.1. The router does this when you use a /32 mask. The router also converted PERMIT 0.0.0.0 255.255.255.255 to PERMIT ANY.
Note, while the show ip access-lists command only displays IP access lists, the show access-lists command displays all access lists, regardless of the protocol. This includes IP access lists, MAC address access lists, and others. For more detailed information about the IP access lists, use the show ip access-lists command.
Notice that each entry is given a number indicating the order. We configured the DENY statement first, and it was assigned 10, then the PERMIT statement, and it was assigned 20. The order of the entries makes the ACL. If the PERMIT ANY entry was first, all traffic would be permitted and the DENY 1.1.1.1 entry would be useless. Modern routers should prevent you from doing configurations like that, but still you should be aware of how important the order is.
Notice the remark is not displayed in the SHOW ACCESS-LISTS command. It is only displayed in the config, using show running-config. We used SHOW RUNNING-CONFIG, followed by the pipe, and then INCLUDE ACCESS-LIST to only show lines in the config that include ACCESS-LIST.
Remember, for the ACL configuration to take effect, we have to apply the ACL to an interface. Here is the command.
R(config-if)#ip access-group number {in | out}
It’s ACCESS-GROUP, not ACCESS-LIST, then the ACL number, then IN or OUT.
Now let’s get into a real example of using these configurations.
Here’s the same network as before. We will specify some requirements and then use ACLs to restrict traffic to fulfill those requirements.
We will configure standard numbered ACLs on R1 (the next section shows how to configure standard named ACLs, on R2).
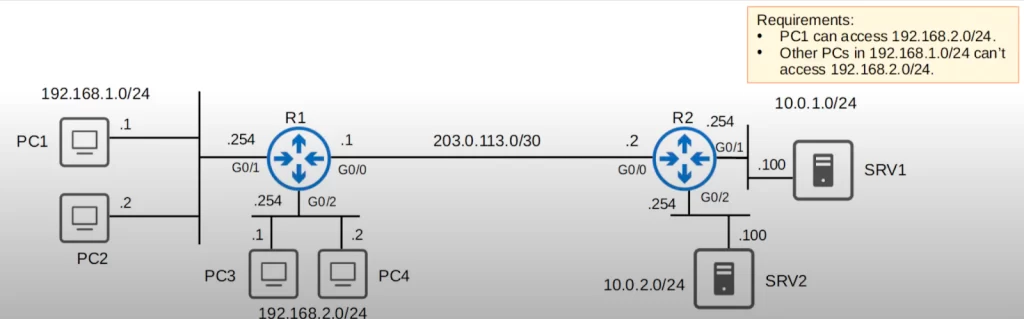
Here are some requirements which we can achieve by configuring an ACL on R1:
PC1 can access 192.168.2.0/24, but other PCs in 192.168.1.0/24 cannot access 192.168.2.0/24.
Here’s how we configured and applied an ACL to fulfill these requirements.
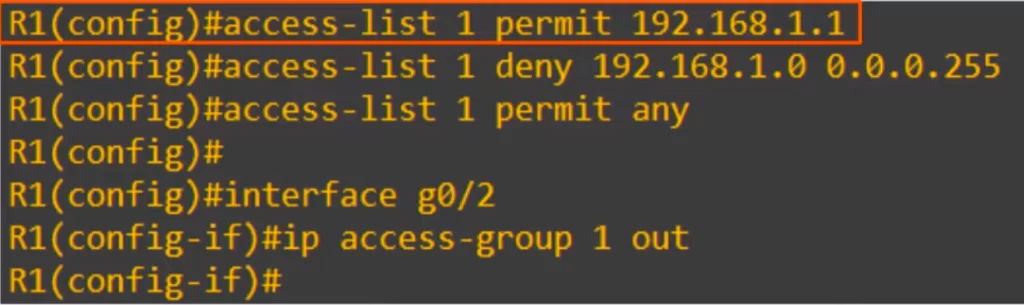
First we configured ACL 1 with an entry permitting 192.168.1.1/32, thus fullfling the first requirement of allowing PC1 to access 192.168.2.0/24. Then we configured an entry denying the 192.168.1.0/24 network access to 192.168.2.0/24, thus fulfilling the second requirement.
The order of these is very important. If we denied 192.168.1.0/24 first, PC1 would not be able to access 192.168.2.0/24, even if we put an entry permitting PC1 after the deny entry.
We then configured a permit any entry at the end. Remember there is an implicit deny hidden at the end of every ACL (if source IP = any, then deny). If we forget to permit any, the ACL will not only block PCs in the 192.168.1.0/24 network, it will block all other traffic.
Finally we applied the ACL to R1’s G0/2 interface with IP ACCESS-GROUP 1 OUT.
Why outbound on G0/2? We could have applied it inbound on G0/1.
Recall, standard ACLs should be applied as close as possible to the destination. We are trying to control access to the 192.168.2.0/24 network, so that is the destination.
Now let’s see how that ACL will work. PC1 tries to ping PC3.
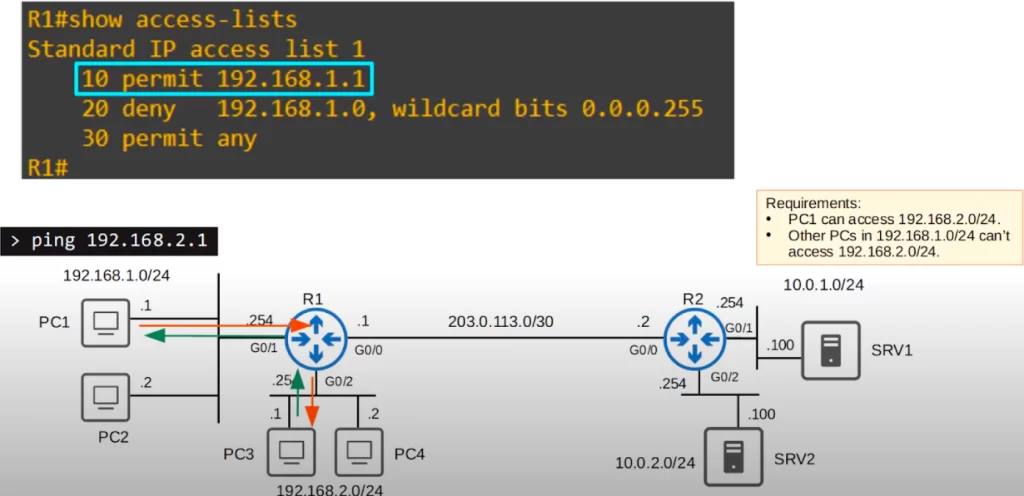
R1 receives the ping on G0/1. R1 looks up the destination in its routing table, and sees it’s connected to the G0/2 interface. Before forwarding the ping out of G0/2, R1 checks ACL 1. ACL 1 is applied outbound on G0/2. The first entry, entry 10, says permit source IP 192.168.1.1. The ping’s source is PC1, 192.168.1.1, so that’s a match. R1 will take the action, which is to permit the packet. So R1 forwards the packet to PC3. PC3 will be able to reply because there is no ACL blocking the return path from PC3 to PC1.
What if PC2 tries to ping PC3? R1 receives the ping on G0/1. R1 checks the routing table and sees that it should forward the packet out of G0/2, but because ACL 1 is applied outbound on G0/2, R1 checks ACL 1 first. R1 checks the top entry first, permit 192.168.1.1/32. The source of the ping is 192.168.1.2, so no IP match. Then R1 checks the next entry, deny 192.168.1.0/24. PC2’s IP is in this subnet, so it matches this entry and R1 takes the action, which is to deny. The ping to PC3 will not go through.
Configuring standard named ACLs on Cisco routers
Standard named ACLs are identified with a name rather than a number. We could, for example, name the ACL “BLOCK_BOB” – seeing as Bob is up to no good.
Configure standard named ACLs from standard named ACL config mode, by configuring each entry within that config mode.
Enter standard named ACL config mode from global config mode using the command IP ACCESS-LIST STANDARD, followed by the ACL name. Then configure the deny and permit entries.
R(config)#ip access-list standard acl-name
R(config-std-nacl)#[entry-number] {deny | permit} src-ip wildcard-mask
You can manually specify an entry number before each entry. If you don’t, entries will be numbered 10, then 20, then 30, etc. Each entry’s number will be 10 more than the previous one, just like in the standard numbered ACLs.
Here is an example.
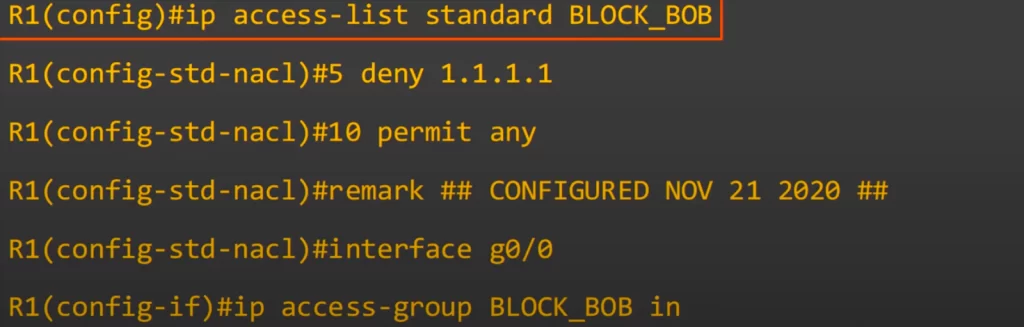
First, we entered the standard named ACL config mode from global config mode using the command IP ACCESS-LIST STANDARD BLOCK_BOB.
Then we configured a statement denying 1.1.1.1/32, as entry number 5.
Then we configured a permit any entry, as entry number 10.
Then we configured a remark.
Then we moved to interface configuration mode, and applied the ACL using IP ACCESS-GROUP, ACL name, and then IN or OUT.
R(config-if)#ip access-group name {in | out}
Let’s check with some show commands.
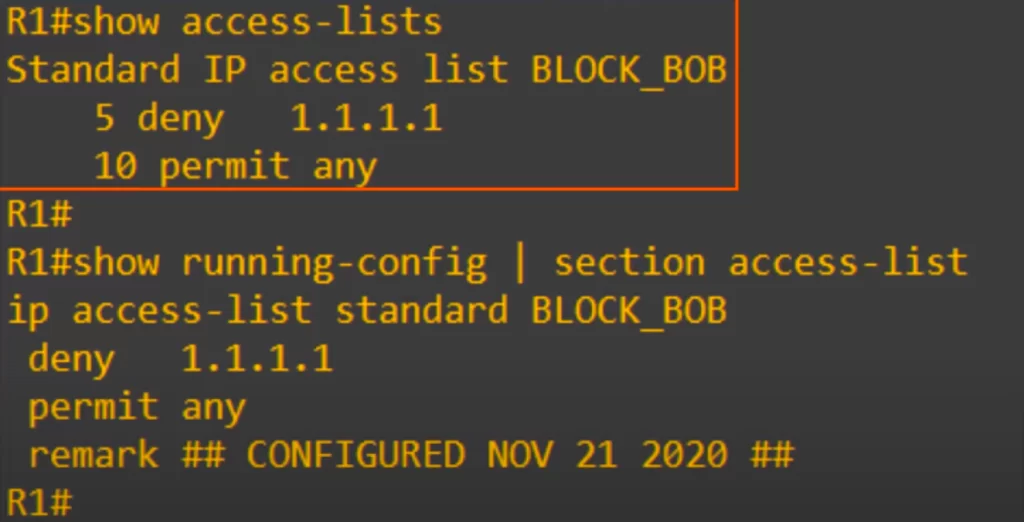
We used SHOW ACCESS-LISTS. The ACL is shown, and you can see each entry with the entry numbers we manually configured.
Then we checked the running config. We used SECTION ACCESS-LIST to filter the output. This displays just the ACL section of the running config. But we can view the whole ACL. We can see each entry including the remark, although the entry numbers are not displayed in the config.
Now let’s try configuring some standard named ACLs on R2.
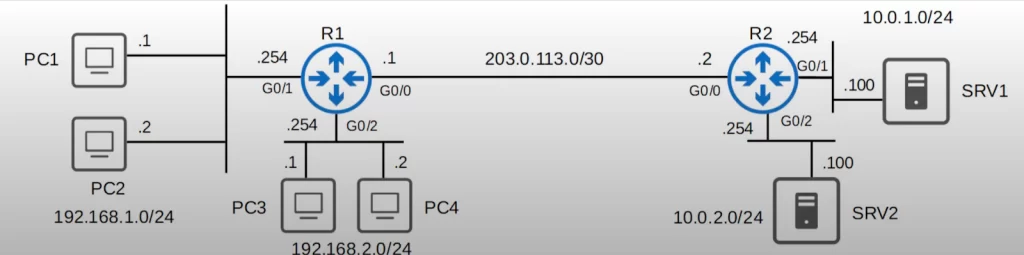
Here are the requirements.
Requirements:
- PCs in 192.168.1.0/24 cannot access 10.0.2.0/24
- PC3 cannot access 10.0.1.0/24
- Other PCs in 192.168.2.0/24 can access 10.0.1.0/24
- PC1 can access 10.0.1.0/24
- Other PCs in 192.168.1.0/24 cannot access 10.0.1.0/24
We will need two ACLs to meet these requirements.
1) We will configure one ACL to control access to 10.0.2.0/24 and apply it outbound on R2’s G0/2.
2) We will configure another ACL to control access to 10.0.1.0/24 and apply it outbound on R2’s G0/1.
Here’s how we can do that. The first ACL is named TO_10.0.2.0/24. The second ACL is named TO_10.0.1.0/24.
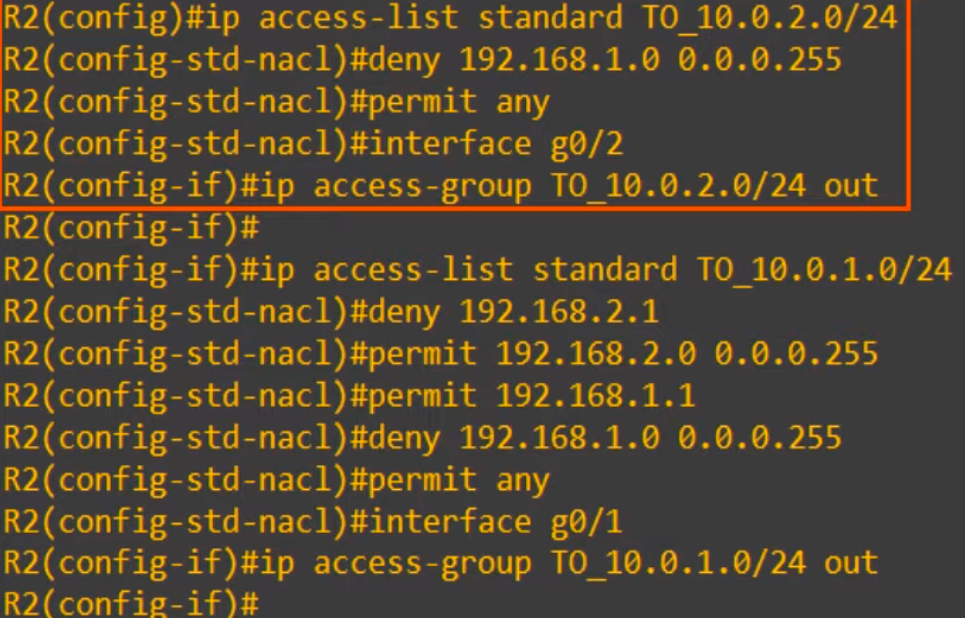
First, we entered the standard named ACL config mode from global config mode using the command IP ACCESS-LIST STANDARD TO_10.0.2.0/24. Then we denied the 192.168.1.0/24 network, but permitted other traffic. Then we applied the configuration outbound on G0/2. PC1 and PC2 will be blocked from accessing SRV2, but PC3 and PC4 will not be blocked from accessing SRV2.
The second ACL is called TO_10.0.1.0/24. First we denied PC3, 192.168.2.1. Then we permitted the rest of the PCs in PC3’s network, 192.168.2.0/24. Then we permitted PC1, but denied the other PCs in PC1’s network, 192.168.1.0/24. Then we permitted all other traffic. Finally we applied the ACL outbound on the G0/1 interface.
Note, there are other ways to configure these ACLs that will work too.
Now let’s check those ACLs with SHOW IP ACCESS-LISTS.
Do you notice something off about the TO_10.0.1.0/24 ACL? Look at the sequence numbers. 30, then 10, then 20, then 40, then 50. The sequence numbers match the order in which we configured the entries, but their actual order in the ACL is different.
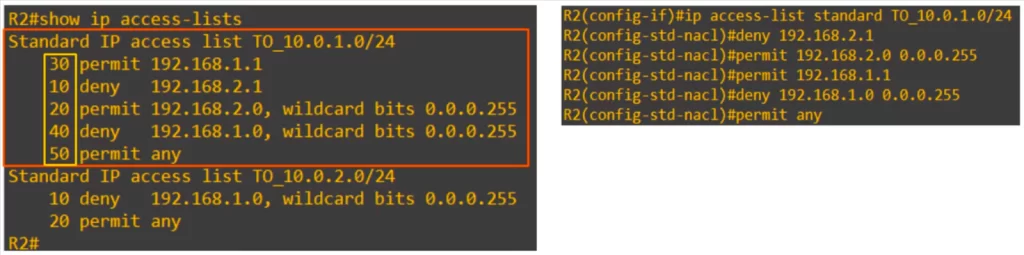
The reason for this difference has to do with the internal operations of Cisco IOS and how ACLs are processed. The router may re-order the /32 entries to improve the efficiency of processing the ACL. This changed ordering does not affect the ACL.
Let’s walk through one more example of an ACL being processed.
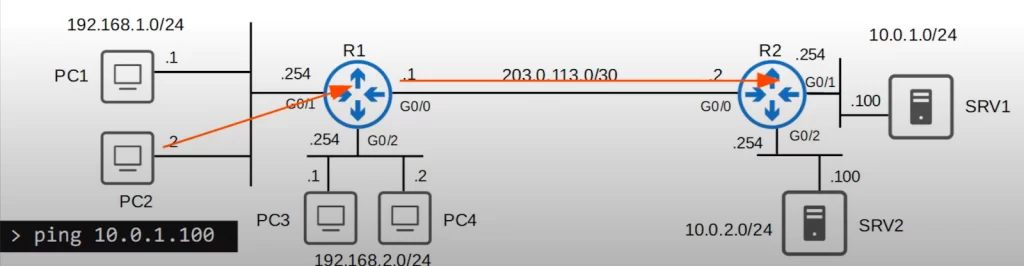
PC2 wants to access SRV1, so PC2 pings SRV1 to test the connectivity. The ping reaches R2, which is directly connected to SRV1’s network.
The TO_10.0.1.0/24 ACL is applied outbound on R2’s G0/1, so R2 will check the packet against that ACL before forwarding it. The source is 192.168.1.2, so this IP does not match the top entry.
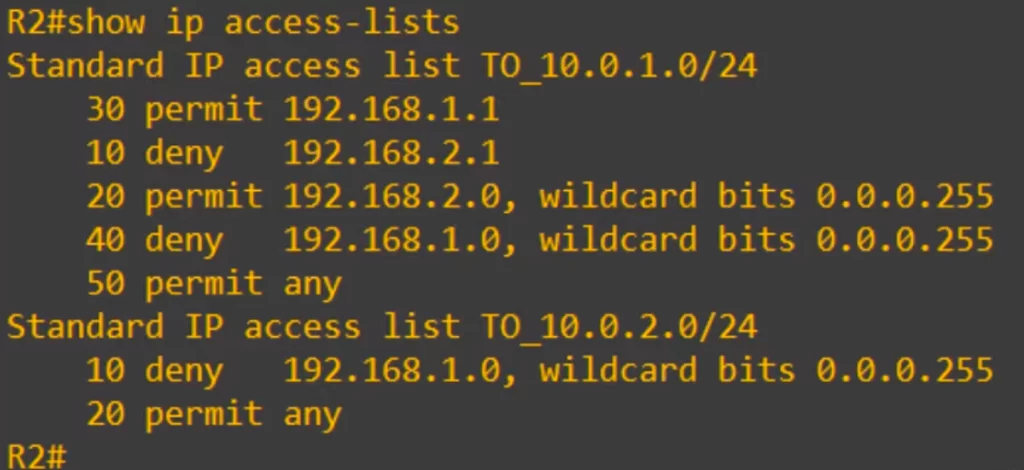
The source IP only matches entry 40, because the source is in the 192.168.1.0/24 network. So R2 denies flow of the packet to SRV1.
Command review
1. Standard numbered ACLs
Standard numbered ACLs are configured in global config mode. Configure the deny and permit entries, and then apply the ACL to an interface.
The command syntax to configure a standard numbered ACL is:
R(config)#access-list number {deny | permit} src-ip wildcard-mask
The ACL number must be in the range 1 to 99 or 1300 to 1999.
Configure a single entry in ACL 1 (example):
R1(config)#access-list 1 deny 1.1.1.1 0.0.0.0
or
R1(config)#access-list 1 deny 1.1.1.1
or
R1(config)#access-list 1 deny host 1.1.1.1
If you are matching anything other than a /32 mask you have to specify the wildcard mask.
Tell the router to permit all traffic, with any source IP (example):
R1(config)#access-list 1 permit any
or
R1(config)#access-list 1 permit 0.0.0.0 255.255.255.255
Configure a remark for an ACL (example):
R1(config)#access-list 1 remark ## BLOCK BOB FROM ACCOUNTING ##
>To apply the ACL to an interface:
R(config-if)#ip access-group number {in | out}
>Show commands:
R#show access-lists
→to display all ACLs on the router. You can see how many packets matched each entry of each ACL
R#show ip access-lists
→to display only IP ACLs on the router
R#show running-config | [include access-list]
→to check a configured remark
R#show ip interface interface
→to check the access lists that are applied to the interface (the specific rules within those ACLs will not show)
2. Standard named ACLs
Standard named ACLs are configured from standard named ACL config mode, by configuring each entry within that config mode. For an ACL to take effect you must apply it to an interface.
R(config)#ip access-list standard acl-name
→to enter the standard named ACL config mode. Then configure the deny and permit entries
R(config-std-nacl)#[entry-number] {deny | permit} src-ip wildcard-mask
R(config-std-nacl)#remark remark
→to configure a remark
>To apply the ACL to an interface:
R(config-if)#ip access-group name {in | out}
R#show running-config | [section access-list]
→to check each ACL entry including the remark, although the entry numbers are not displayed in the config
Free CCNA | Standard ACLs | Day 34 Lab – Notes
Key learnings
*How ACLs work/how to build ACLs
*ACL logic/how the router processes ACLs
*ACL types overview – standard ACLs and extended ACLs, and each of those can be configured as numbered or named ACLs.
*How to configure standard numbered ACLs from global config mode
Standard numbered ACLs are configured in global config mode using a series of entries with the ACCESS-LIST command.
R1(config)#access-list 1 permit …
R1(config)#access-list 1 deny …
R1(config)#access-list 1 permit …
*How to configure standard named ACLs from standard named ACL config mode
For standard named ACLs, you use the IP ACCESS-LIST command to enter standard named ACL config mode, and then configure the entries.
R1(config)#ip access-list standard BLOCK_BOB
R1(config-std-nacl)#permit …
R1(config-std-nacl)#deny …
R1(config-std-nacl)#permit …
*Verify configurations with show access-lists, show ip access-lists, and show running-config
Practice quiz questions
Quiz question 1
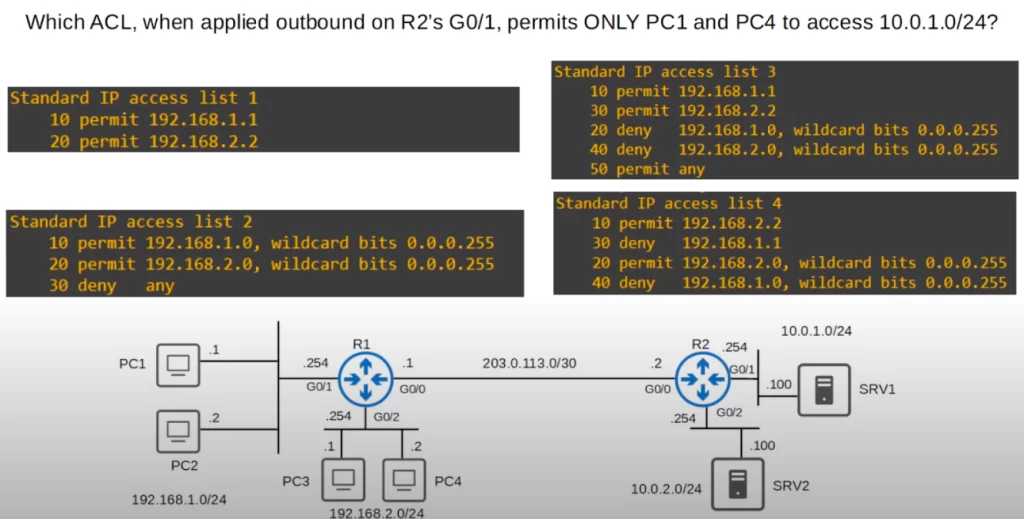
The answer is ACL 1. Entry 10 permits PC1 and entry 20 permits PC4. The implicit deny will deny all other traffic. ACL 1 fulfills the requirements. The other ACLs do not.
Quiz question 2
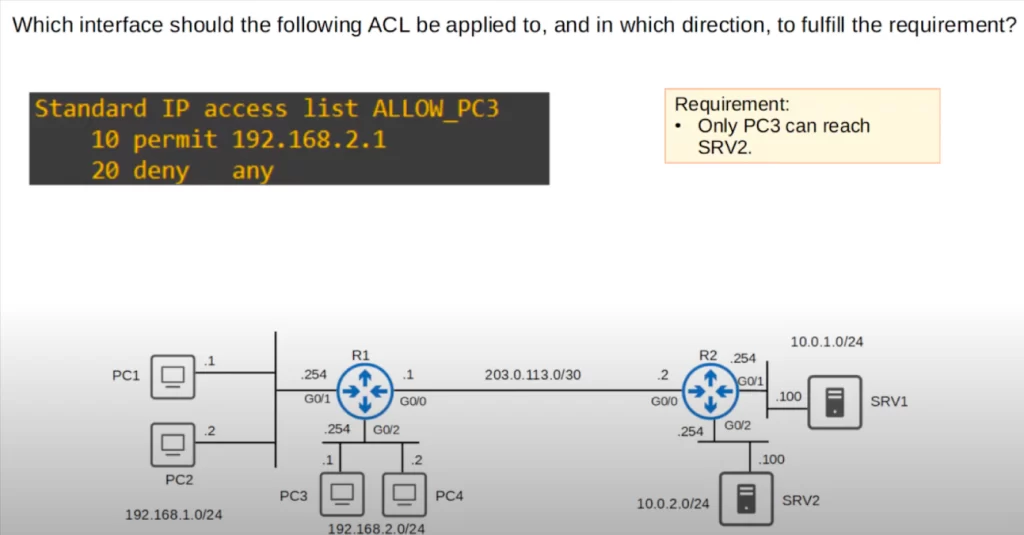
The ACL should be applied outbound on R2’s G0/2. Remember that rule-of-thumb, standard ACLs should be applied as close to the destination as possible. We are controlling access to 10.0.2.0/24, so that is the destination.
You can find three more practice questions for this lesson (plus a bonus one) in Jeremy’s video lesson Standard ACLs, cited below.
Key references
Note: The resources cited below (in the “Key references” section of this document) are the main source of knowledge for these study notes/this lesson, unless stated otherwise.
Free CCNA | Standard ACLs | Day 34 | CCNA 200-301 Complete Course
Free CCNA | Standard ACLs | Day 34 Lab | CCNA 200-301 Complete Course
Related content
Compliance frameworks and industry standards
How data flow through the Internet
How to break into information security
How to configure extended ACLs on Cisco routers
IT career paths – everything you need to know
Job roles in IT and cybersecurity
Network security risk mitigation best practices
The GRC approach to managing cybersecurity
The penetration testing process
The Security Operations Center (SOC) career path
Back to DTI Courses


