This is Part 2 of 2 of ACLs study notes for the CCNA. This lesson, ACLs Part 2, focuses on how to configure extended ACLs on Cisco routers. The previous lesson, ACLs Part 1, focused on how to configure standard ACLs on Cisco routers. Everything covered in ACLs Part 1 about the purpose of ACLs, how they work, and how to apply them to interfaces is the same for extended ACLs. The only difference is that extended ACLs can do more specific matching (of packet filtering requirements in an ACL) than standard ACLs, which can only match based on the source IP address of the packet. This lesson looks at configuring extended ACLs to match based on L4 protocols and port numbers, source IP addresses, and destination IP addresses.
This lesson looks at another way to configure numbered ACLs that applies to both standard and extended ACLs, using the named ACL config mode. We learn how to configure extended numbered and extended named ACLs. Although the configuration commands are a little longer than those of standard ACLs, because they can match based on more variables, the configuration method in general is the same as for standard ACLs. We learn how to edit ACLs to add or remove specific entries in a specific order, as well as how to resequence ACL entries. This post constitutes Issue 29 of my CCNA 200-301 study notes.
- Configuring numbered ACLs with subcommands
- Advantages of named ACL config mode
- Resequencing ACLs
- How to configure extended ACLs on Cisco routers
- Matching based on protocol
- Matching based on Src/Dst IP
- Extended ACL entry practice (1)
- Matching TCP/UDP port numbers
- Extended ACL entry practice (2)
- Extended ACL example
- Command review
- Key learnings
- Practice quiz questions
- Key references
You may also be interested in CCNA 200-301 study notes.
Configuring numbered ACLs with subcommands
*In ACLs Part 1 we learned that numbered ACLs are configured in global config mode. For example, here’s a simple ACL denying 192.168.1.1 but permitting all other traffic.
R1(config)#access-list 1 deny 192.168.1.1
R1(config)#access-list 1 permit any
The entries of ACL 1 are configured directly from global config mode with the ACCESS-LIST command.
*In ACLs Part 1 we learned that named ACLs are configured with subcommands in standard named ACL config mode. Here’s the same ACL, configured as a named ACL.
R1(config)#ip access-list standard BLOCK_PC1
R1(config-std-nacl)#deny 192.168.1.1
R1(config-std-nacl)#permit any
The IP ACCESS-LIST STANDARD command is used to enter standard named ACL config mode, and then subcommands within that mode are used to configure each entry of the ACL.
*However, in modern Cisco IOS you can also configure numbered ACLs in the exact same way as named ACLs. Here’s a numbered ACL, configured in the same way as the named ACL above.
R1(config)#ip access-list standard 1
R1(config-std-nacl)#deny 192.168.1.1
R1(config-std-nacl)#permit any
*This is just a different way of configuring numbered ACLs. If you check the ACL in the running config it will be displayed as if it was configured using the traditional method, directly from global config mode.
To demonstrate: from global config mode we entered IP ACCESS-LIST STANDARD and then checked the options.
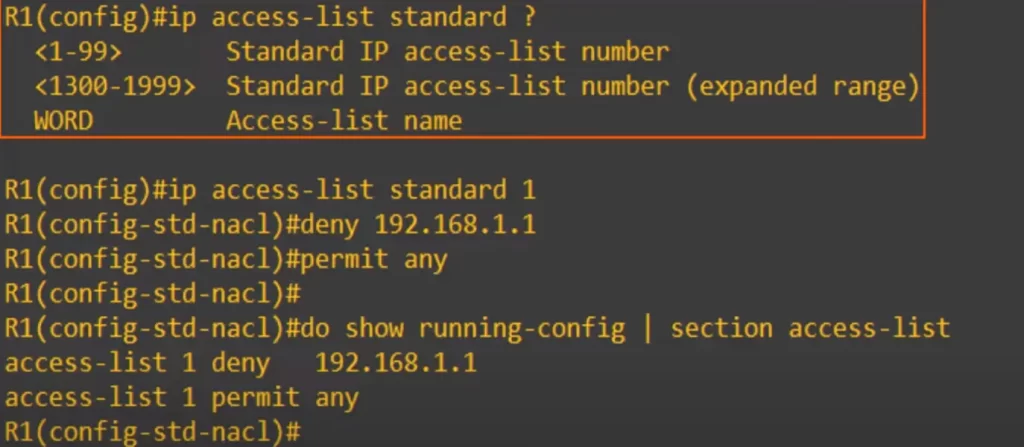
Both numbered and named ACLs are available options. So we configured ACL 1 using the named ACL configuration method, IP ACCESS-LIST STANDARD 1 and then the two separate entries (deny 192.168.1.1, and permit any). After checking the running config it displays as if we configured the ACL using the traditional numbered ACL method, configuring the entries from global config mode.
Advantages of named ACL config mode
Both numbered and named ACLs configuration options give the same result. But there are advantages to using the named ACL config mode.
>The first advantage of using named ACL config mode, even if you’re configuring numbered ACLs, is that you can delete individual ACL entries with the command NO, followed by the entry number. Let’s see how that works.
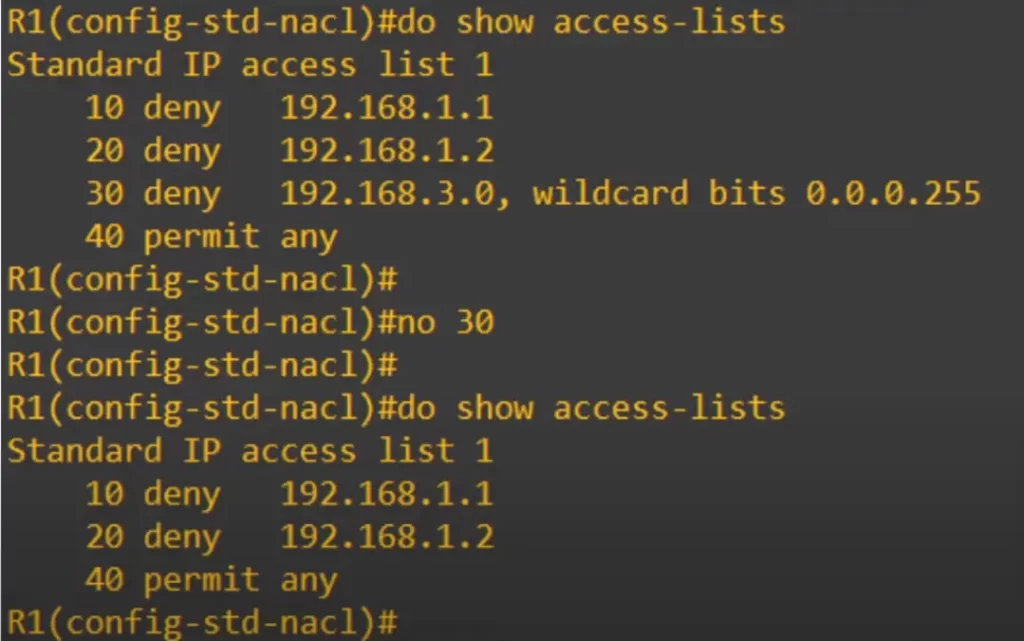
First, we used the command SHOW ACCESS-LISTS, and you can see a configured ACL that has four entries, with sequence numbers 10, 20, 30, and 40. These are the default sequence numbers, starting at 10 and increasing by 10. In named ACL config mode you can also specify the sequence number manually.
Then we entered the command NO 30 from named ACL config mode for ACL 1. Then we checked the ACL again with SHOW ACCESS-LISTS, and now you can see that entry 30 has been deleted.
We cannot edit an ACL like that – we cannot delete an entry like that – using the traditional numbered ACL method, from global config mode. Here’s the same ACL, with the same four entries. We also checked it out in the running-config.
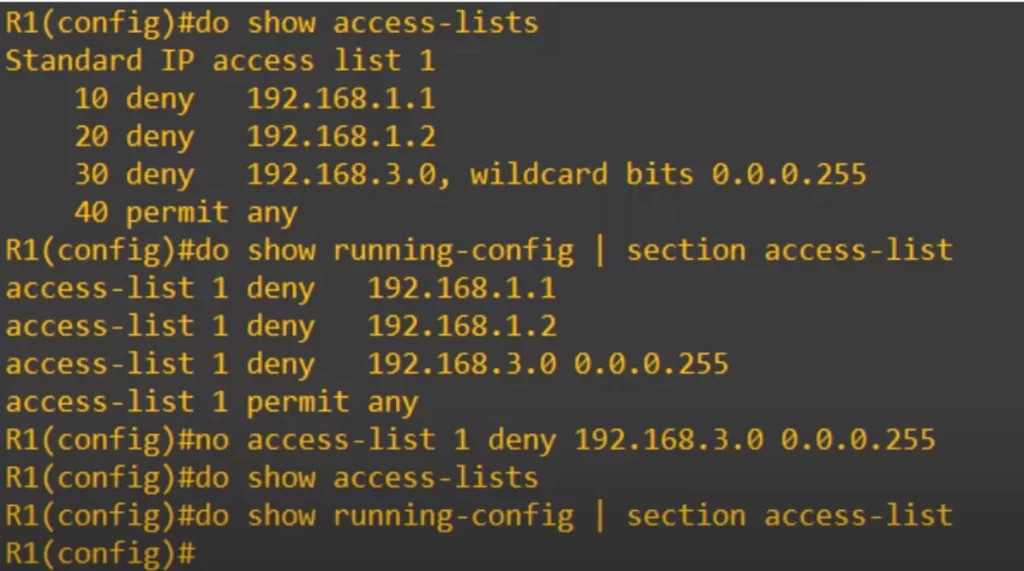
We tried to delete the same entry as before, sequence number 30, using NO in front of the command: NO ACCESS-LIST 1 DENY 192.168.3.0 0.0.0.255.
We then checked with SHOW ACCESS-LISTS, and with show running-config. But nothing is displayed. We have deleted the whole ACL!
When configuring or editing numbered ACLs from global config mode, you cannot delete individual entries, you can only delete the entire ACL.
So if you want to edit an ACL you should use named ACL config mode. Alternatively, you can configure a numbered ACL in global config mode, and then use named ACL config mode if you need to edit the ACL.
>The second advantage of using named ACL config mode is that you can insert new entries in between other entries by specifying the sequence number.
When configuring an ACL from global config mode, you cannot specify the sequence number. The entry is simply added to the end of the ACL, and the sequence number is automatically set to 10 higher than the existing highest sequence number. However, from named ACL config mode you can set the sequence number, so you can insert new entries in the middle of an ACL.
Let’s take a look. Here’s that same ACL from before after deleting entry 30. Let’s configure a new entry with sequence number 30.
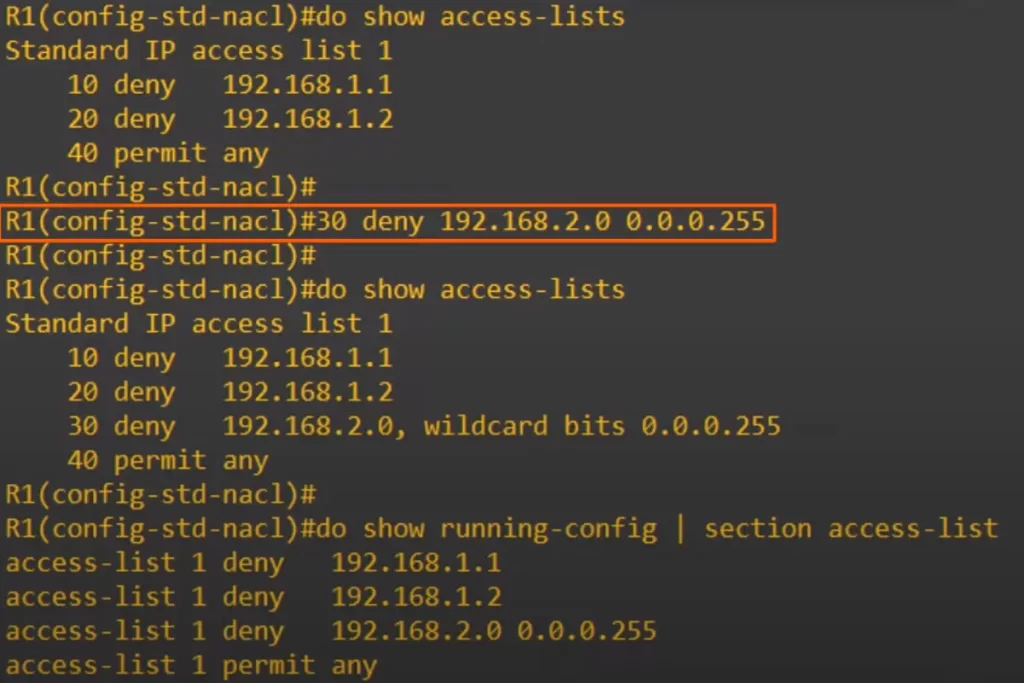
We used 30 DENY 192.168.2.0 0.0.0.255 to create a new entry, specifying the sequence number of 30. Then we checked the ACL (using show access-lists), and you can see the new entry was inserted between entries 20 and 40, and it has the sequence number of 30 that we specified. We also checked the running config. Notice that the ACL is displayed as if the ACL was configured in global config mode, and the new entry was inserted between the 2nd and 4th entries.
Resequencing ACLs
*There is a resequencing function that helps edit ACLs. The command is IP ACCESS-LIST RESEQUENCE, followed by the ACL ID, whether that’s a number or a name, and then the starting sequence number and the increment that you want to use to increase the sequence numbers. The command, from global config mode, is:
ip access-list resequence acl-id starting-sequence-number increment
This command works for all ACLs – standard and extended, numbered and named.
Let’s see how it works. Here’s an ACL.
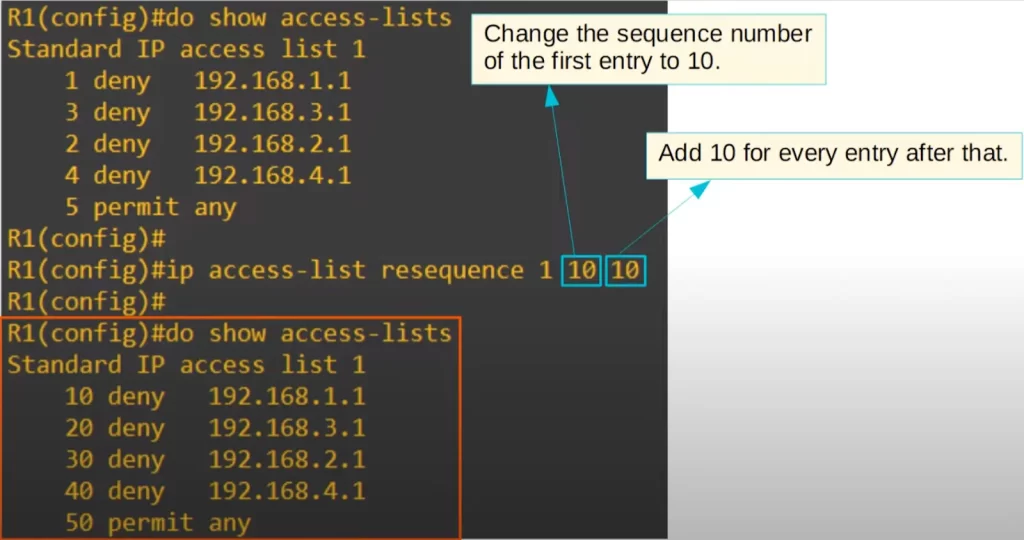
Notice the sequence numbers. It seems someone made the bad decision of sequencing the entries 1, 2, 3, 4, and 5. Note that the displayed order is 1, 3, 2, 4, 5, but that’s just because IOS sometimes reorders the /32 ACL entries. This is a bad sequencing of entries because there are no free sequence numbers in between. Now we cannot insert an entry in between the 1, 2, 3, 4, and 5 entries.
We used the resequence command to fix this bad sequencing: IP ACCESS-LIST RESEQUENCE 1 10 10.
1 is the ACL number. The first 10 is the starting sequence number. It instructs the IOS to change the sequence number of the first entry to 10. The second 10 is the increment. It means increase the value of entry numbers by increments by 10. We used SHOW ACCESS-LISTS again, and the ACL has been resequenced.
Note that the order of ACL 1 entries is kept as before applying ip access-list resequence. However, the sequence numbers have changed, starting at 10 for the top entry and adding 10 for each entry after that.
How to configure extended ACLs on Cisco routers
*Extended ACLs function very similarly to standard ACLs. Extended ACLs can be numbered or named, like standard ACLs. Extended ACLs are processed from top to bottom, like standard ACLs.
*However, extended ACLs can match traffic based on more parameters, so they are more precise than standard ACLs. You can specify exactly what traffic you want to deny and what traffic you want to permit, specific kinds of traffic from specific hosts to specific destinations.
Extended ACLs are more complex than standard ACLs. There are lots of different variations and options that can be used when configuring the access list entries.
We will focus on matching based on these parameters: Layer 4 protocol and port number, source IP address, and destination IP address.
To configure an extended numbered ACL entry from global config mode, the command is ACCESS-LIST, then the access list number. You can use the following ranges: 100 to 199, and 2000 to 2699. Then PERMIT or DENY. Then specify the IP protocol (TCP, UDP, ICMP, etc.), and then the source IP address and the destination IP address.
R(config)#access-list number [permit | deny] protocol src-ip dst-ip
Extended numbered ACLs can be configured in extended named ACL config mode.
To configure an extended named ACL start with IP ACCESS-LIST EXTENDED, and then the name or number of the access list. Once you are in extended named ACL config mode, you can specify the sequence number, the permit or deny statements, the protocol (TCP, UDP, ICMP, etc.), source IP, and destination IP.
R(config)#ip access-list extended {name | number}
R(config-ext-nacl)#[seq-num] [permit | deny] protocol src-ip dst-ip
We will focus on configuring extended ACLs using the named method, from named ACL config mode.
Matching based on protocol
First, let’s see how extended ACLs can match based on protocol. From extended named ACL config mode, we entered DENY and used the question mark to see the options.
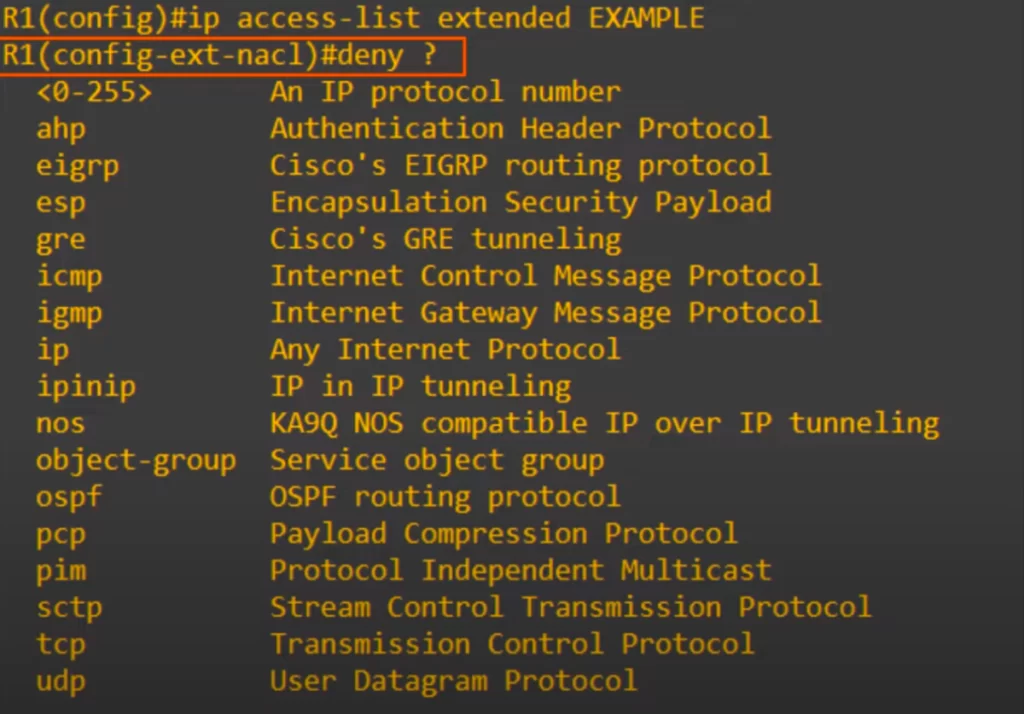
You can use an IP protocol number. There is a protocol field in the IPv4 header which identifies the protocol that is encapsulated inside of the IP header, such as TCP or UDP. You can identify the protocol by the number in the IPv4 protocol field. Or you can use the name of the protocol.
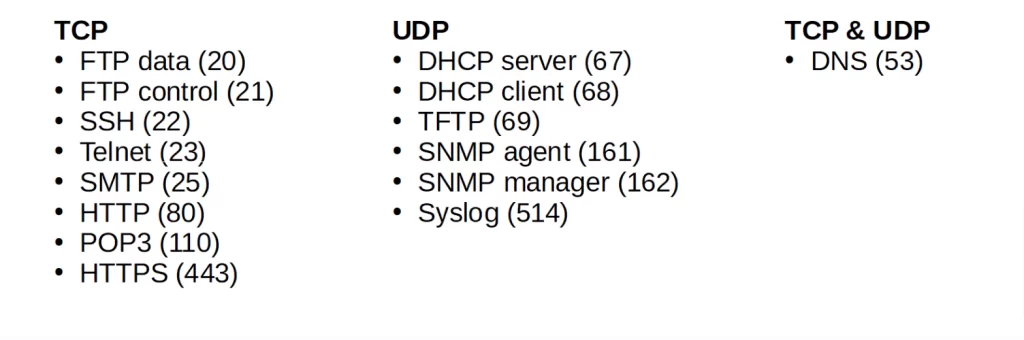
You may want to memorize these common protocols with their protocol numbers for the CCNA:
1: ICMP
6: TCP
17: UDP
88: EIGRP
89: OSPF
For example, we can use an extended ACL to deny ICMP packets to deny pings or to block OSPF messages on an interface.
For this lesson we are going to focus on TCP and UDP as well as IP itself. If you use the IP option, it matches all IP packets. We use the IP option when we do not care about the protocol, we just want to deny or permit all packets. For example, if you want to put a permit any statement at the end of an ACL, you would use the IP option.
Matching based on Src/Dst IP
We selected TCP as the protocol. So any IP packets with a TCP segment inside will match this part of the entry. However, we still have to specify the source and destination IP addresses to match. Let’s see how to add the source and destination IP addresses to the ACL entry.
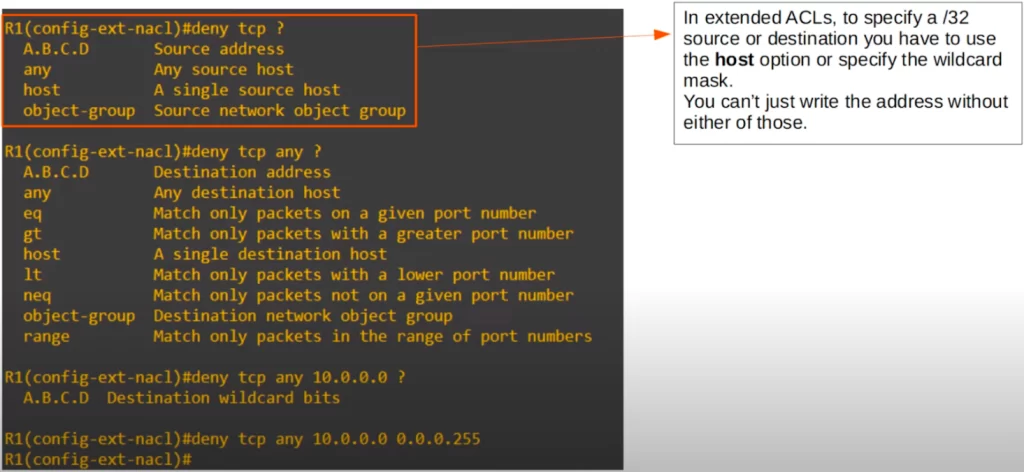
We decided to use ANY to match all source IP addresses. Now we can specify the destination IP address. Note the many more options related to the Layer 4 port number.
We decided to specify the destination 10.0.0.0, and now we have to enter the wildcard mask. We specified a /24 wildcard mask, and now this entry is complete.
This entry will deny all packets that encapsulate a TCP segment, from any source IP address to destination network 10.0.0.0/24.
Extended ACL entry practice (1)
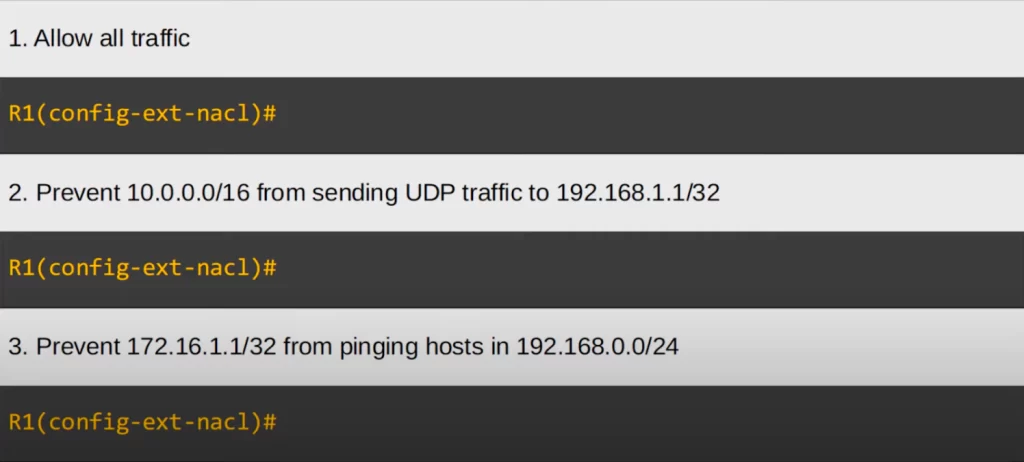
Time to practice writing extended ACL entries. Here are a few practice questions.
Let’s see the answers.
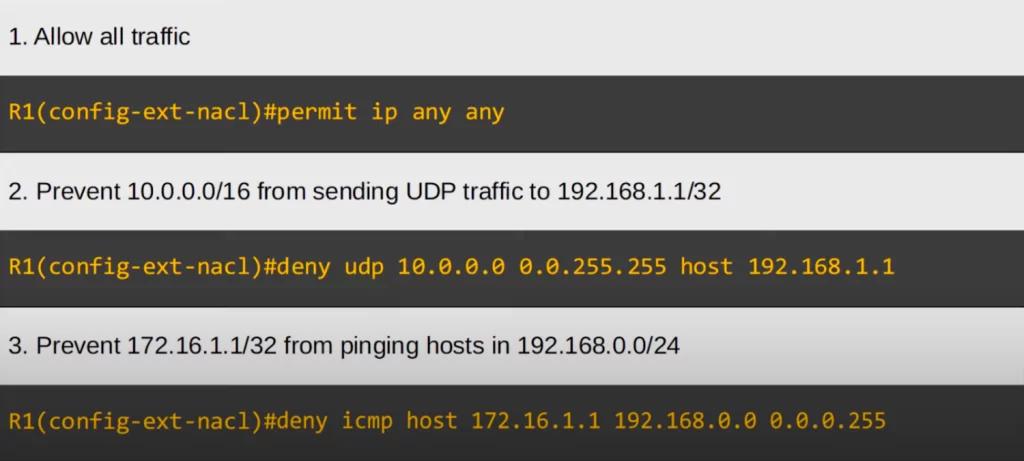
An extended ACL entry that allows all traffic is PERMIT IP ANY ANY. We use IP to match all protocols, and then we can use ANY for both the source and destination to match all IP addresses. This is like PERMIT ANY in a standard ACL.
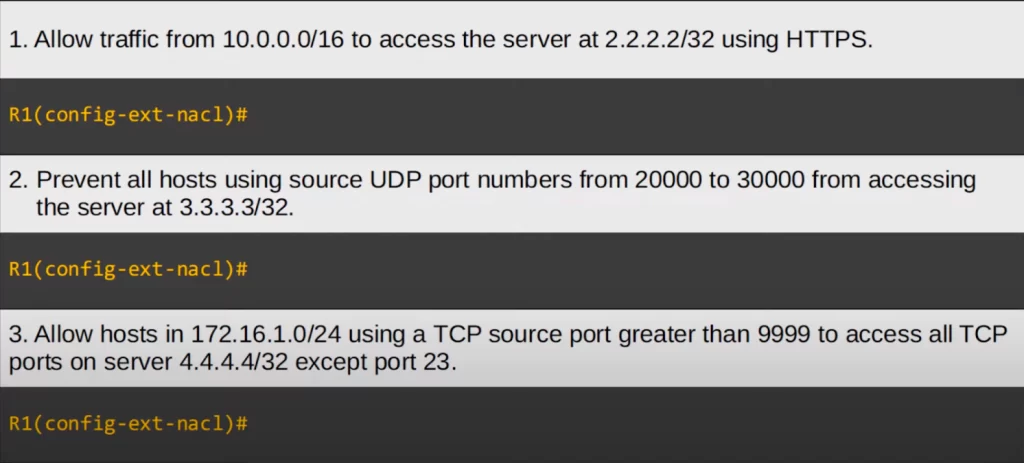
An ACL entry to prevent 10.0.0.0/16 from sending UDP traffic to 192.168.1.1/32 would be DENY UDP 10.0.0.0 0.0.255.255 HOST 192.168.1.1. Alternatively, instead of HOST, write out the wildcard mask for 192.168.1.1, which is 0.0.0.0, at the end.
You get the idea.
Matching TCP/UDP port numbers
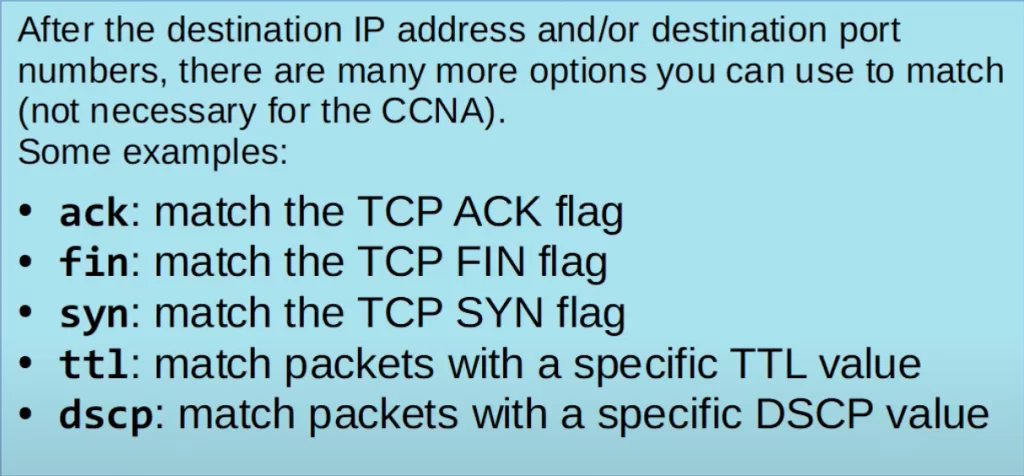
When you specify TCP or UDP as the protocol to match you can optionally specify the source and/or destination port numbers to match. If you just specify TCP or UDP without the port numbers, all port numbers will be matched.
If you want to specify the source TCP or UDP port, you specify it after the source IP address and wildcard mask.
R(config-ext-nacl)#[seq-num] [permit | deny] protocol src-ip dst-ip
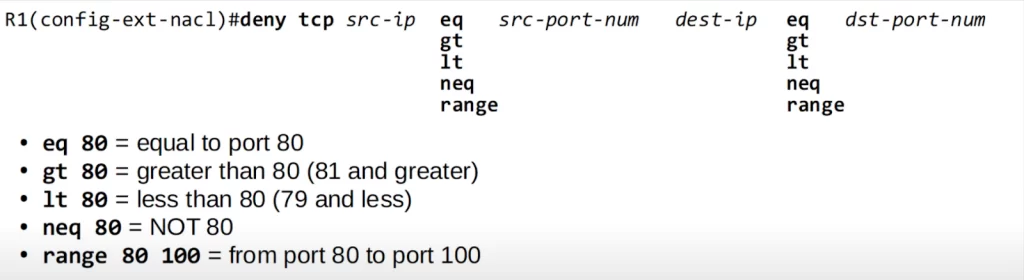
eq 80 means equal to port 80, so it matches TCP source port 80. gt 80 means greater than, so it matches all ports greater than 80, so 81 and up. lt 80 matches all port numbers less than 80, so 79 and less. neq 80 means not 80. neq 80 matches all ports except 80. The final option is RANGE, for example RANGE 80 100 matches all port numbers from 80 to 100.
After the destination IP address, the same options are available to match the destination port number.
In the example shown below, we entered DENY TCP ANY, and then we entered the destination IP, HOST 1.1.1.1. Then we entered EQ to match a specific port, and you can see the options.
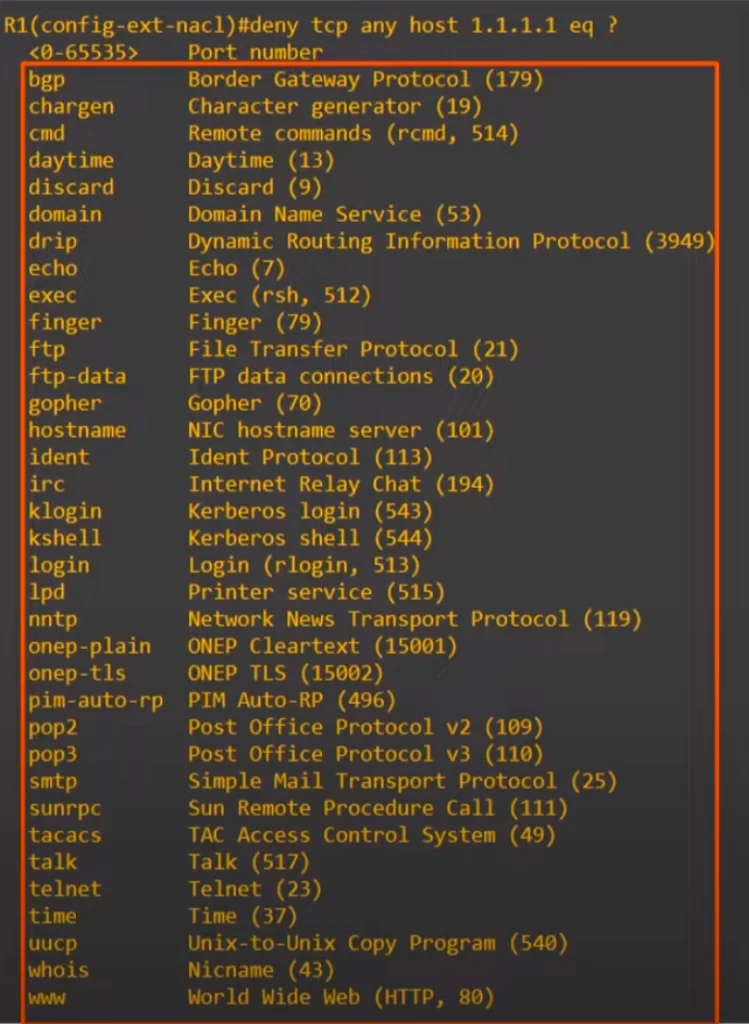
You can enter the specific port number, or you can enter the keyword instead, such as WWW to match HTTP, which is port 80. A lot of common port numbers do not have a keyword you can use. So make sure you learn the actual numbers.
We entered port 80, for HTTP.
R1(config-std-nacl)#deny tcp any host 1.1.1.1. eq 80
This ACL entry denies all packets destined for IP address 1.1.1.1/32, TCP port 80.
Extended ACL entry practice (2)
Here’s some more practice for writing individual extended ACL entries.
Let’s see the answers.
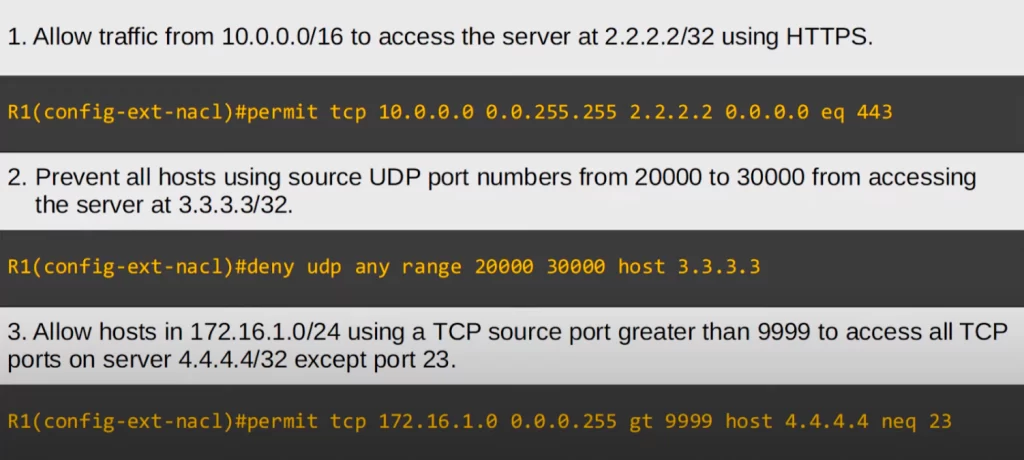
Regarding the first question, the answer says PERMIT TCP because we need to match HTTPS, which uses TCP. Then the source IP address is 10.0.0.0/16, and we don’t need to specify a source port number. The destination IP is 2.2.2.2/32. We used a /32 wildcard mask, but you can use HOST 2.2.2.2 instead. Finally, we used EQ 443 to match only HTTPS, which uses TCP port 443.
You get the idea.
Extended ACL example
For standard ACLs, the rule is to apply the ACLs as close as possible to the destination because standard ACLs are not very specific. They only match the source IP address. If we apply standard ACLs close to that source, we will probably block more traffic than intended.
Because extended ACLs are much more specific than standard ACLs, extended ACLs should be applied as close as possible to the source. This limits how far packets will travel in the network before being denied, and routers do not waste resources processing packets that will be discarded.
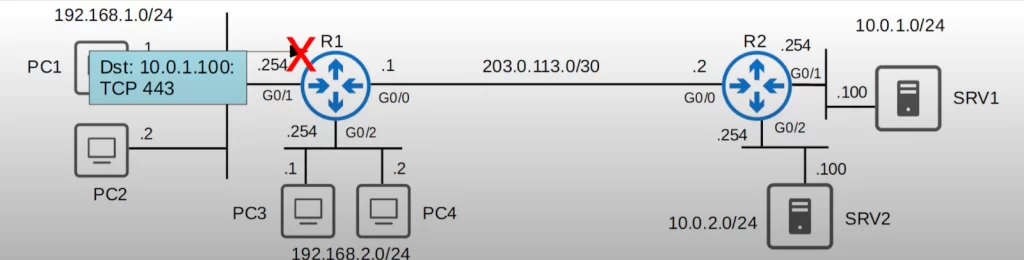
Let’s return to our network from ACLs Part 1, How to configure standard ACLs on Cisco routers, to configure and apply a few extended ACLs.
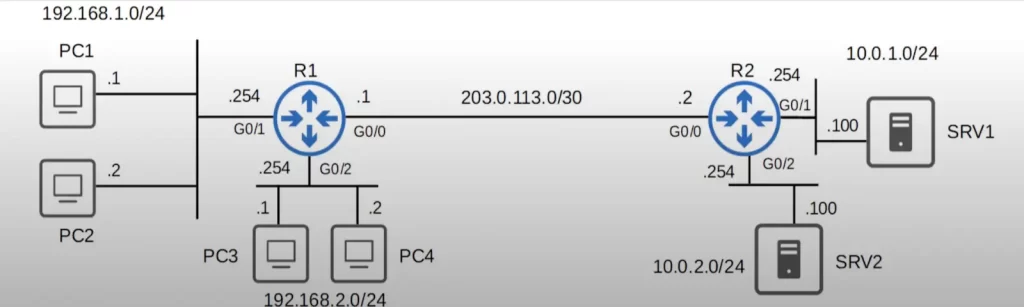
Here are the requirements:
- Hosts in 192.168.1.0/24 cannot use HTTPS to access SRV 1.
- Hosts in 192.168.2.0/24 cannot access 10.0.2.0/24.
- None of the hosts in 192.168.1.0/24 or 192.168.2.0/24 can ping 10.0.1.0/24 or 10.0.2.0/24.
We will use three ACLs, one ACL for each requirement, and the three ACLs will be configured on R1. We will see why in a minute.
ACL 1
Hosts in 192.168.1.0/24 cannot use HTTPS to access SRV 1. Here is the ACL.

After entering extended named ACL config mode, we made a deny statement that matches TCP traffic coming from 192.168.1.0/24. The destination IP address is 10.0.1.100/32, SRV1, and the destination port is 443, which is HTTPS. Then we used PERMIT IP ANY ANY to allow all other traffic.
Then we applied ACL 1 inbound on R1’s G0/1 interface.
That fulfills the first requirement.
Now if a PC in 192.168.1.0/24 tries to access SRV1 using HTTPS, the packet will be dropped right away at R1.
ACL 2
Hosts in 192.168.2.0/24 cannot access 10.0.2.0/24. Here is ACL 2.

Specifying IP as the protocol basically matches all packets, anything with an IP header. Then we specified the source, 192.168.2.0/24, and then destination, 10.0.2.0/24. Finally we added PERMIT IP ANY ANY to allow all other traffic.
Then we applied the ACL inbound on R1’s G0/2 interface.
Now the second requirement has been fulfilled.
ACL 3
None of the hosts in 192.168.1.0/24 or 192.168.2.0/24 can ping 10.0.1.0/24 or 10.0.2.0/24.
We need to deny ICMP, the protocol that ping uses, and make a few entries to specify each source and destination. Here is ACL 3.

We created three deny entries that match ICMP, two for source IP 192.168.1.0/24, but only one for 192.168.2.0/24. In the previous ACL we already blocked all traffic from 192.168.2.0/24 to 10.0.2.0/24, so we do not need to include it in this ACL. At the end of the ACL, again we added a PERMIT IP ANY ANY statement.
Then we applied the ACL outbound on R1’s G0/0. We needed to prevent hosts in both 192.168.1.0/24 and 2.0/24 from reaching the servers’ networks.
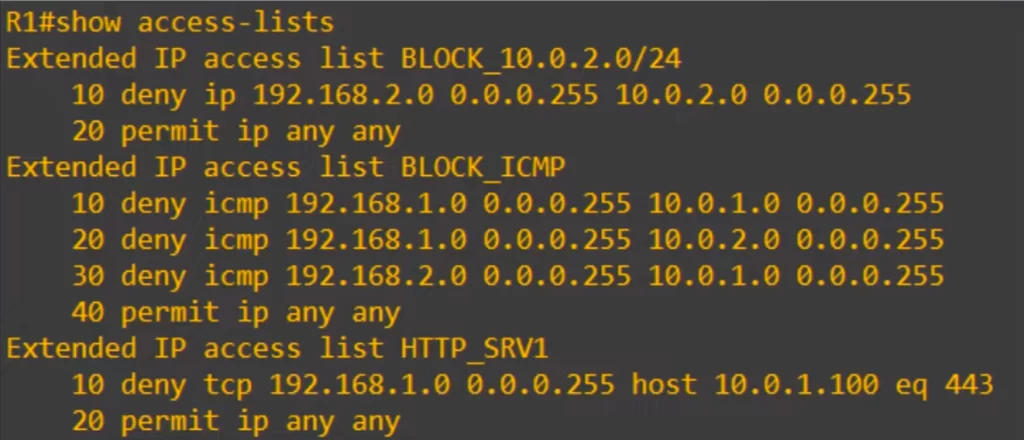
Here are the three ACLs we configured shown using show access-lists. Note, this is not the only configuration that would work.
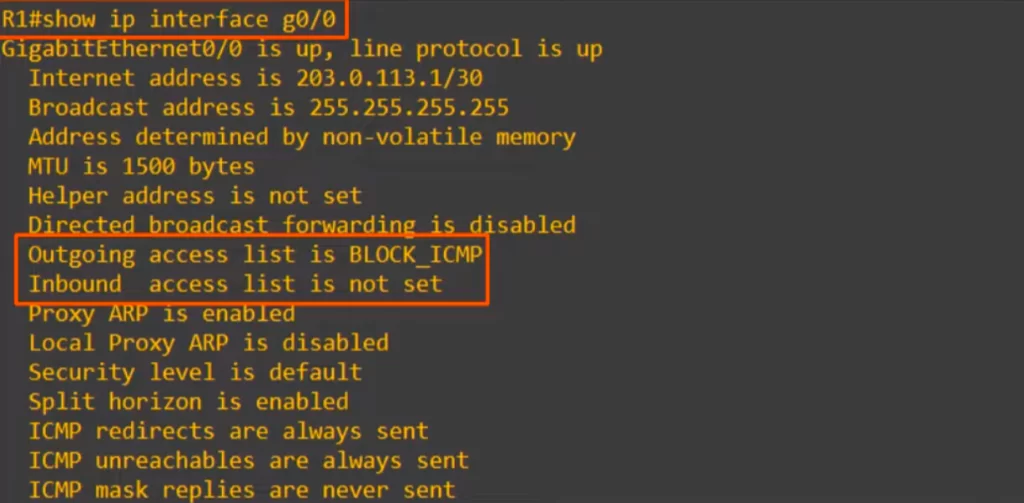
Finally, here’s how to check which ACLs are applied to an interface. The command is SHOW IP INTERFACE, then the interface name.
Command review
>The named ACL config mode can be used to configure numbered ACLs:
R(config)#ip access-list standard {name | number}
→then configure the deny and permit entries in standard named ACL config mode
R(config)#ip access-list extended {name | number}
→then configure the deny and permit entries in extended named ACL config mode
R#show access-lists
R#show running-config | section access-list
→to check the ACL in the running-config
>Two advantages of using the named ACL config mode:
1) You can delete individual ACL entries with the command NO, followed by the entry number.
2) You can insert new entries in between other ACL entries by specifying a sequence number at the beginning of the ACL entry being configured.
>You can edit an ACL using a resequencing function:
R(config)#ip access-list resequence acl-id starting-sequence-number increment
>Configure an extended numbered ACL entry:
R(config)#access-list number [permit | deny] protocol src-ip dst-ip
You can use the following ranges for the access-list number: 100 to 199, and 2000 to 2699.
>Configure an extended named ACL:
R(config)#ip access-list extended {name | number}
R(config-ext-nacl)#[seq-num] [permit | deny] protocol src-ip dst-ip
In extended ACLs, for a /32 mask source or destination you have to use either the host option or the wildcard mask.
R(config-ext-nacl)#[permit | deny] protocol src-ip eq src-port dst-ip eq dst-port
→to match traffic based on TCP/UDP port numbers (eq = equal to)
Free CCNA | Extended ACLs | Day 35 Lab – Notes
Key learnings
*How to use named ACL config mode to configure numbered and named ACLs.
*How to delete individual ACL entries, insert new ACL entries in between other entries, and how to resequence ACL entries.
*How to configure extended numbered and extended named ACLs to match based on L4 protocols and port numbers, source IP addresses, and destination IP addresses.
Practice quiz questions
Practice question 1
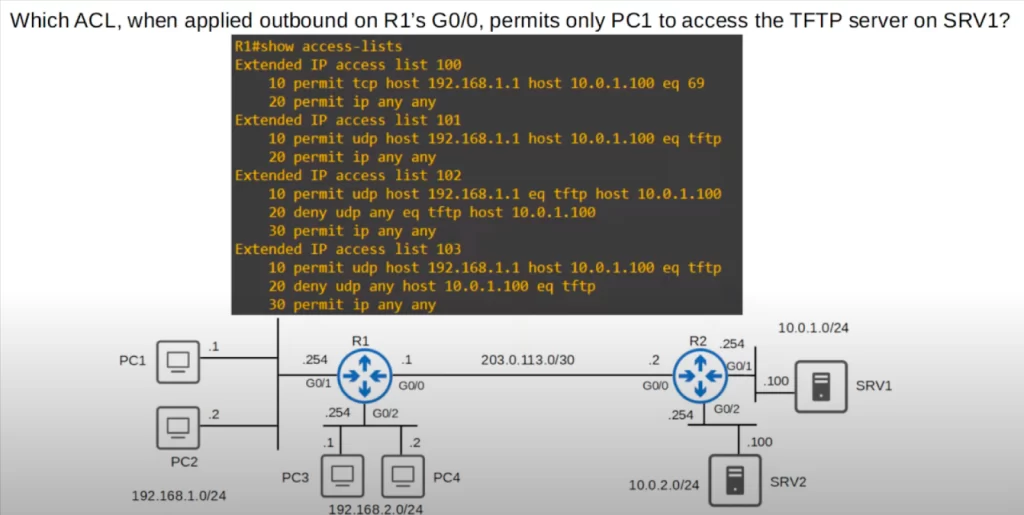
The answer is 103. Entry 10 permits UDP traffic from PC1 to access port 69, TFTP, on SRV1. When we enter this command, we enter the port number of 69 and IOS automatically converts it to TFTP. Entry 20 denies all other hosts from sending UDP traffic to port 69 on SRV1. Finally, entry 30 permits all other traffic.
You can find four more practice questions for this lesson (plus a bonus one) in Jeremy’s video lesson Standard ACLs, cited below.
Key references
Note: The resources cited below (in the “Key references” section of this document) are the main source of knowledge for these study notes/this lesson, unless stated otherwise.
Free CCNA | Extended ACLs | Day 35 | CCNA 200-301 Complete Course
Free CCNA | Extended ACLs | Day 35 Lab | CCNA 200-301 Complete Course
Related content
Compliance frameworks and industry standards
How data flow through the Internet
How to break into information security
How to configure standard ACLs on Cisco routers
IT career paths – everything you need to know
Job roles in IT and cybersecurity
Network security risk mitigation best practices
The GRC approach to managing cybersecurity
The penetration testing process
The Security Operations Center (SOC) career path
Back to DTI Courses


