This post is dedicated to discussing IPv4 address configuration and verification on Cisco routers. In this lesson we learn how to configure and verify IPv4 addresses on router interfaces. The next lesson, Configuring and verifying Cisco switch interfaces, looks at how switch interfaces are different from as well as similar to router interfaces and we learn how to configure speed and duplex on Cisco switch interfaces. This post constitutes Issue 6 of my CCNA 200-301 study notes.
- IPv4 address configuration and verification – introduction
- show ip interface brief command
- IPv4 address configuration
- show interfaces command
- show interfaces description command
- Command review
- Practice quiz questions
- Key references
You may also be interested in CCNA 200-301 study notes.
IPv4 address configuration and verification – introduction
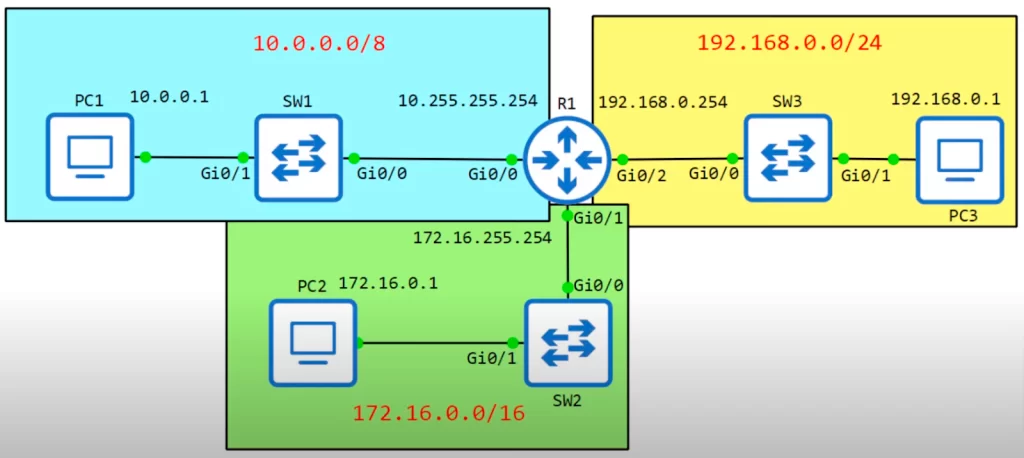
Below is a network topology put together in GNS3. The topology contains three networks connected to a single router, R1.
The aqua blue network 10.0.0.0/8 is a Class A network. PC1 has the first usable IP address in the network, 10.0.0.1. R1’s Gigabit0/0 interface has the last usable address, 10.255.255.254.
The light green network 172.16.0.0/16 is a Class B network. PC2 has the first usable address, 172.16.0.1. R1’s Gigabit0/1 interface has the last usable address, 172.16.255.254.
The yellow network 192.168.0.0/24 is a Class C network. PC3 has the first usable address, 192.168.0.1. R1’s Gigabit0/2 interface has the last usable address, 192.168.0.254.
Let’s go into the CLI of R1 and make the configurations. We will configure IP addresses on R1’s G0/0, G0/1, and G0/2 interfaces, enable the interfaces with the no shutdown command, and then verify the configurations using several show commands.
show ip interface brief command
We log into the CLI of R1 and use the enable command to enter privileged EXEC mode.
We then use the show ip interface brief command to confirm the status and IP address of each interface on the device. This command gives us:
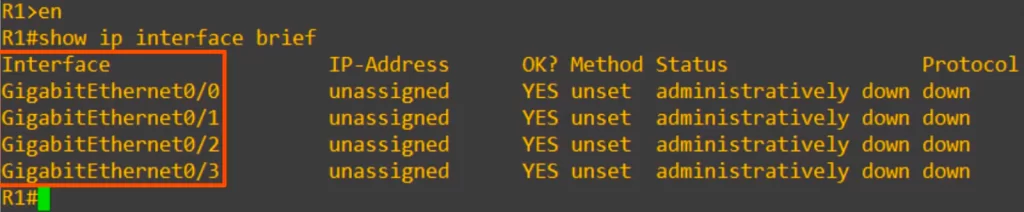
>The Interface column lists the network interfaces on the device. As shown, R1 has four interfaces, gigabiterthernet 0/0, 0/1, 0/2, and 0/3.
>The next column lists the IP address of each interface. As shown, IP addresses are unassigned. Shortly we will assign IP addresses to the top three interfaces and recheck the configuration using the same command.
>The OK column indicates whether the IP address is valid or not. This column is likely a legacy feature of the command. You should never see NO in this column.
>The Method column indicates the method by which the interface was assigned an IP address, for example, manually or via DHCP. It is currently unset.
>The Status column refers to the L1 status of the interface. The status should be up if the interface is enabled, there is a cable connected, and the other end of the cable is properly connected to another device (e.g., another router or switch). Administratively down means the interface has been disabled with the “shutdown” command. We have not done any configurations on the interfaces yet. Administratively down is the default status of Cisco router interfaces.
Note that even though GigabitEthernet 0/0, 0/1, and 0/2 on R1 are connected to switches, R1’s interfaces remain administratively down because the shutdown command is applied to R1’s interfaces by default.
Note, Cisco switch interfaces are not administratively down by default. They will be up if connected to another device or down if they are not connected.
>The Protocol column refers to the L2 status of the interface, for example, is Ethernet functioning properly between this device and the device it is connected to. Because the interfaces are down in L1, L2 cannot operate. So all the interfaces are down at L2.
You might see an interface with an up in the status column and a down in the protocol column, but the reverse is impossible.
Once we configure these interfaces with an IP address each and enable them, we should see up in both the status and protocol columns.
IPv4 address configuration
Let’s configure the GigabitEthernet 0/0 interface first.
To configure the interface we have to enter interface configuration mode for the interface GigabitEthernet 0/0, thus:
R1#configure terminal
R1(config)#
R1(config)#interface gigabitethernet 0/0
Or
R1(config)#interface gigabitethernet0/0
Or
R1(config)#interface g0/0
R1(config-if)#
Now that we are in the interface configuration mode, let’s set the IP address for R1’s Gi0/0. To set the IP address use the command ip address ip-address subnet-mask.
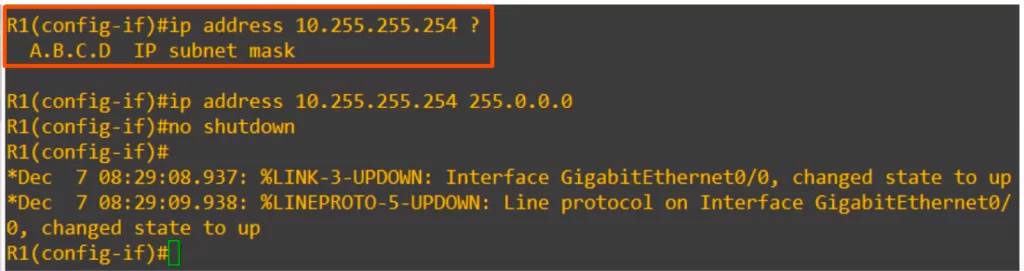
R1(config-if)#ip address 10.255.255.254
→using the context sensitive help (the question mark) displays the next option. And it is the subnet mask or netmask: Class A, B, C, or D.
10.255.255.254 is a Class A IP address. It can be written as 10.255.255.254/8. Slash 8 means all bits in the first octet, the network portion of the IP address, are set to 1 (it is a way to identify the network portion of the address). But we cannot use the /8 notation in the Cisco CLI, we have to write out the subnet mask for the IP address in dotted decimal – i.e., 255.0.0.0.
R1(config-if)#ip address 10.255.255.254 255.0.0.0
Next we enter the command no shutdown, the command to enable the interface. Recall, Cisco router interfaces have the shutdown command applied to them by default. To cancel the command we type no shutdown.
R1(config-if)#no shutdown
After entering the no shutdown command on the interface we get two messages on the device.
The first message says GigabitEthernet0/0 changed state to up. This refers to the Physical layer status of the interface, i.e., the Status column of the show ip interface brief command.
The second message says Line protocol on interface GigabitEthernet0/0 changed state to up. This is the L2 status of the interface, the Protocol column of the show ip interface brief command.
Now if we check the show ip interface brief command, both the Status and Protocol columns should display up.
R1(config-if)#do sh ip int br (i.e., show ip interface brief)
We used “do” to be able to execute this privileged EXEC mode command from interface config mode.
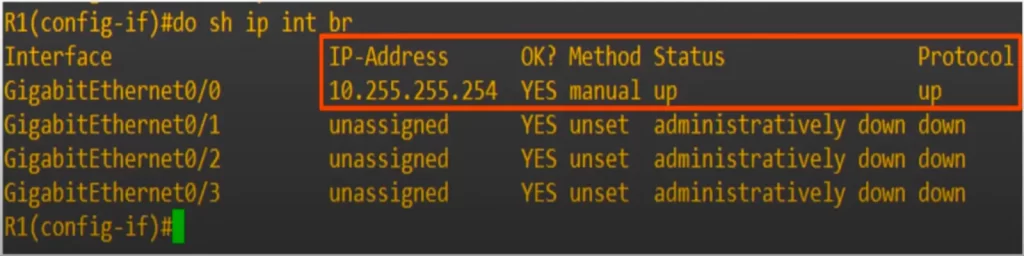
We can see the IP address, the method is displayed as manual instead of unset, and both the Status and Protocol columns display up. So the interface configuration was a success.
We follow the same process to configure the interfaces for G0/1 and G0/2, beginning with G0/1.
We can enter the interface configuration mode for the interface GigabitEthernet 0/1 without having to return to global config mode first, as we can directly switch from one interface to the other:
R1(config-if)#int g0/1
Next,
R1(config-if)#ip add 172.16.255.254 255.255.0.0
R1(config-if)#no shut (i.e., no shutdown to enable the interface)
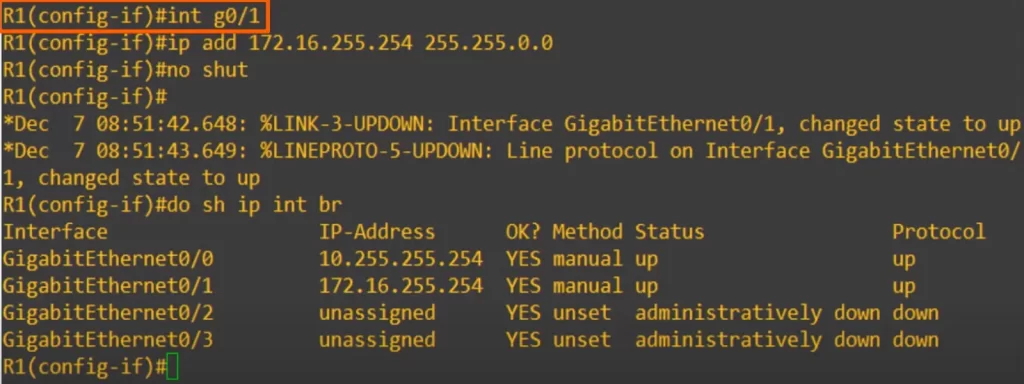
Again we get two messages saying the interface has come up for both the Status and Protocol columns.
Then we check the interfaces again with show ip interface brief:
R1(config-if)#do sh ip int br
We can see the configuration for interface G0/1 was successful.
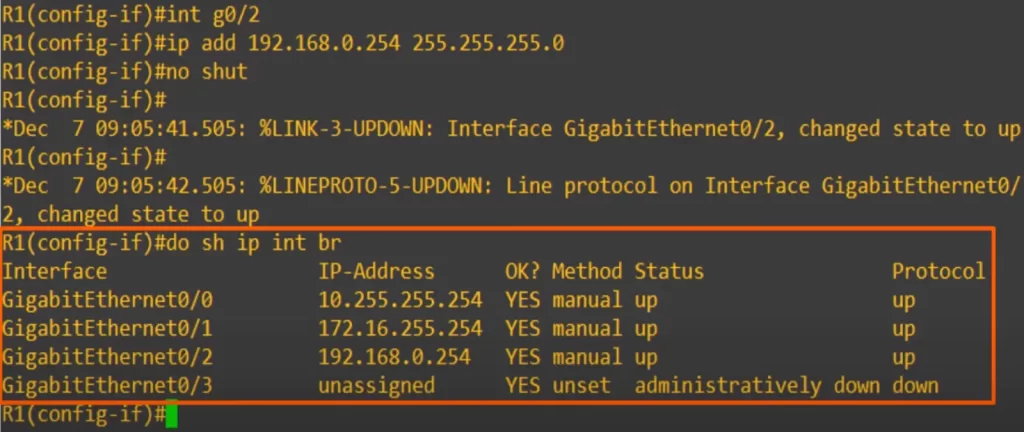
We followed the same procedure to configure and verify G0/2.
Now let’s look at a few more show commands to check out the interfaces on a Cisco device.
show interfaces command
If we just enter show interfaces, the output will display a lot of information. It is better to specify the interface.
R1#show interfaces g0/0
This command will show L1, L2, and, to a lesser extent, L3 information about the interface.
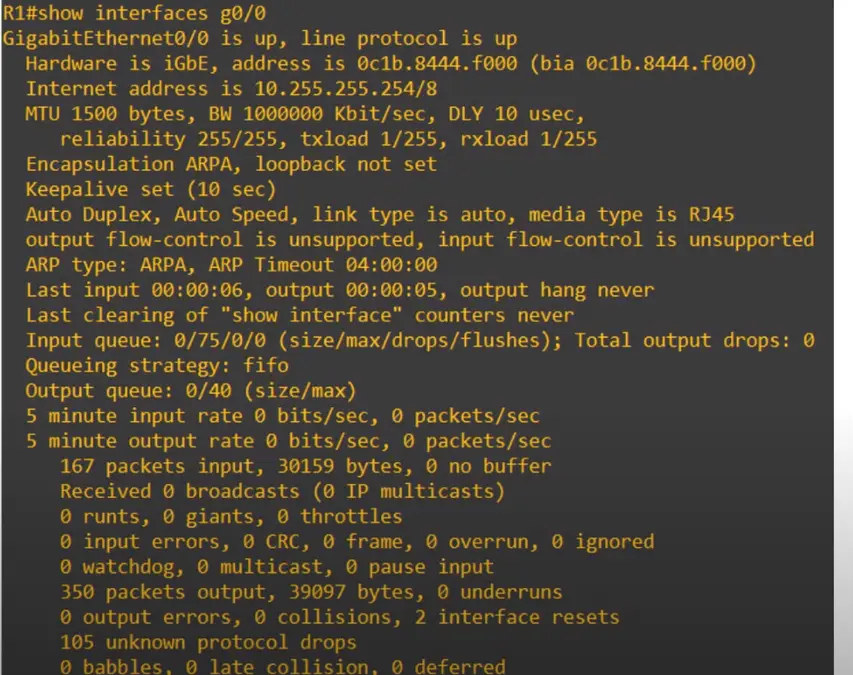
“GigabitEthernet0/0 is up” means L1 is working. “line protocol is up” refers to the L2 status of the interface. This line is similar to the Status and Protocol columns of the show ip interface brief command.
“Hardware is iGbE”, i.e., one GigabitEthernet. Ethernet refers to a family of standards defining data transfer rates (in bits per second) and associated technologies (cables). Gigabit Ethernet or GigabitEthernet (GbE or GigE) is the term applied to transmitting Ethernet frames at a rate of a gigabit per second.
“address” is the MAC address of this interface. “bia” stands for burned-in address, i.e., the MAC address. bia refers to the actual physical address of the interface. The MAC address is repeated because one can configure a different MAC in the CLI.
Internet address is the IP address, 10.255.255.254/8 as shown.
show interfaces description command
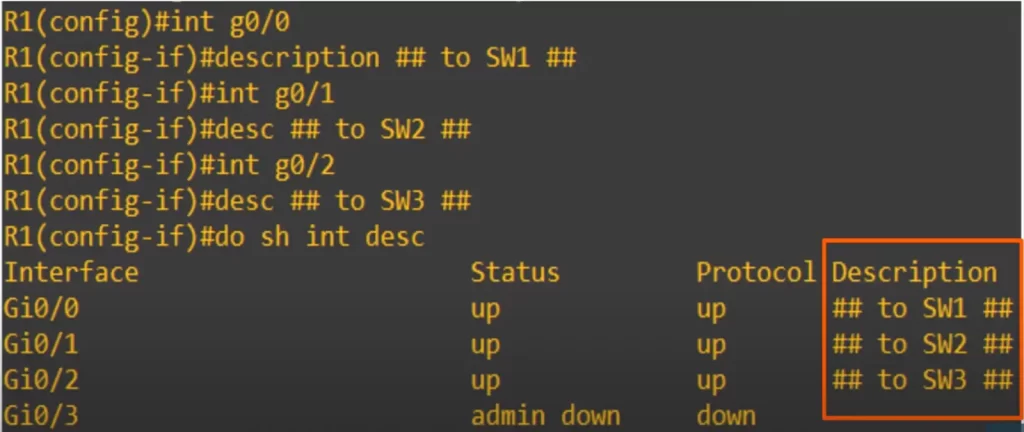
Similar to the show ip interface brief command, the show interfaces description command has Status and Protocol columns. But it also has a description column. Interface descriptions are optional but can be helpful in identifying the purpose of the interface.
Let’s configure the descriptions on our three interfaces.
From global config mode, we enter interface config mode for g0/0.
R1(config)#int g0/0
R1(config-if)#description description
For example,
R1(config-if)#description ## to SW1 ## (thus we indicate which device the interface is connected to)
We do the same for g0/1 and g0/2 interfaces.
Then,
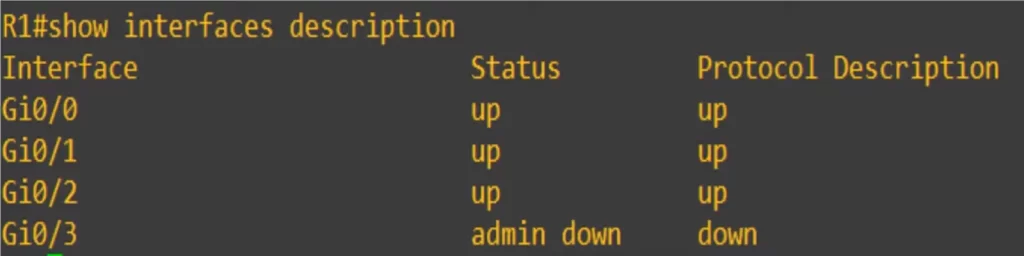
R1(config-if)#do sh int desc (i.e., show interfaces description)
Now we can see the description of each interface.
Note: there are many more show commands to obtain information about device interfaces.
Command review
R#show ip interface brief
→to confirm the status and IP address of each interface on the device
>To configure an IP address on a router interface:
R(config)#interface interface-name
R(config-if)#ip address ip-address subnet-mask
R(config-if)#no shutdown
R(config-if)#description description
→to configure a description on an interface
>More show commands to check out the interfaces on a Cisco device:
R#show interfaces
R#show interfaces interface-name
R#show interfaces description
Free CCNA | Configuring IP Addresses | Day 8 Lab – Notes
Practice quiz questions
Quiz question 1
PC1 has an IP address of 43.109.23.12/8. Find the following:
Network address → 43.0.0.0
Max. number of hosts in the network → 2^24 – 2
Network broadcast address → 43.255.255.255
First usable address in the network → 43.0.0.1
Last usable address in the network → 43.255.255.254
You can find four more practice questions for material covered in this lesson and the lesson IPv4 addressing for the CCNA in Jeremy’s IPv4 Addressing (Part 2) video, cited below.
Key references
Note: The resources cited below (in the “Key references” section of this document) are the main source of knowledge for these study notes/this lesson, unless stated otherwise.
Free CCNA | IPv4 Addressing (Part 2) | Day 8 | CCNA 200-301 Complete Course
Free CCNA | Configuring IP Addresses | Day 8 Lab | CCNA 200-301 Complete Course
Other references/resources
Basic Router Configuration. (February 6, 2017). Cisco 800M Series ISR Software Configuration Guide
Related content
Cisco IOS CLI and device security
Compliance frameworks and industry standards
How data flow through the Internet
How to break into information security
IT career paths – everything you need to know
Job roles in IT and cybersecurity
Network security risk mitigation best practices
The GRC approach to managing cybersecurity
The penetration testing process
The Security Operations Center (SOC) career path
Back to DTI Courses


